Soft, twisted low bun hairstyles are everywhere right now, from wedding aisles to office days and brunch plans. They sit at the nape of your neck, feel comfortable all day, and look polished without feeling stiff or overdone. What makes them so popular is how easily you can dress them up with accessories or keep them minimal for everyday wear. You can go sleek and smooth, undone and piecey, or detailed with braids and rope twists while still sticking to a single low bun shape. With the right tweaks, a twisted low bun works on fine, thick, straight, wavy, or curly hair and flatters most face shapes. This guide walks through twenty different twisted low bun looks, showing how each one changes with texture, parting, volume, and accessories so you can find the version that fits your hair, lifestyle, and favorite outfits.
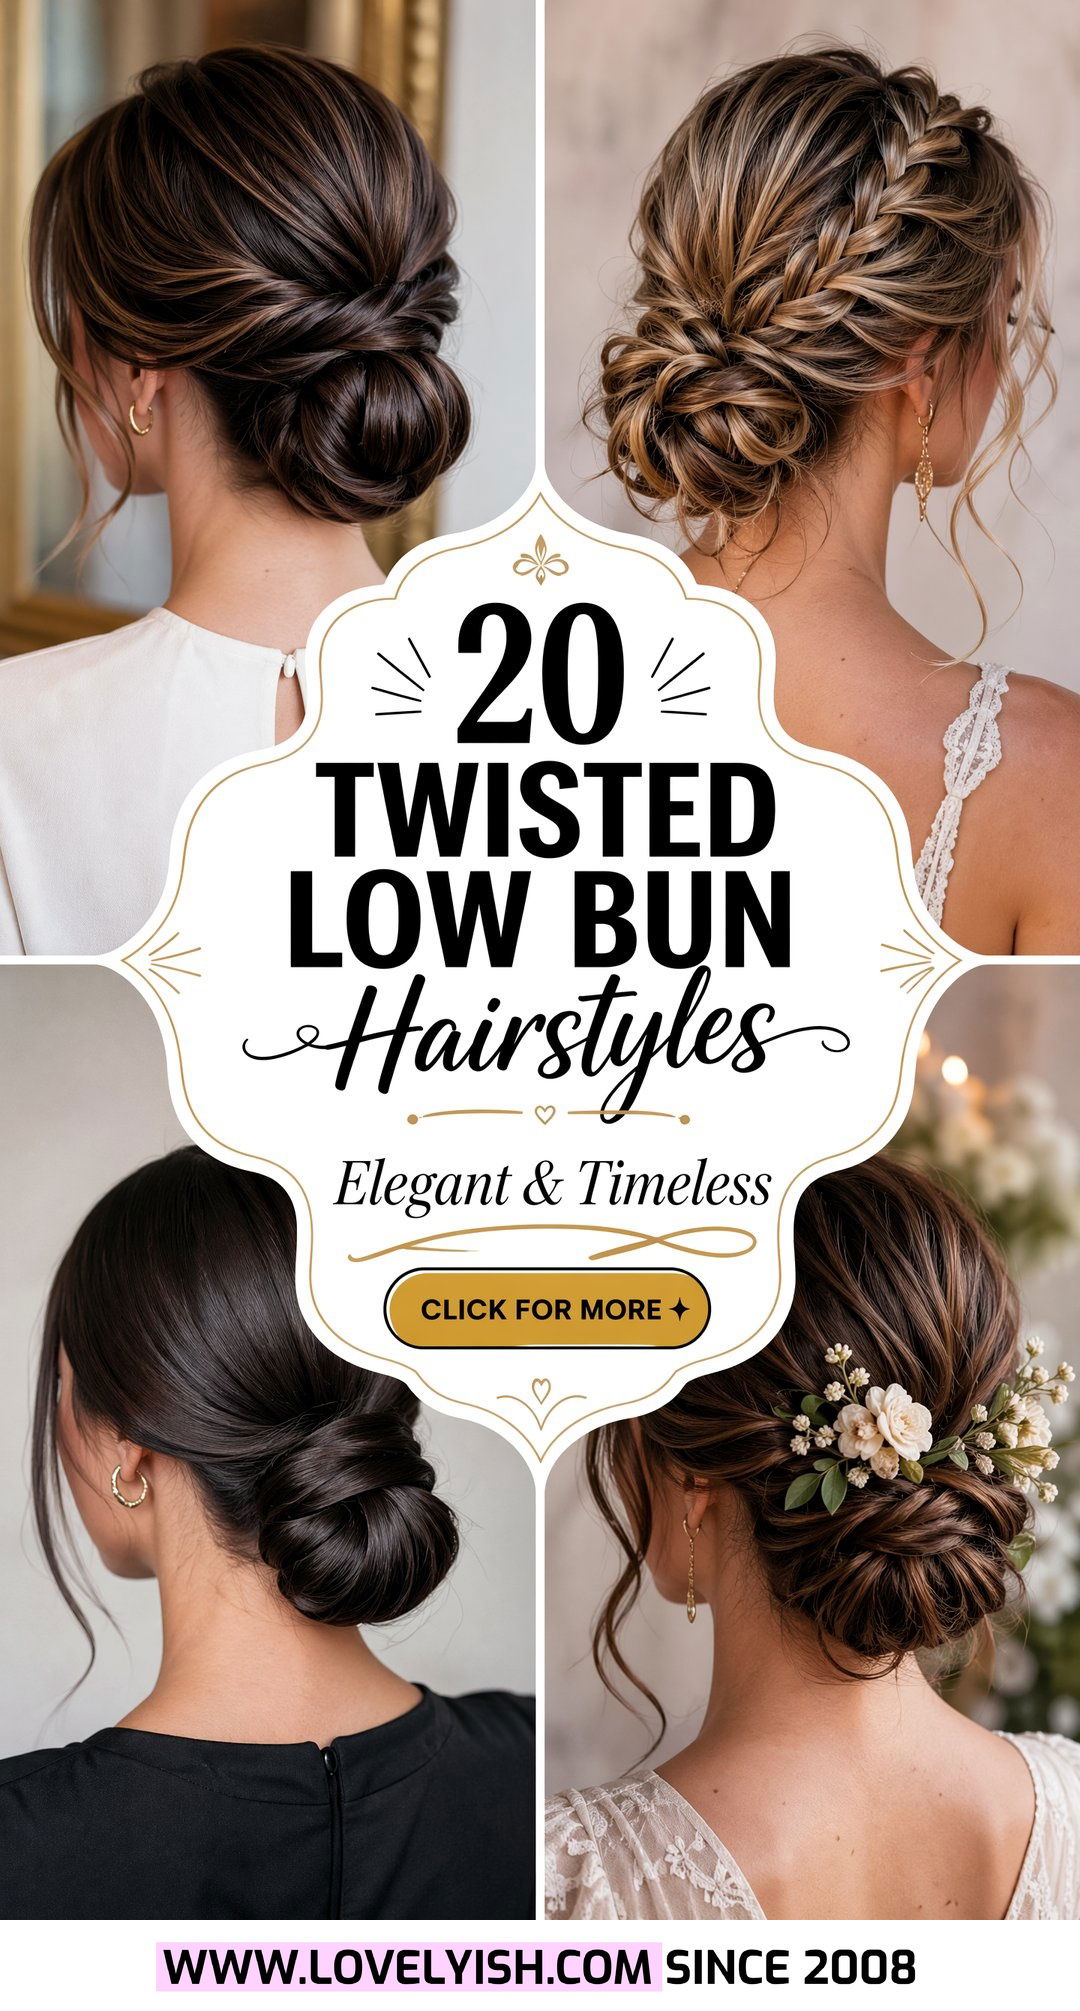
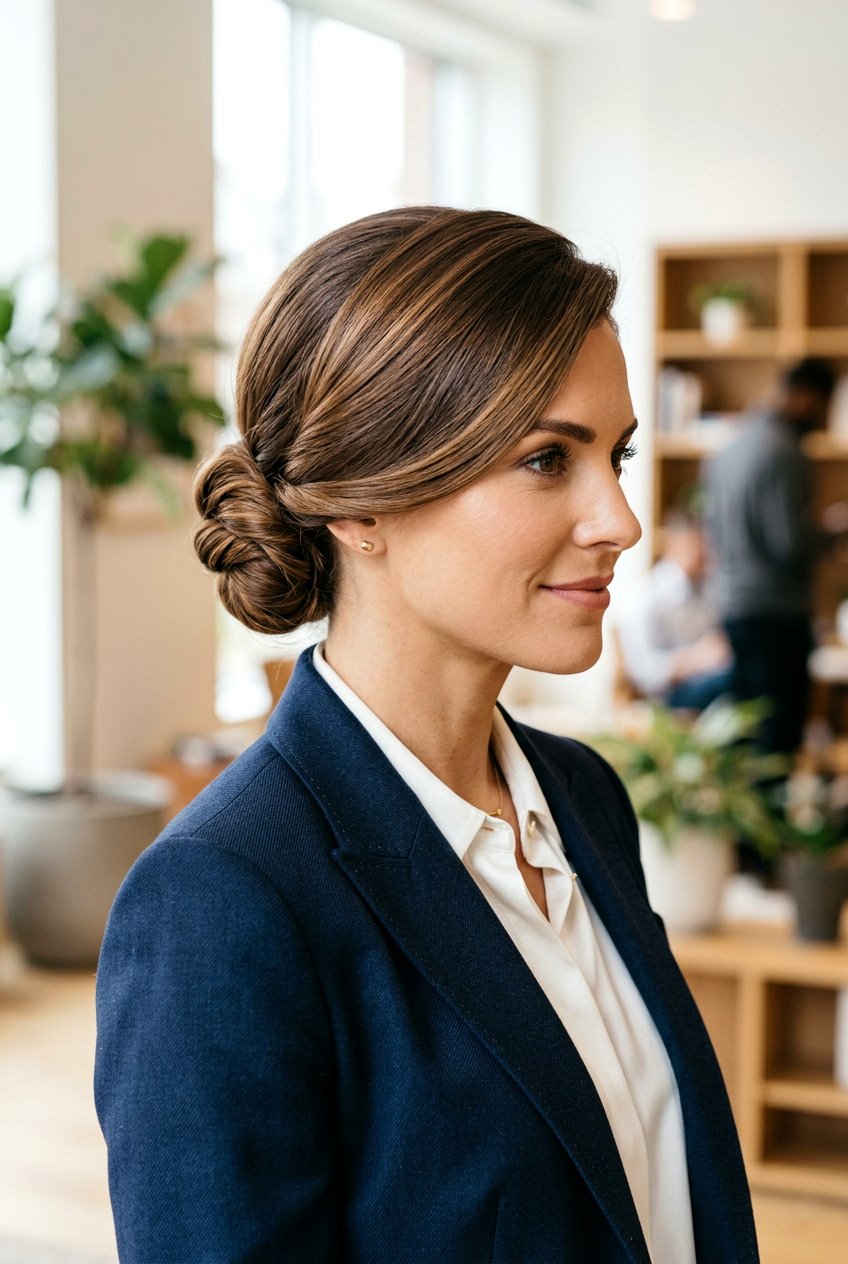
1. Elegant Twisted Low Bun
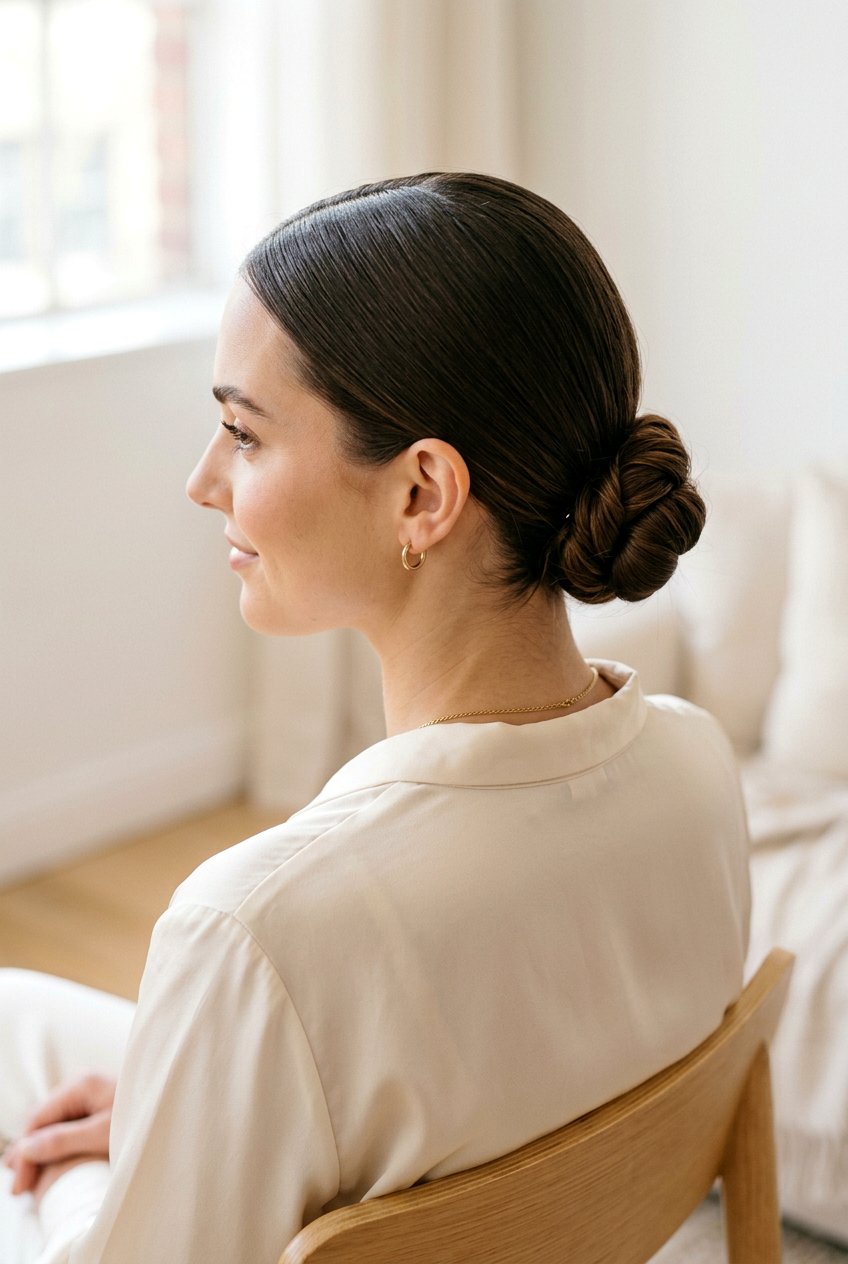
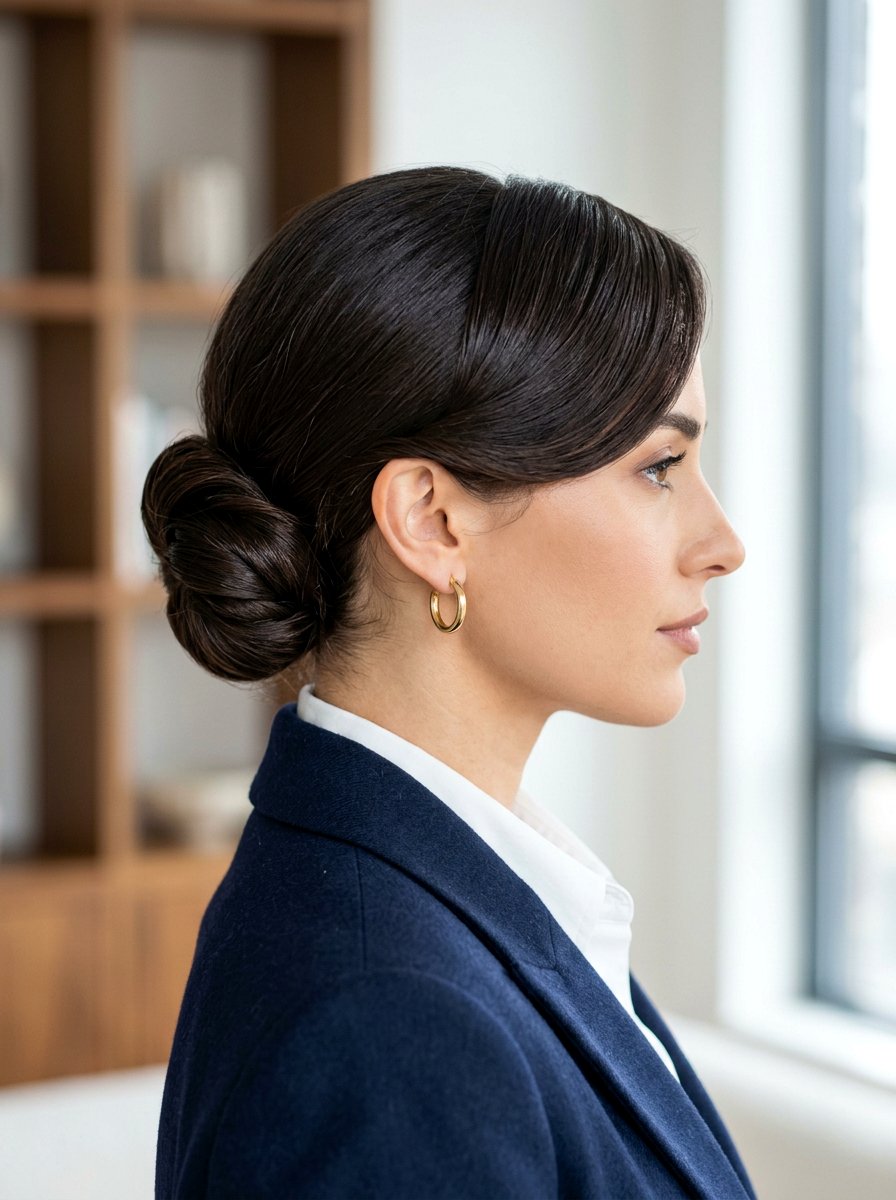
A polished twisted low bun is perfect when you want your hair to look neat, shiny, and intentional without stealing the whole show. Start with smooth, brushed hair parted in the middle or slightly off-center, then gather it at the nape and twist the lengths until they coil into a compact bun. Secure with bobby pins crossed in an X pattern, then smooth the surface with a light styling cream or serum to control frizz and add soft shine. This version works especially well on fine to medium, straight or lightly wavy hair because the strands lie flat and show off the twist detail clearly. Pair it with simple stud earrings and a clean neckline for everyday wear, or add a subtle barrette above the bun for weddings, interviews, or work events.
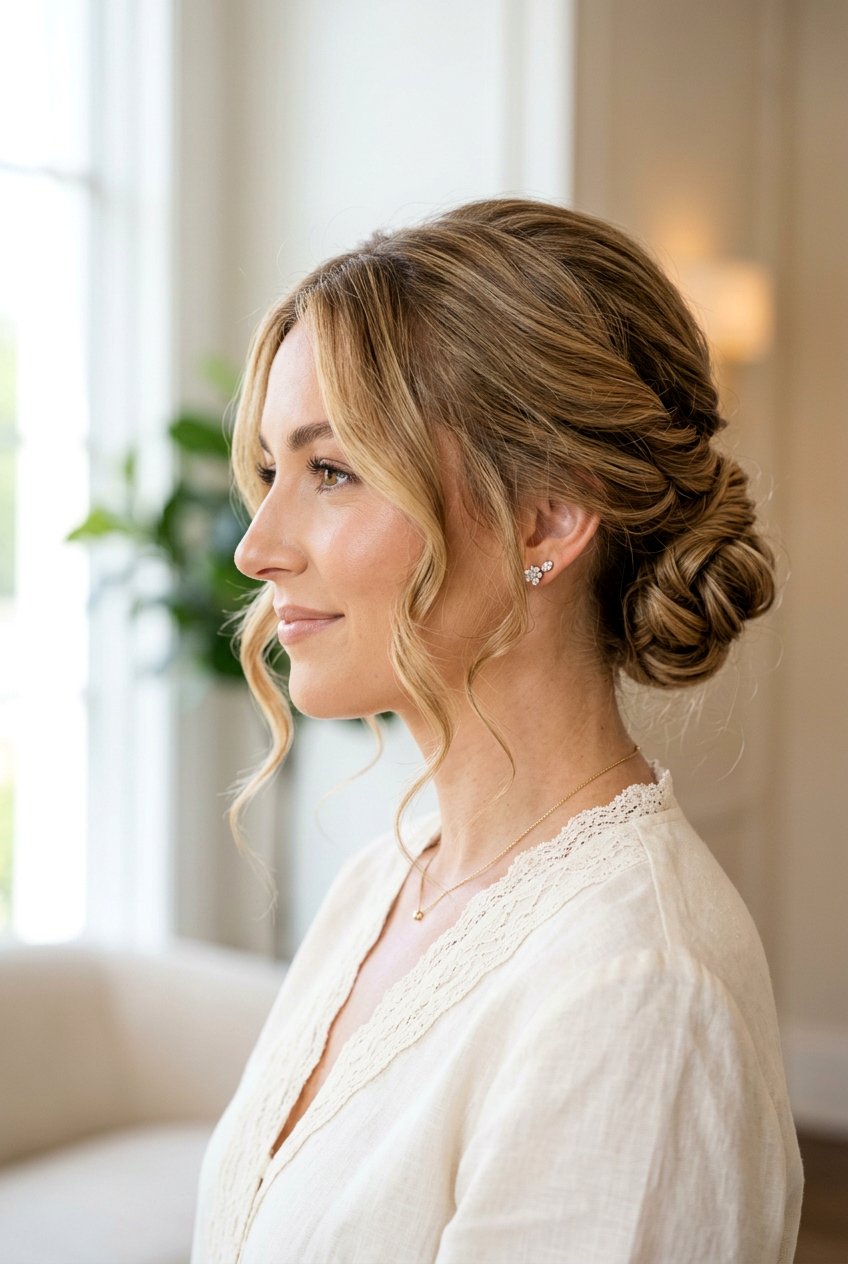
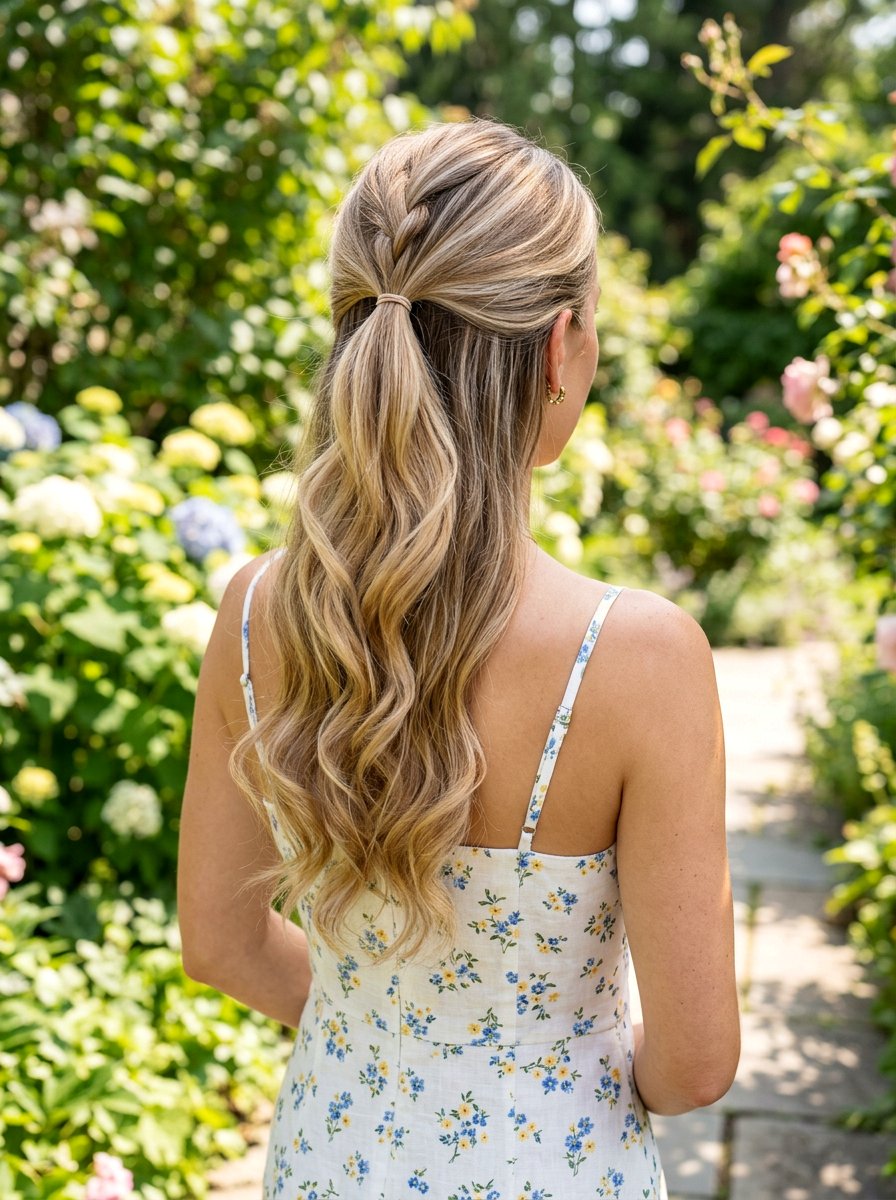
2. Loose Twisted Low Bun
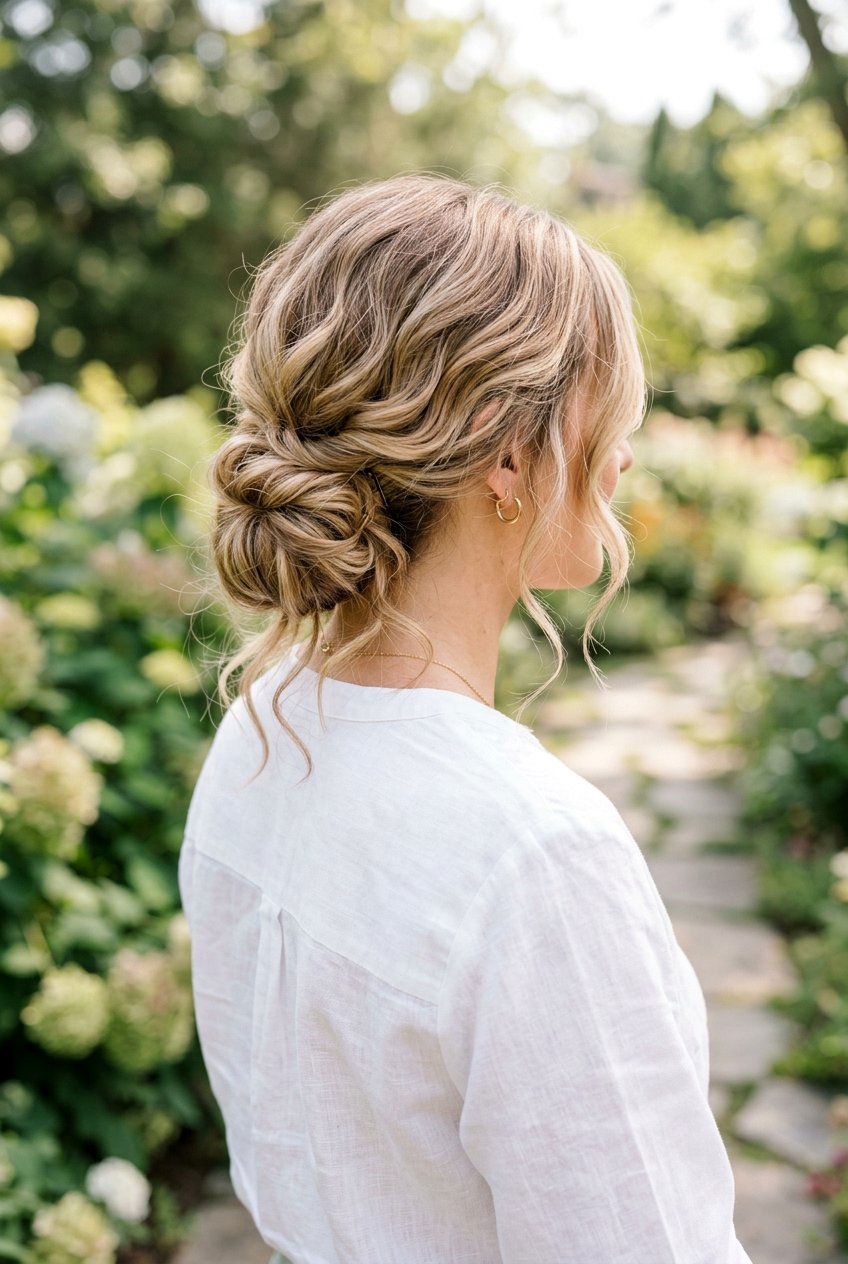
On days when you want something softer and more relaxed, a loose twisted low bun gives that effortless, “barely pinned” vibe while still looking put together. Begin with hair prepped using a texture spray to add grip, then loosely gather it near the nape, leaving out a few face-framing pieces. Twist the lengths gently so the bun has movement instead of a tight coil, pinning sections as you go rather than forcing everything into a single knot. Tug lightly at the crown and along the twist to create airiness and volume without losing structure. This style works beautifully on medium-density hair with soft layers, because the shorter pieces fall out in a pretty way instead of sticking straight out. Wear it with casual outfits, flowy dresses, or any time you want your hair to look romantic, but not overdone or stiff.
3. Twisted Low Bun For Thin Hair

For thin hair, a twisted low bun can actually make your ponytail look fuller and more dimensional when you use the right prep and pinning tricks. Start by applying volumizing mousse or powder at the roots and blowing hair dry with a round brush to build lift. Gather the hair low and slightly off-center, then backcomb the ponytail lightly before twisting so the bun looks plumper once it is pinned. Instead of wrapping the twist too tightly, coil it loosely and secure in smaller sections, which keeps more volume and creates the illusion of density. Leave a few soft pieces around the face and gently pull at the crown to break up the scalp line. A flexible hairspray will help hold everything without collapsing the fullness, making this a great option for workdays, dinners, or low-key events where you still want your hair to feel special.
4. Messy Twisted Low Bun
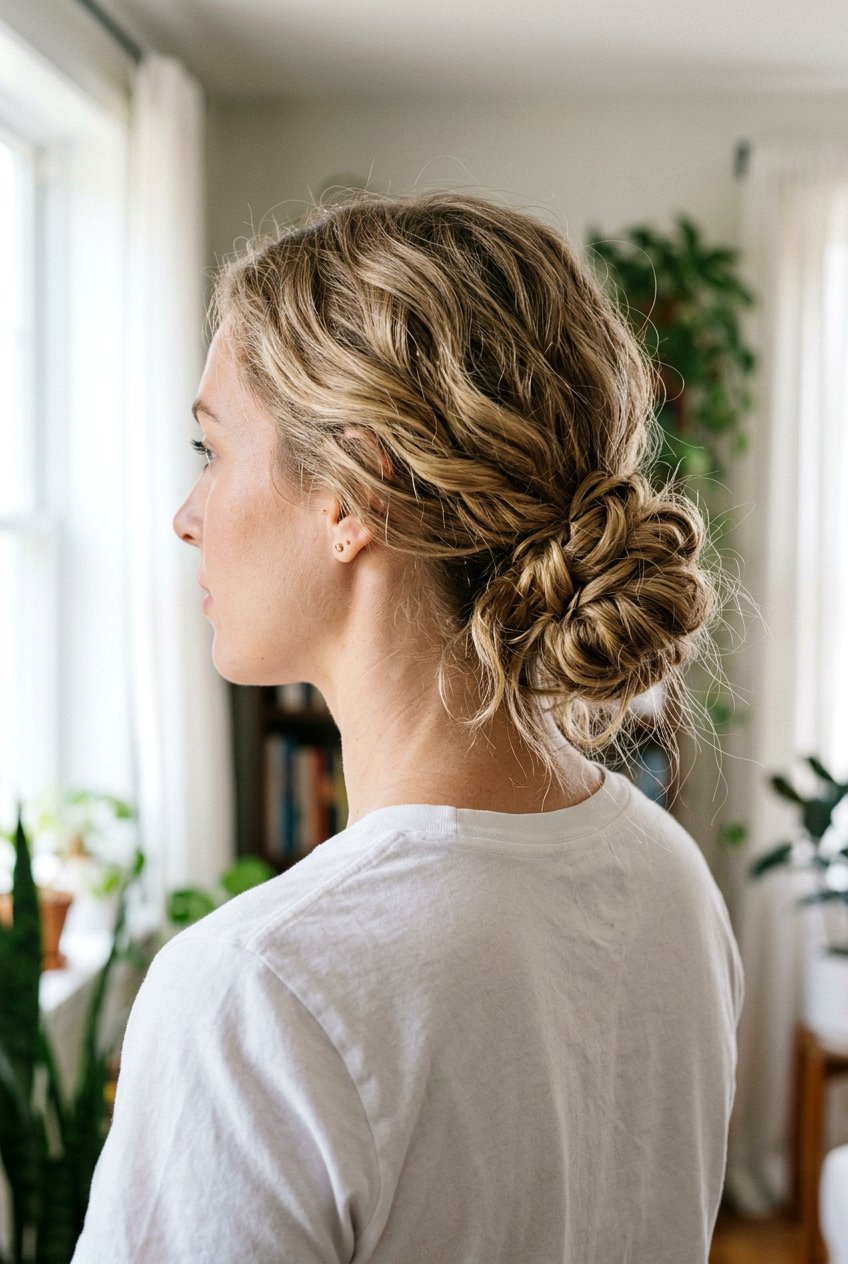
A messy twisted low bun is ideal when you want texture, movement, and a bit of edge while still keeping hair up and off your shoulders. Begin with second-day hair or add dry shampoo and texture spray to clean hair so it has grit and volume. Pull hair into a low ponytail with your fingers instead of a brush, letting natural bumps and separation show, then twist the lengths loosely and wrap them into an imperfect bun. Pin sections in different directions rather than tucking everything under, so some ends and loops of hair peek out on purpose. Pull out extra tendrils around the face and nape, then scrunch in a bit of cream or wax to emphasize the undone finish. This version is perfect for casual weekends, coffee dates, or anytime you want your updo to feel modern, relaxed, and easy to recreate in a few minutes.
5. Low Twisted Bun With Side Part
Shifting your part to one side instantly changes the vibe of a twisted low bun, adding asymmetry and softness that flatters many face shapes. Create a deep or medium side part, then smooth the heavier side over the forehead while keeping the opposite side a bit lighter and tucked. Gather the hair into a low ponytail centered at the nape or slightly off the heavier side, then twist and wrap into a bun. The side part allows one sweeping section of hair to frame the face, which works well for round, heart, or square faces that benefit from a bit of diagonal movement. Finish with a shine serum along the parting line to prevent flyaways and tuck one side behind the ear for a clean, chic finish. This look transitions easily from office meetings to dinners or small events without requiring any major styling changes.
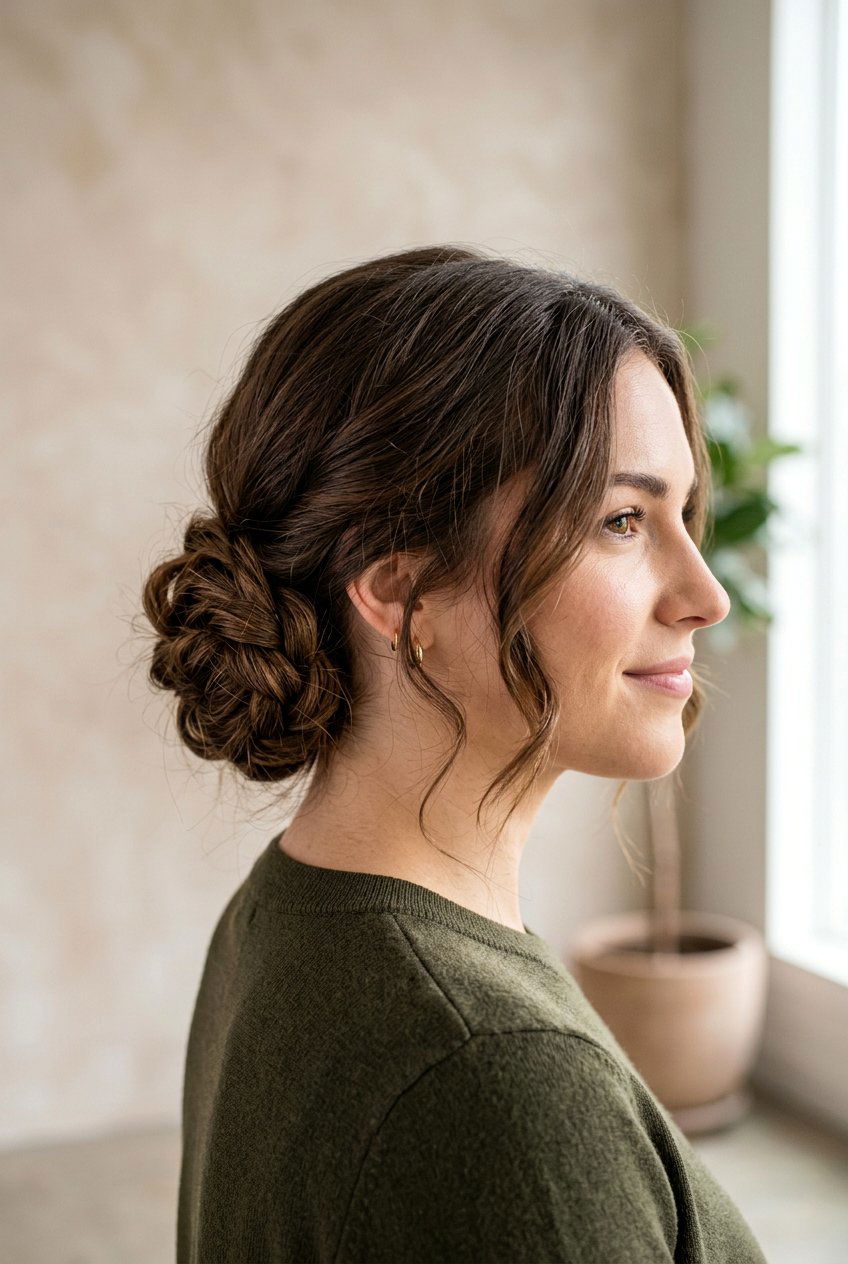
6. Twisted Low Bun With Face Framing Pieces
Face-framing pieces can make a twisted low bun feel softer and more flattering, especially if you love a bit of movement around your cheeks and jawline. Start by sectioning out the front hair on each side before you gather the rest into a low ponytail at the nape. Twist the ponytail into a bun and secure it, then go back to the front sections and curl or wave them lightly so they fall in loose, flattering tendrils. Those front pieces should be thinner and softly textured instead of chunky, so the overall look stays light and romantic rather than heavy. This technique is especially helpful for oblong or square faces because it breaks up length and adds softness near the jaw. Finish with a flexible hairspray that keeps the tendrils in place while still letting them move, making this style perfect for photos, parties, and date-worthy moments.
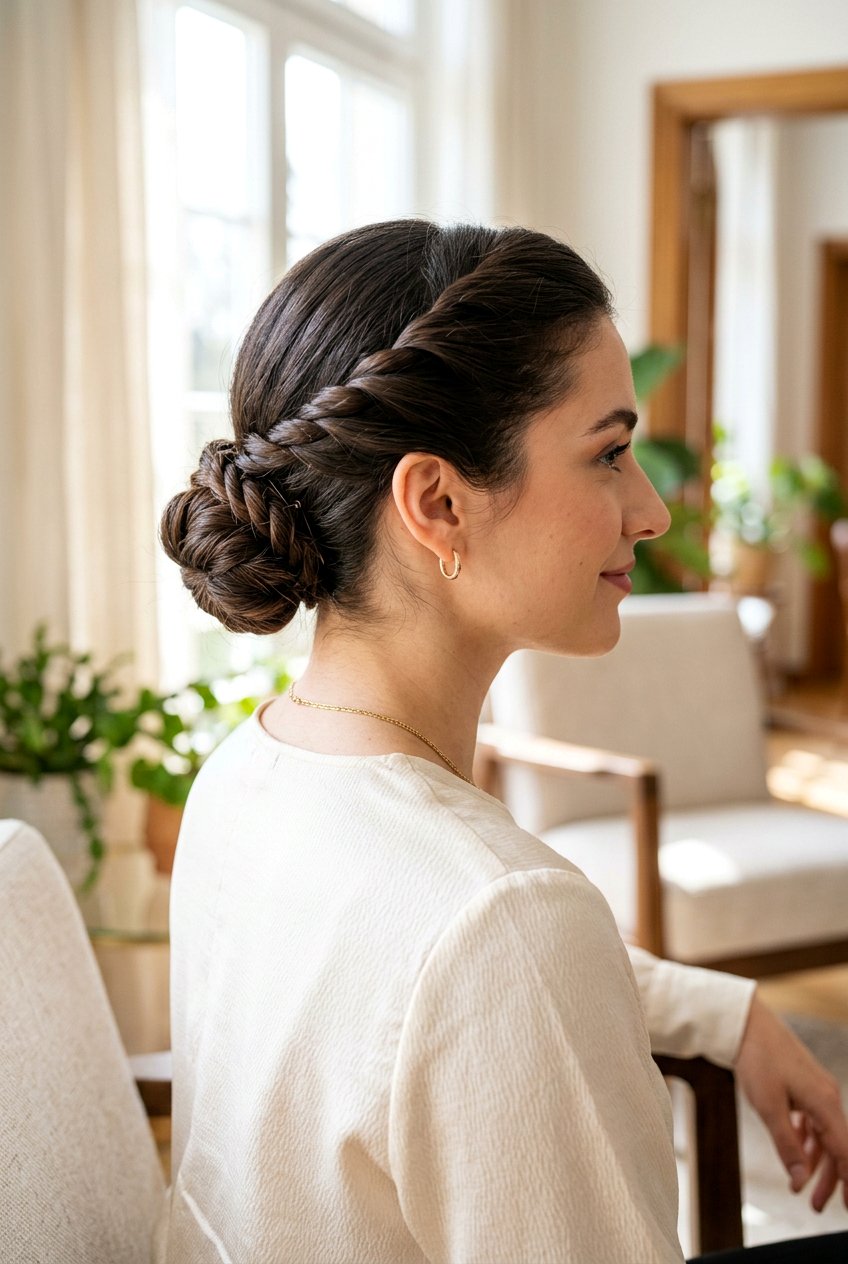
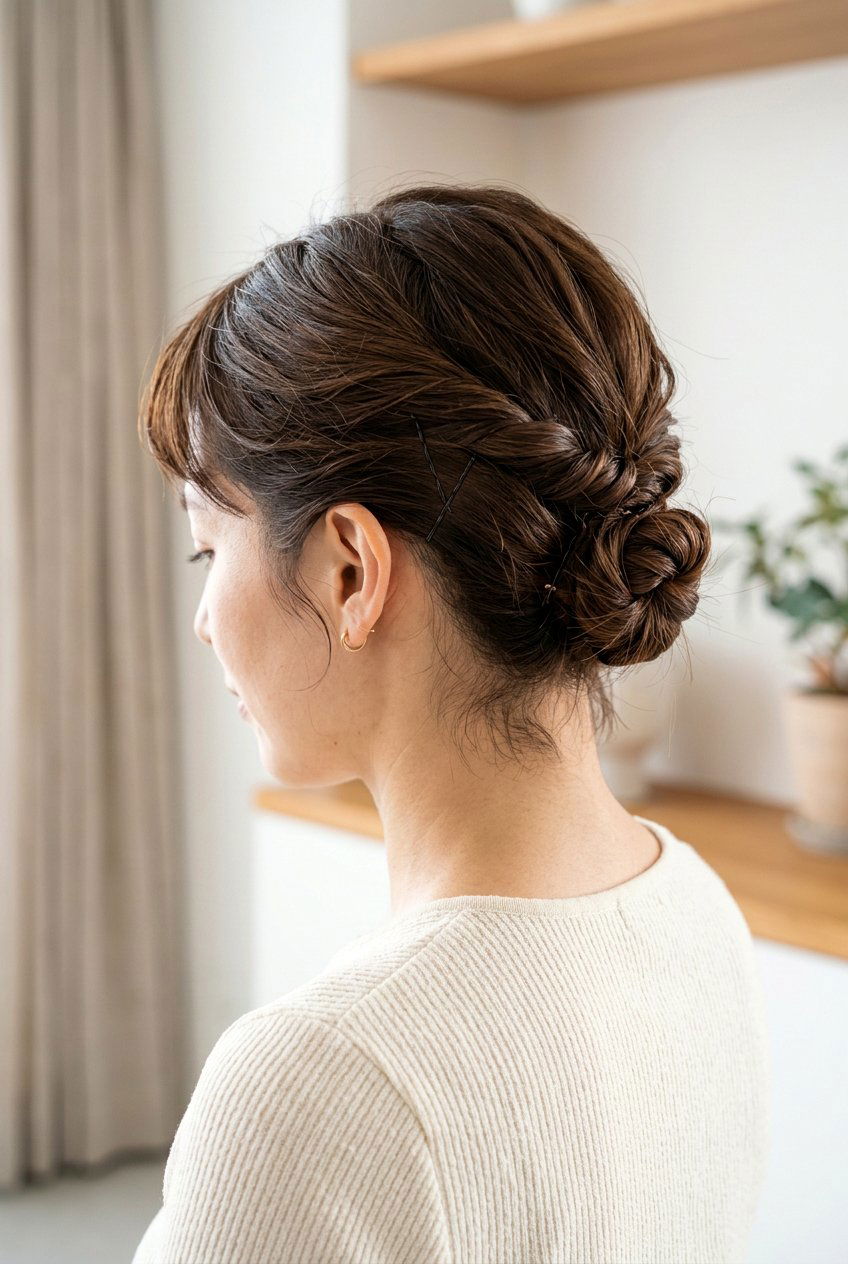
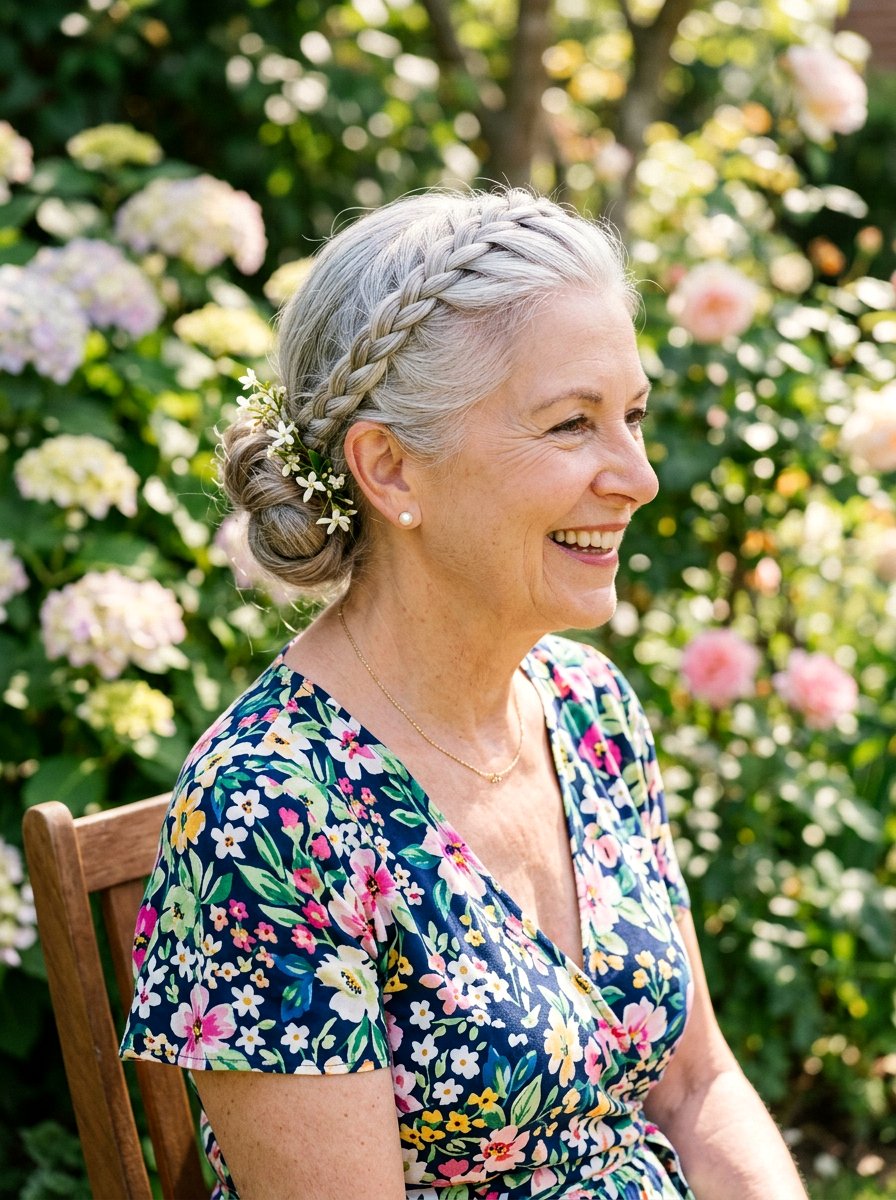
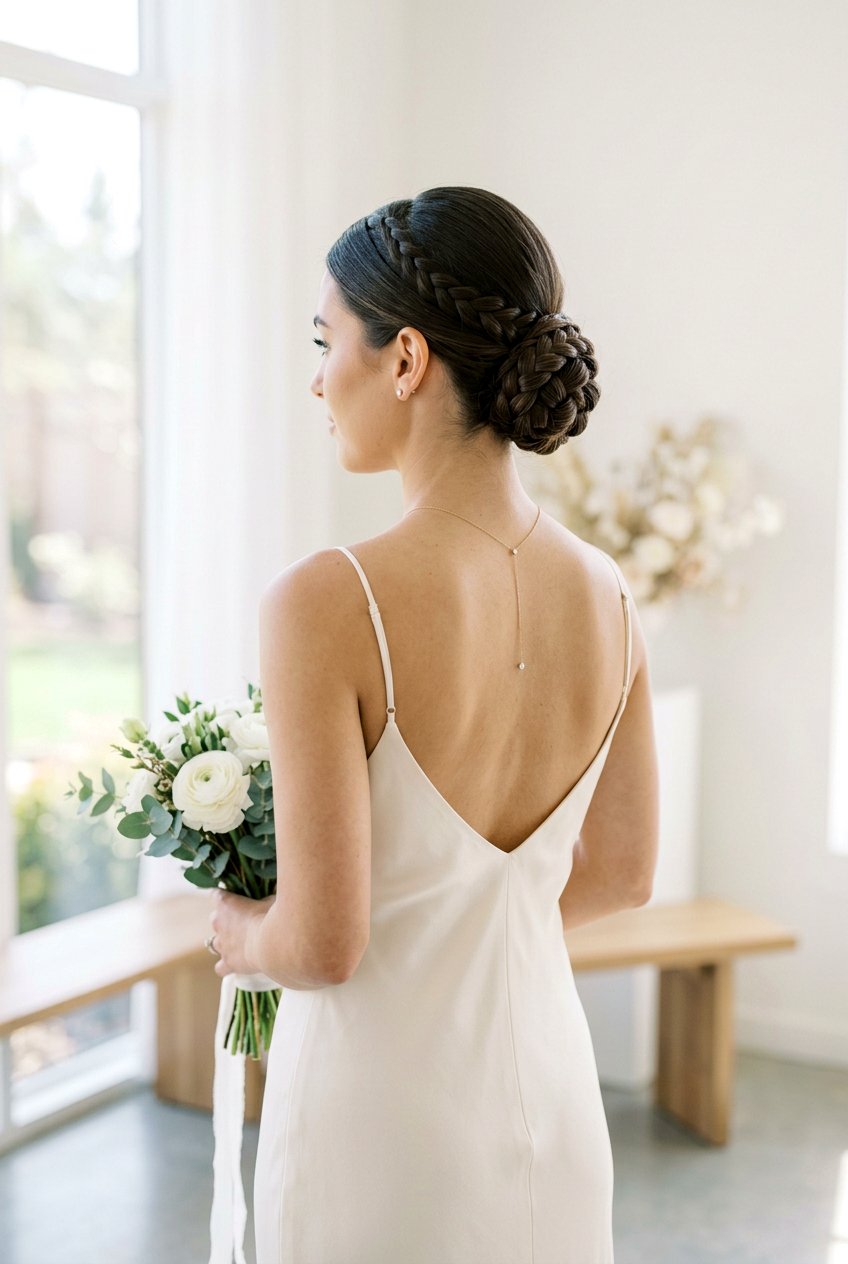
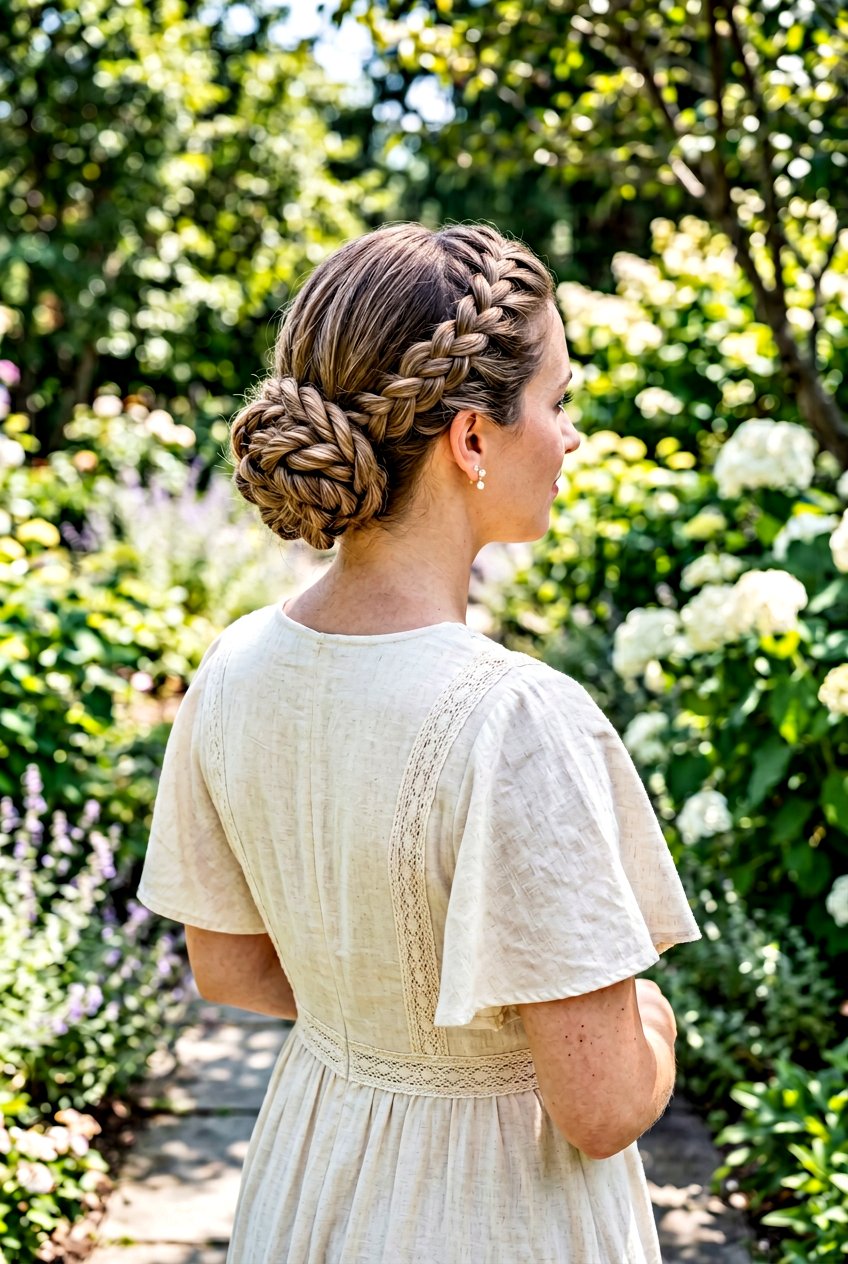
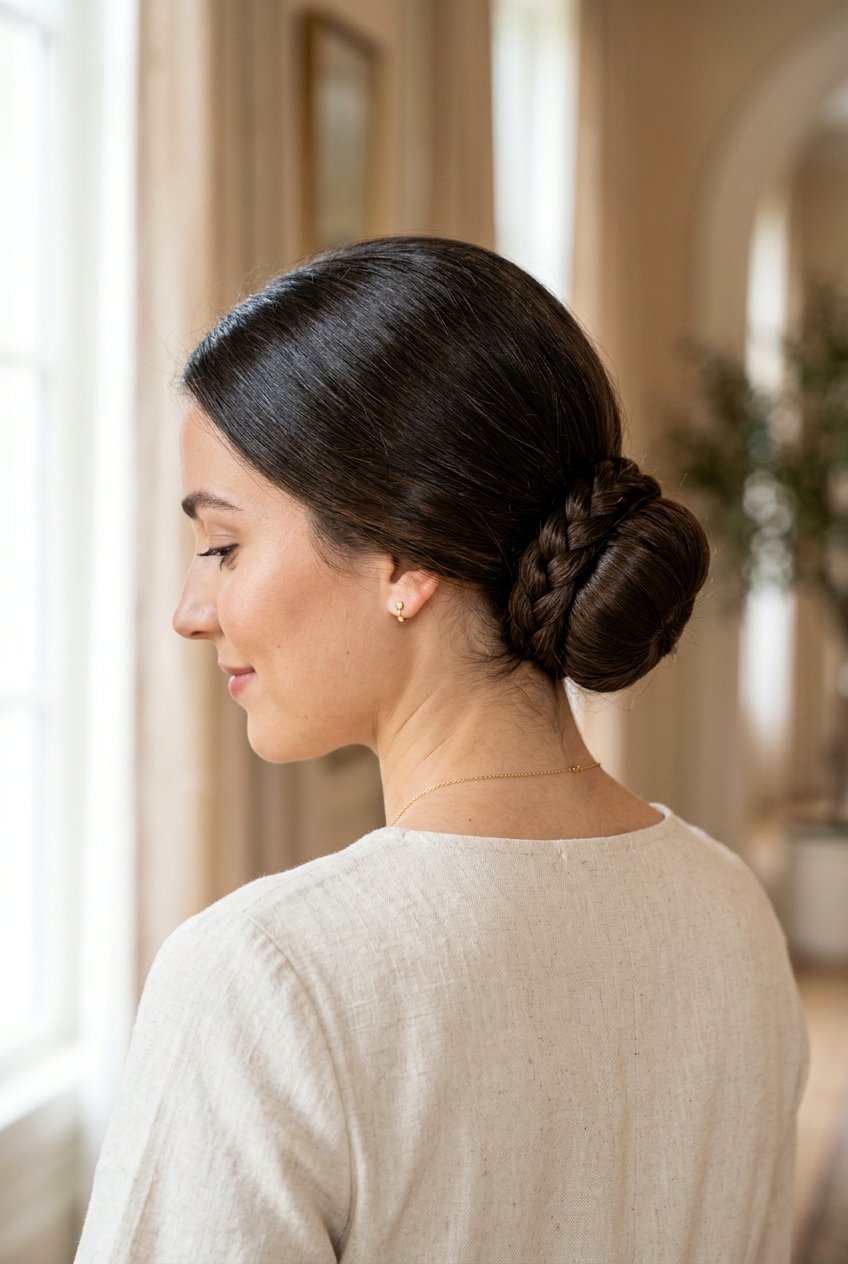
7. Braided Twisted Low Bun
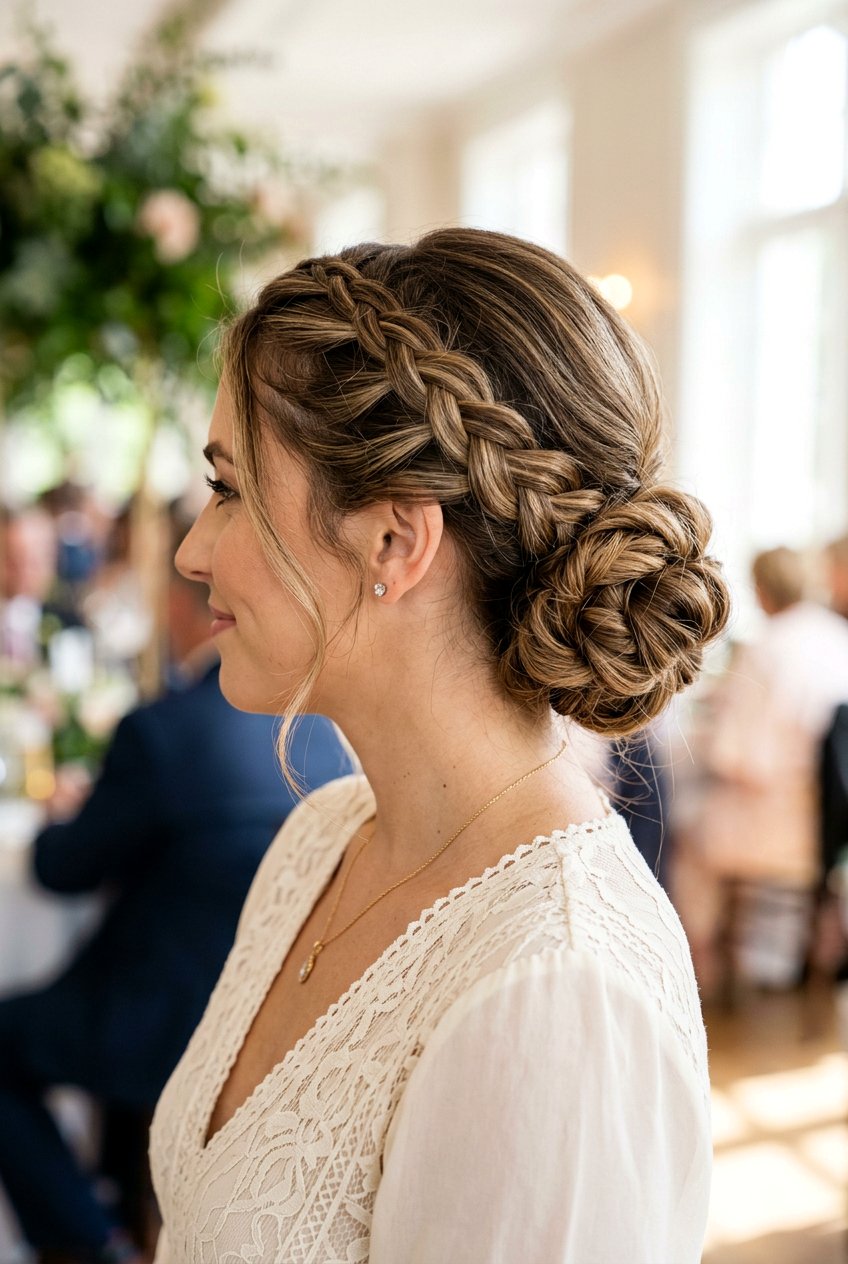
Combining a braid with a twisted low bun creates extra detail and dimension, giving the updo a more intricate look without a complicated routine. Begin by braiding a small section along one side or down the center back, securing it with a tiny elastic at the end. Gather all the hair, including the braid, into a low ponytail at the nape, then twist the lengths into a bun so the braided section weaves through the outer surface. Pin the bun securely, letting parts of the braid show clearly from different angles. This style works well for medium to long hair and especially on finer textures, where the braid gives the bun more visual interest and grip. Add a subtle hair accessory, like a small comb or clips near the braid, if you are wearing it to a wedding, prom, or any special event that calls for extra detail.
8. Twisted Low Bun For Medium Hair

Medium-length hair sits in a sweet spot for twisted low buns because it is long enough to twist but short enough to be easy to manage. To make the most of the length, use a volumizing spray at the roots and a light mousse through the mid-lengths before blow-drying for body. Gather hair at the nape and twist while gently pushing the base of the ponytail upward to create a bit of lift at the crown. Wrap the twist into a bun, letting the ends tuck under naturally instead of forcing them into a tight knot. If layers cause shorter pieces to slip out, pin them individually rather than trying to pull everything into one elastic. This version looks great on straight, wavy, or slightly curly medium hair and can be kept simple for work, or dressed up with a barrette or small clip for evenings out.
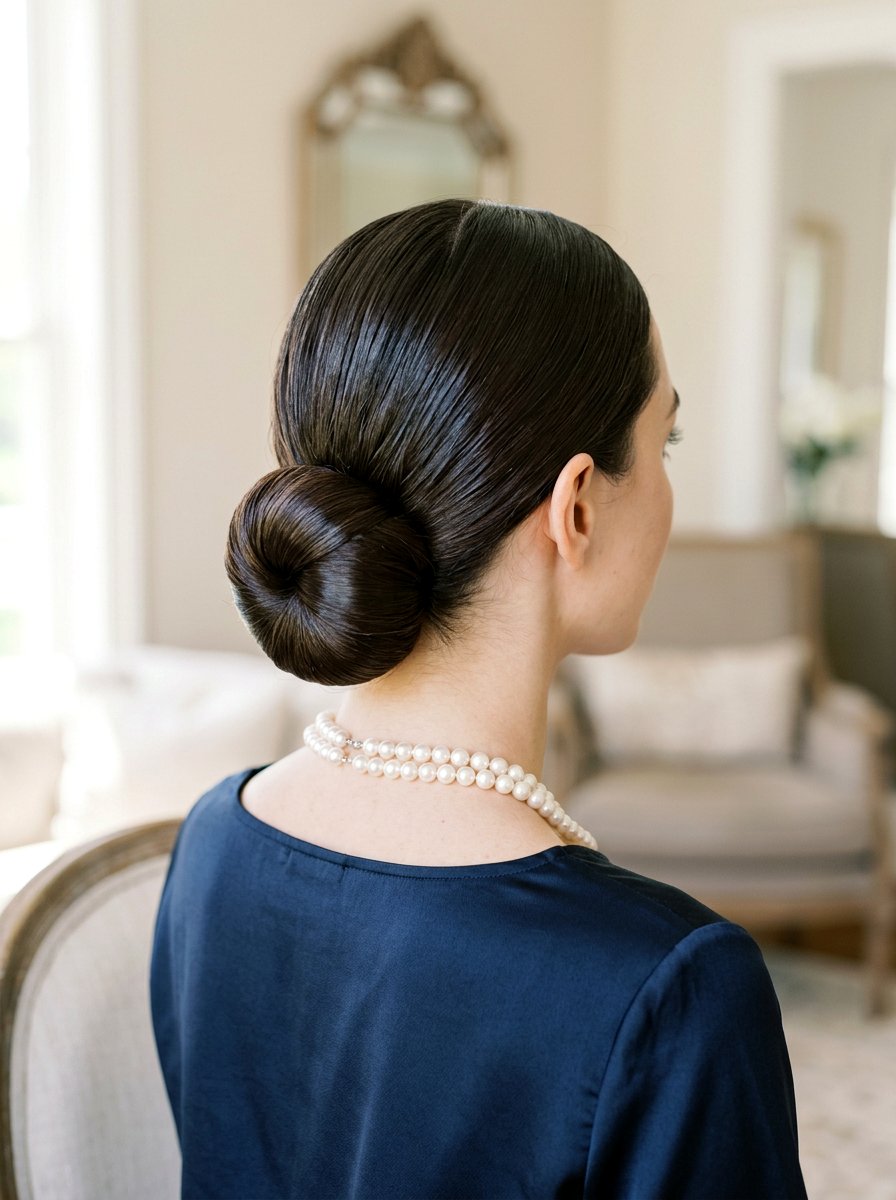
9. Twisted Low Bun For Long Hair

When you have long hair, a twisted low bun becomes a striking focal point with a thicker, more dramatic coil. Start by smoothing hair with a blow-dryer and brush or a quick pass of a straightener if needed, then apply a lightweight serum so the twist looks sleek instead of frizzy. Gather hair low at the nape and divide the ponytail into two or three sections, twisting them together like a rope to prevent bulk. Wrap this rope twist into a bun, pinning as you go so the weight is evenly supported and does not pull on your scalp. For extra security, use a few strong hairpins at the base and a flexible hairspray to lock in the shape. This bun is ideal for formal events, office days when you need hair off your face, or travel days where you want a tidy style that stays in place for hours.
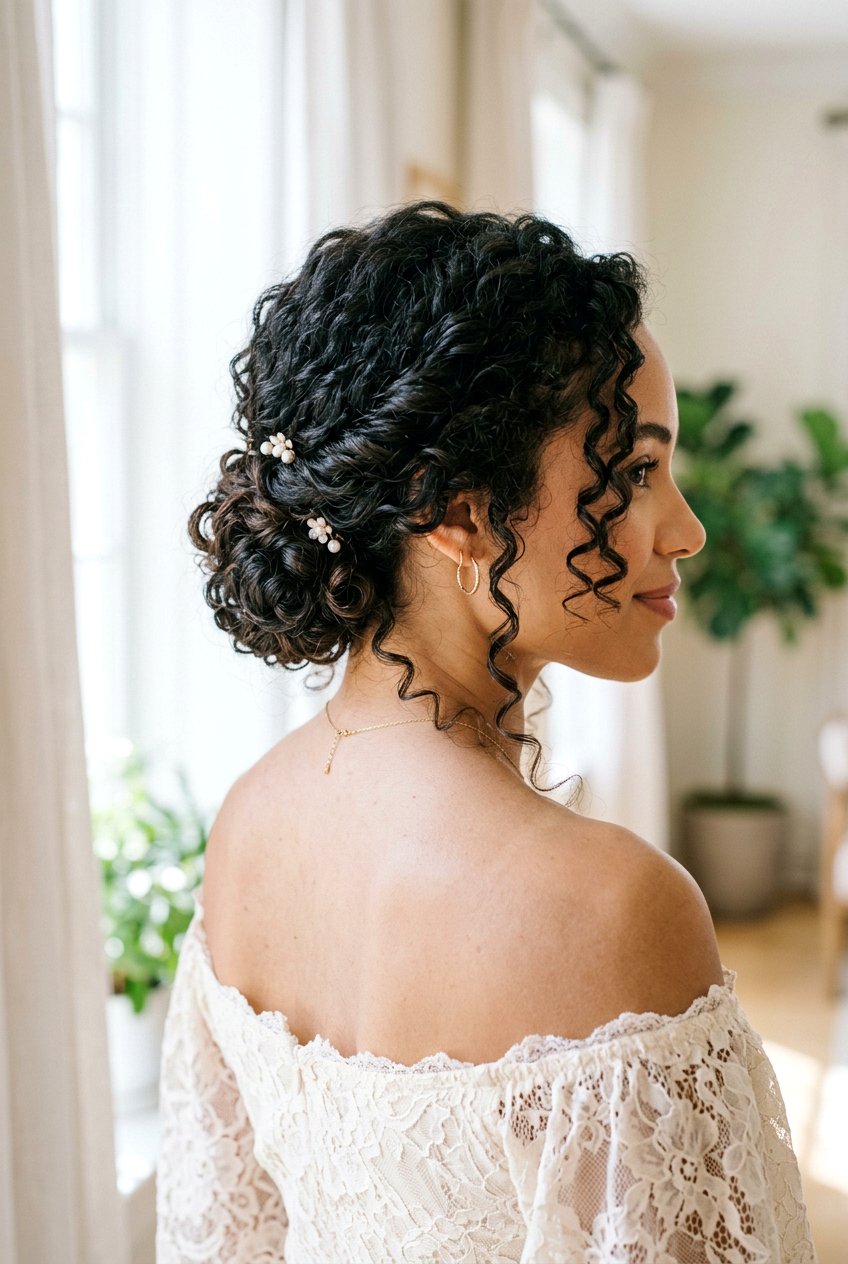
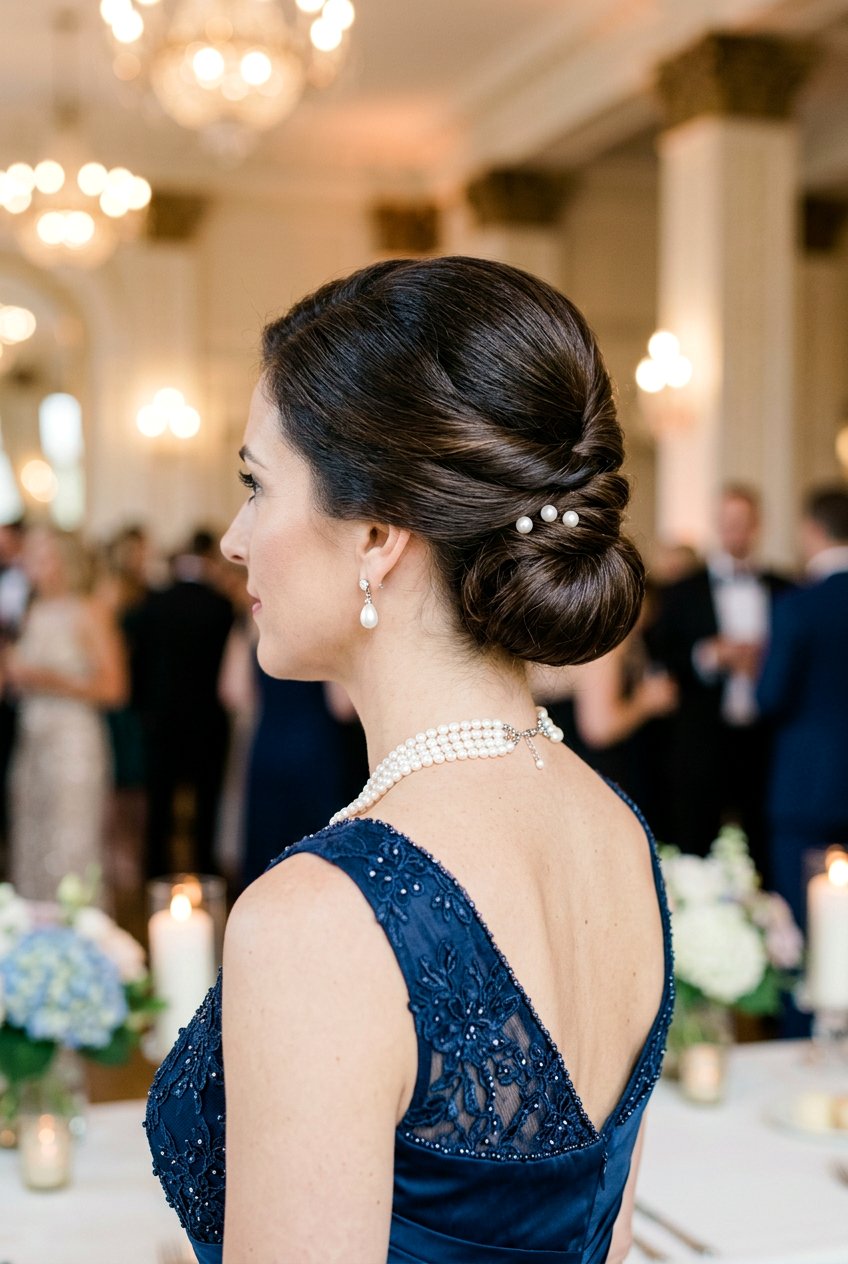
10. Twisted Low Bun With Hair Accessories
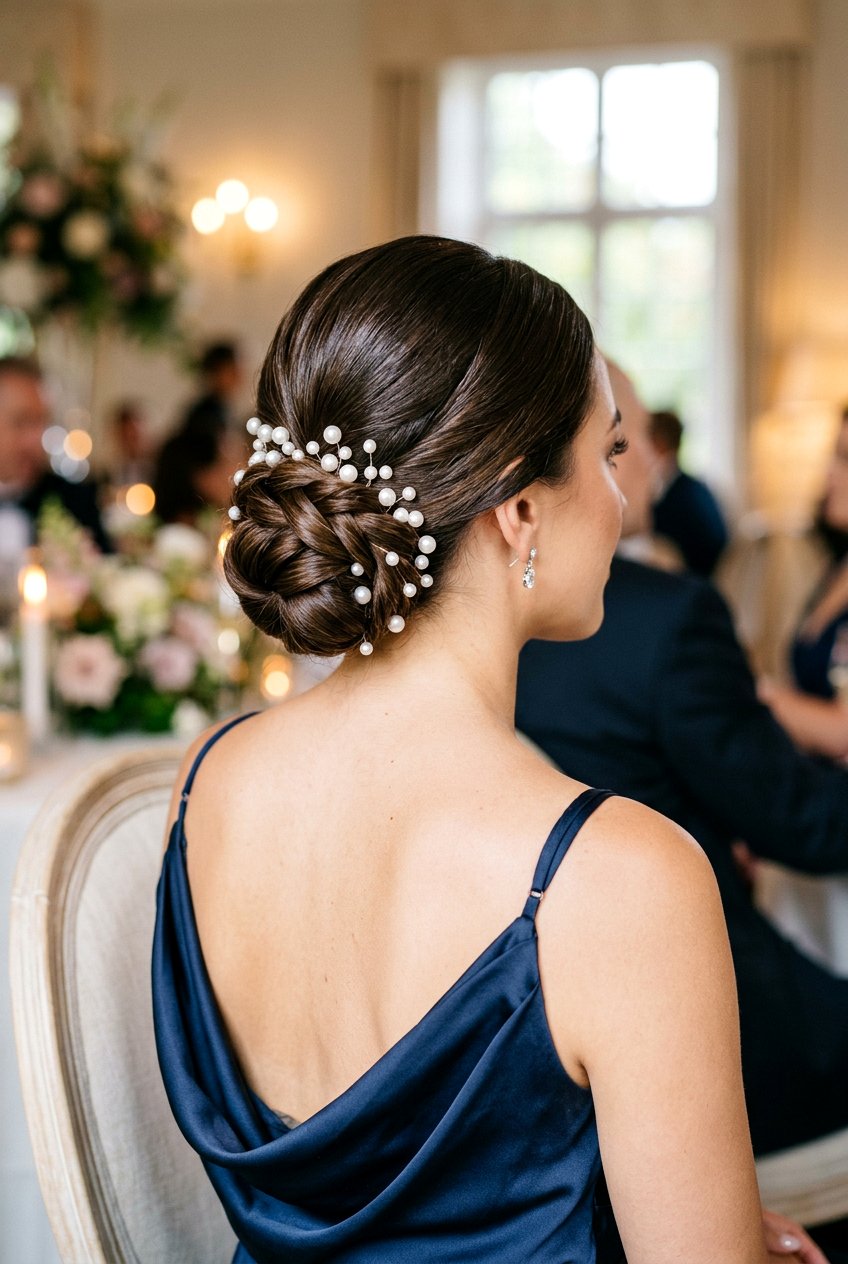
Transforming a simple twisted low bun with accessories is one of the easiest ways to match your hair to a specific occasion or outfit. Create your preferred version of a twisted low bun—sleek, loose, or textured—then decide where you want the focus to sit: above the bun, to one side, or along the twist. Slide in pearl pins, crystal clips, or a delicate comb to highlight the curve of the bun and secure any loose pieces. For daytime, minimalist metallic clips or matte hairpins keep things understated but polished. For weddings or formal events, more ornate headpieces or clustered pins can make the bun look bridal-level without changing the basic shape. Always balance the accessory size with your bun size so the decoration complements the hair rather than overwhelming it, especially if your hair is fine or shorter.
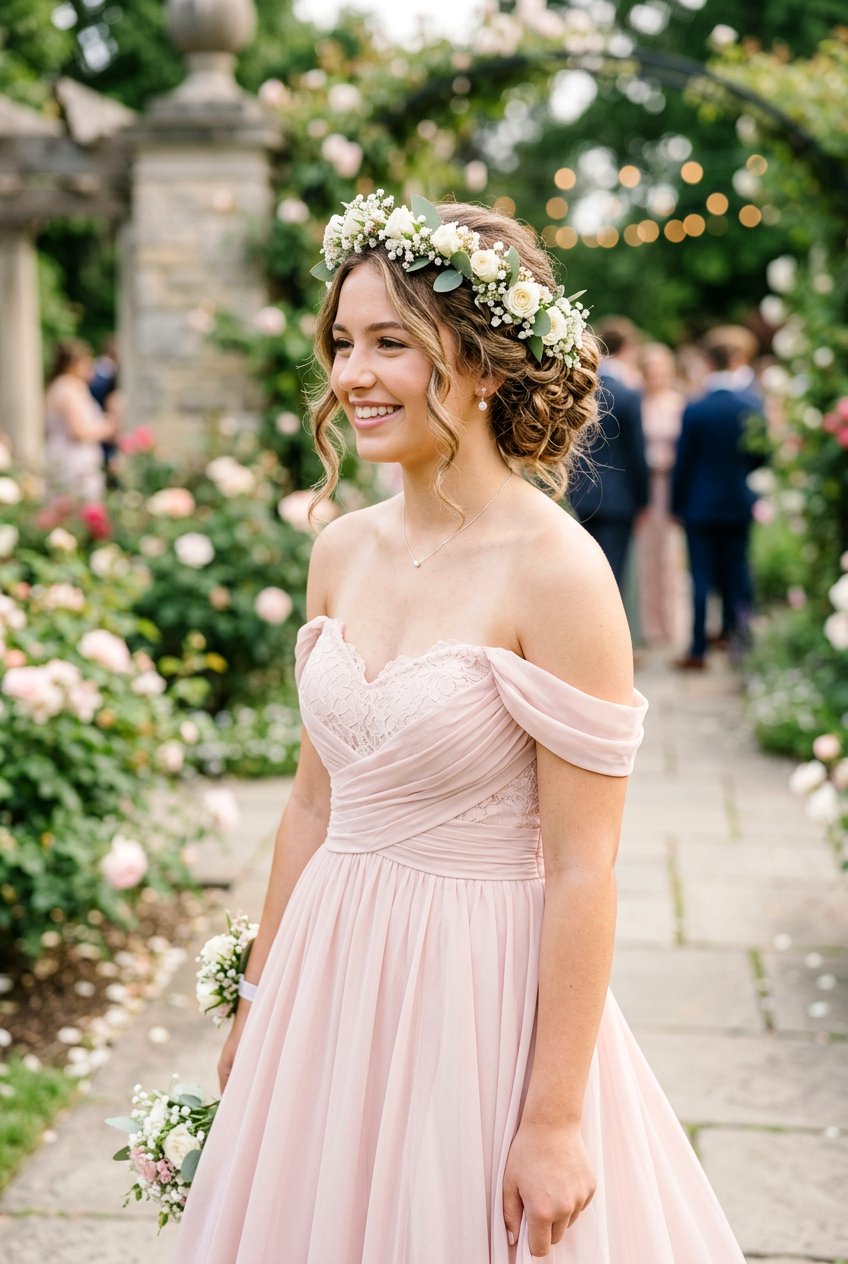
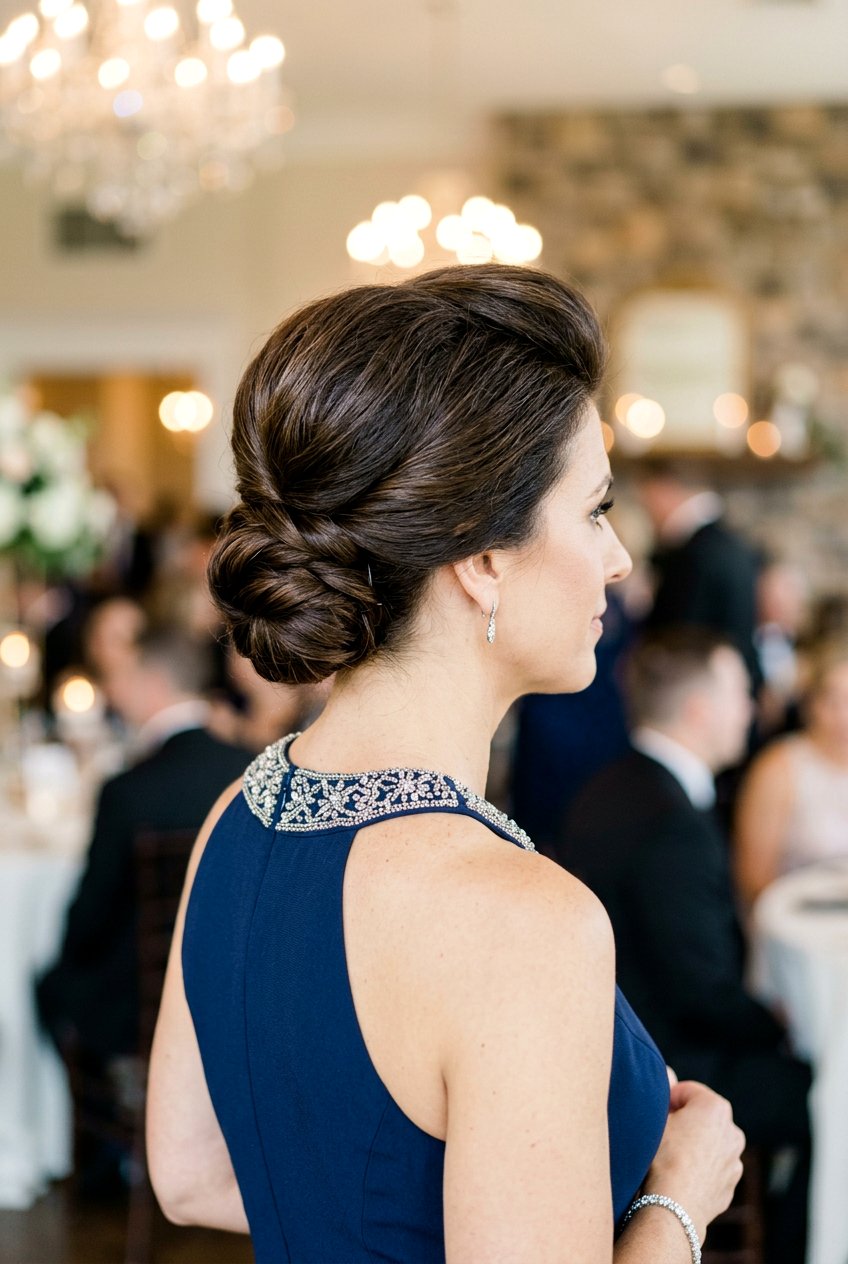
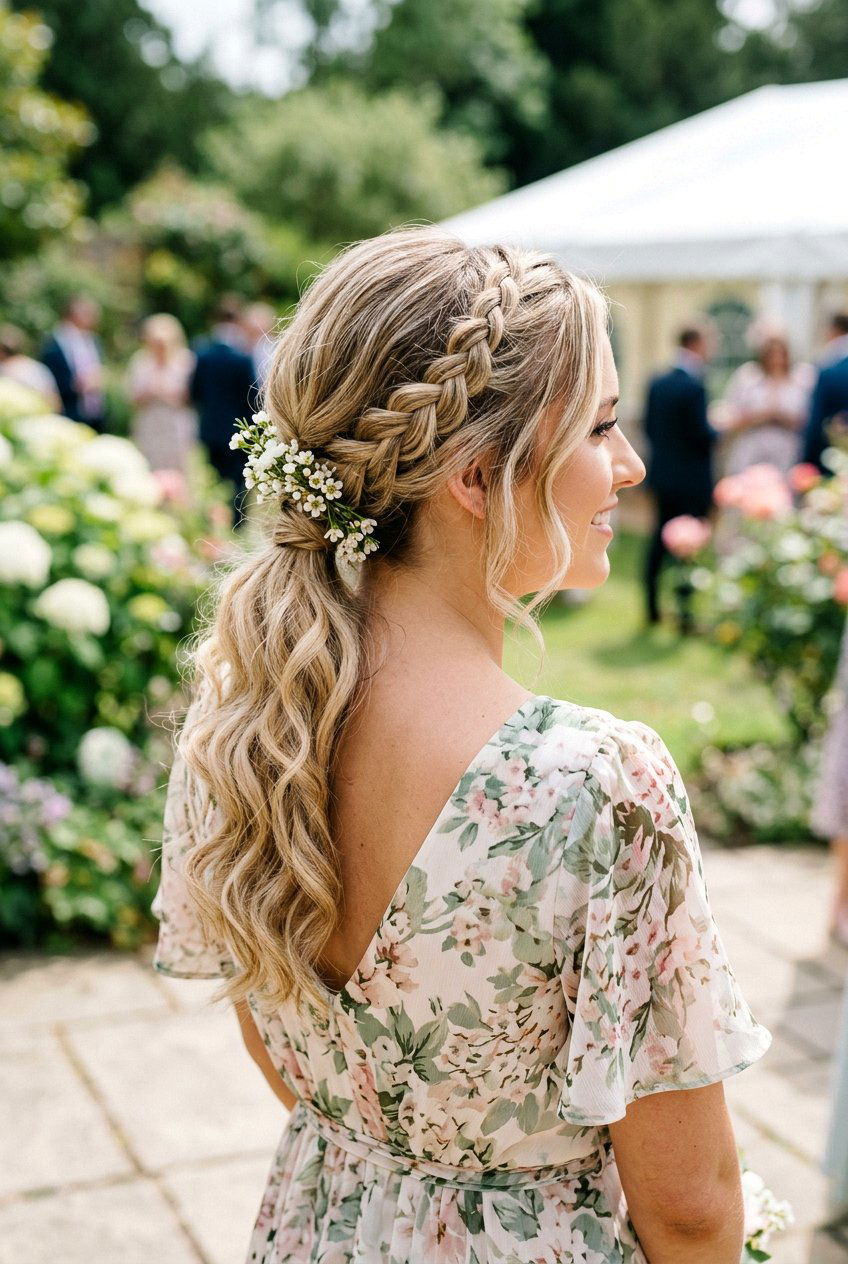
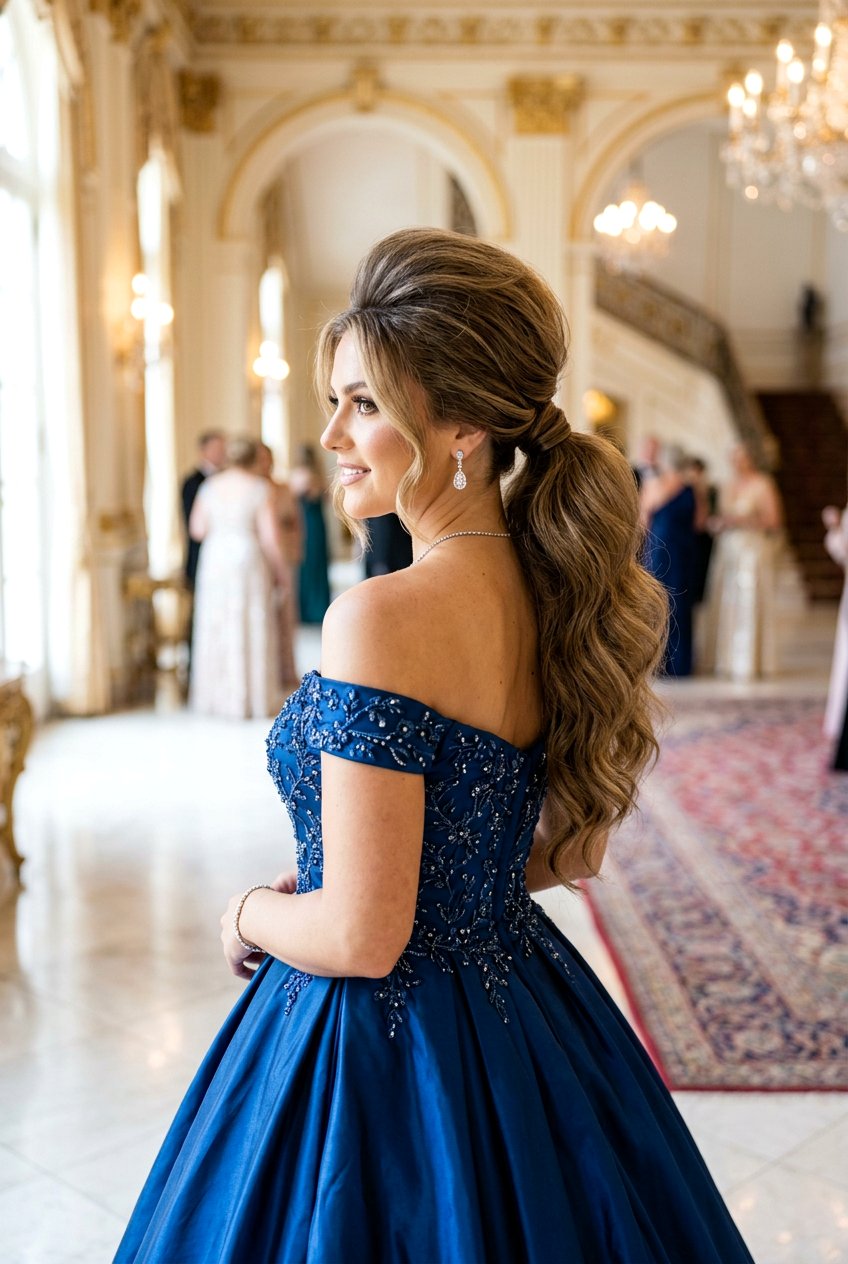
11. Wedding Twisted Low Bun
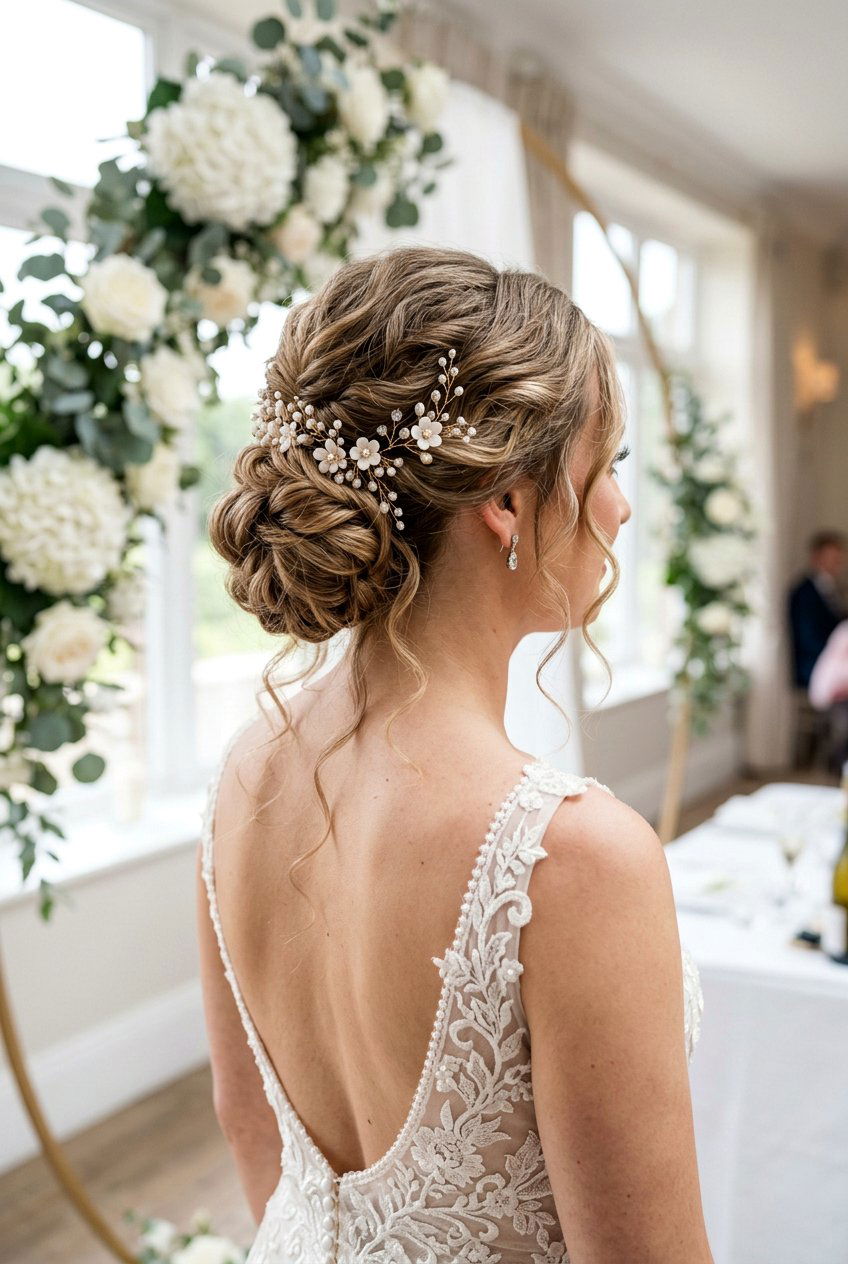
A wedding-ready twisted low bun brings together elegance, comfort, and long-lasting hold so your hair looks beautiful from first photos to last dances. Prep hair with volumizing spray at the roots and smoothing cream on the lengths to create a balanced base. Lift the crown slightly with light backcombing, then gather hair low at the nape, twisting it into a structured but soft bun with texture and movement instead of a rigid knot. Leave a few romantic tendrils around the face and nape, curling them gently so they frame your features in pictures. Secure the bun with a mix of bobby pins and strong hairpins, and finish with a long-wear, flexible hairspray that resists humidity. A veil, comb, or cluster of pins can sit above or to the side of the bun, making this style ideal for brides, bridesmaids, and wedding guests who want a timeless, photo-friendly look.

12. Twisted Low Bun For Bridesmaids
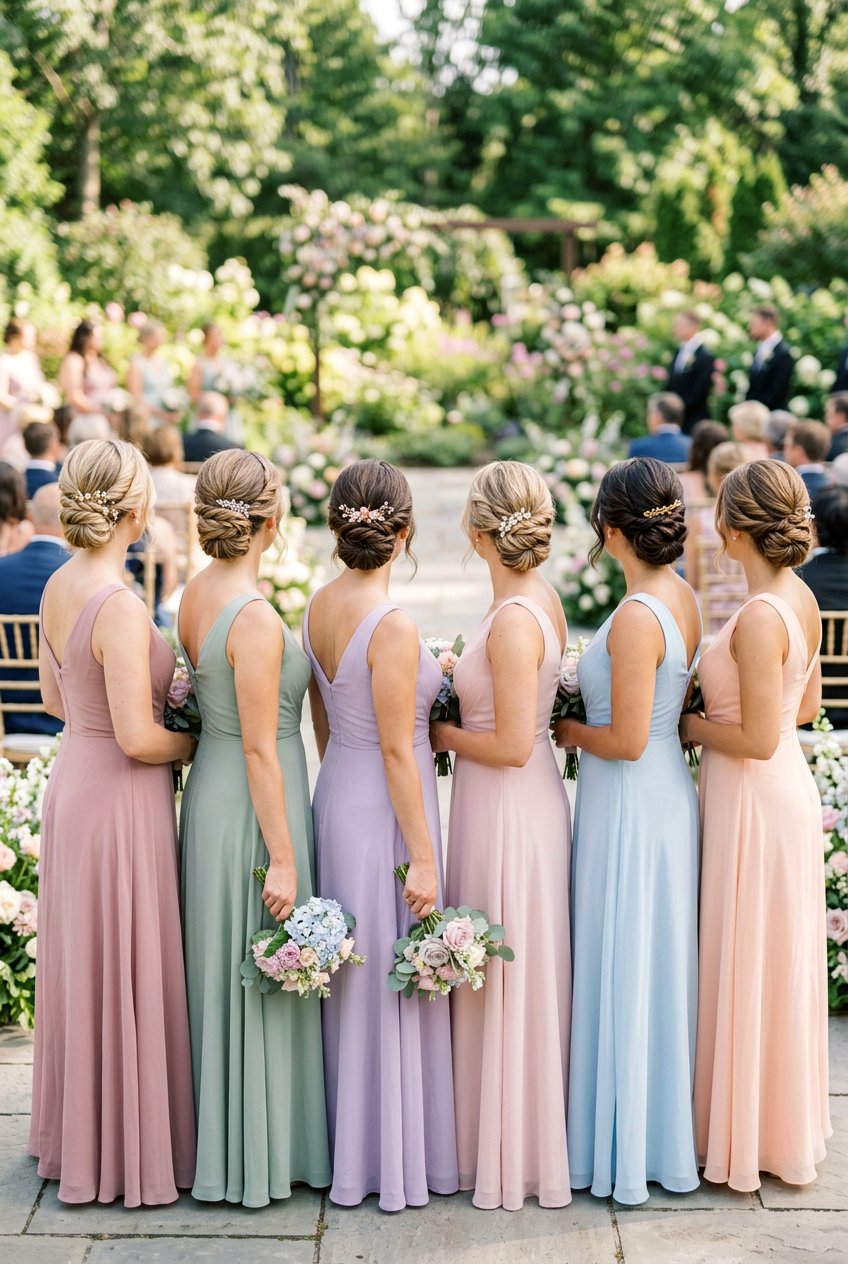
For bridesmaids, a twisted low bun offers a cohesive group look that is still customizable for different hair types and face shapes. Start with a soft, low twisted bun as the shared base, then adjust details like parting, volume, and face-framing pieces according to each person. Some can wear a middle part with sleek sides, while others use a side part or extra texture for volume. A unified accessory, such as matching pins or a small comb, ties all the hairstyles together without making them look identical. The low placement keeps hair visible in backless or low-back dresses while staying comfortable for long ceremonies and receptions. This approach photographs beautifully from every angle and makes it easier for a stylist or group to recreate the look quickly on the wedding morning without complicated techniques.
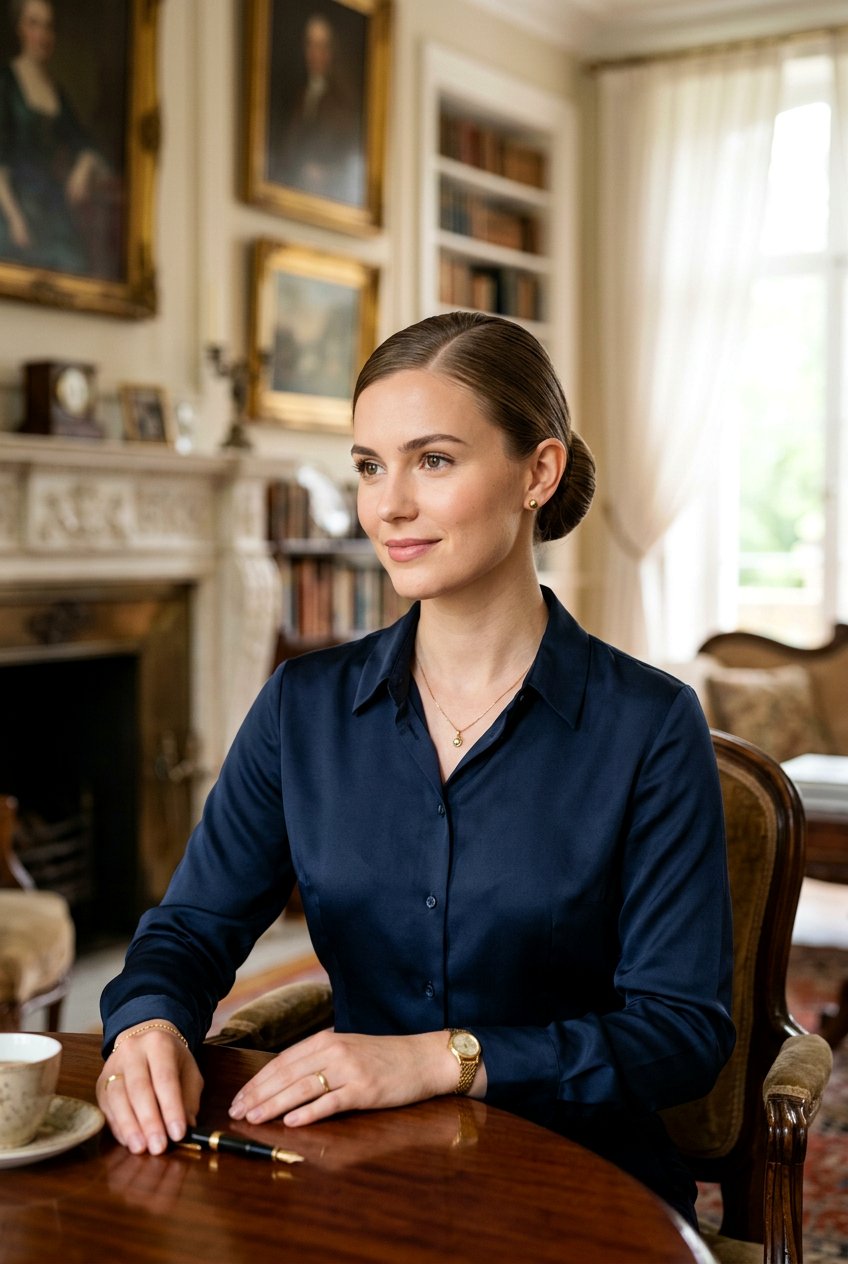
13. Twisted Low Bun For Office

For the office, a twisted low bun strikes the right balance between professional and stylish, keeping hair neat while still showing some personality. Begin with smooth hair and create a low ponytail at the nape, keeping the sides sleek but not overly tight. Twist the ponytail into a simple bun and secure it with pins, making sure the twist is visible for subtle detail without looking messy. Finish with a lightweight hairspray or smoothing cream to control flyaways, especially around the part and hairline. This style works well on busy mornings because it can be created in a few minutes and lasts through long workdays and commutes. Pair it with understated accessories or none at all for conservative environments, or add a small barrette for a bit of polish in more relaxed offices.
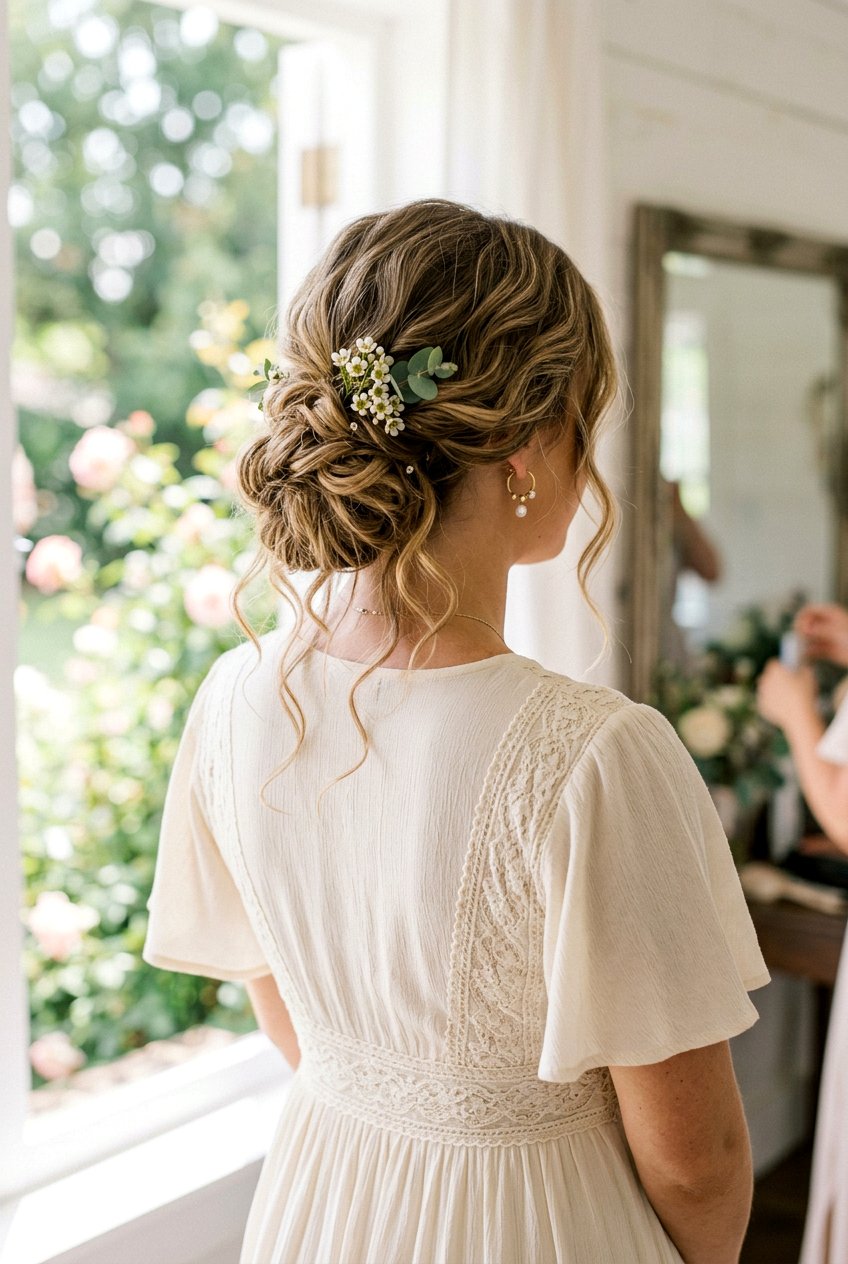
14. Twisted Low Bun For Curly Hair
Curly hair brings instant volume and texture to a twisted low bun, creating a soft, romantic look without needing much extra styling. Start by applying a curl cream or gel to define your natural curls and letting them dry fully, either air-dried or diffused. Gather curls gently into a low ponytail, being careful not to disturb the curl pattern too much, then loosely twist the ponytail and coil it into a bun. Instead of smoothing everything flat, allow some curls to spring out and frame the bun and face for an intentional, textured finish. Pin the bun with open hairpins that hold curls without crushing them, and mist with a frizz-control spray for staying power. This style is perfect for weddings, events, or everyday wear when you want to highlight your natural texture while keeping your hair off your shoulders.
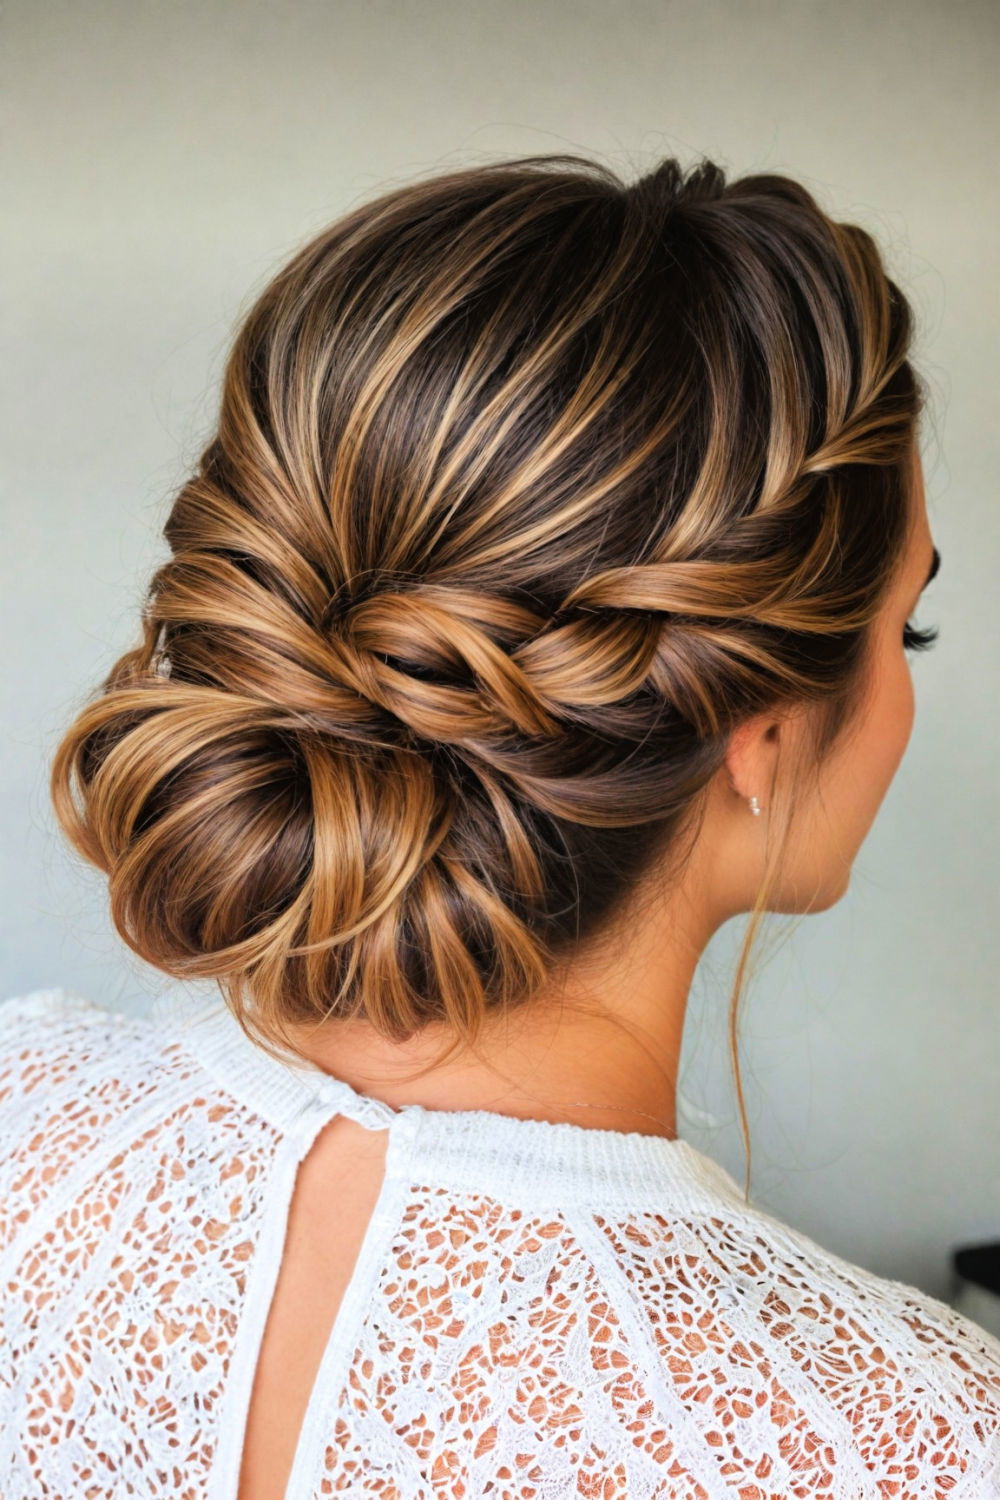
15. Twisted Low Bun With Rope Twist
Using a rope twist adds a defined, modern texture to a low bun while still being quick and beginner-friendly. Create a low ponytail and divide it into two equal sections, twisting each section in the same direction before wrapping them around each other in the opposite direction. This rope twist technique locks the strands together, giving the bun a cable-like look that holds well even in fine hair. Wrap the rope twist into a bun at the nape and secure with pins, making sure the twist pattern stays visible around the outer edges. A bit of shine serum or cream helps highlight the twist and keeps frizz at bay. This variation feels slightly more structured than a regular twist, making it great for semi-formal events, dinners, or any time you want a bun that looks intentionally detailed without a complex braid.

16. Twisted Low Bun With Veil
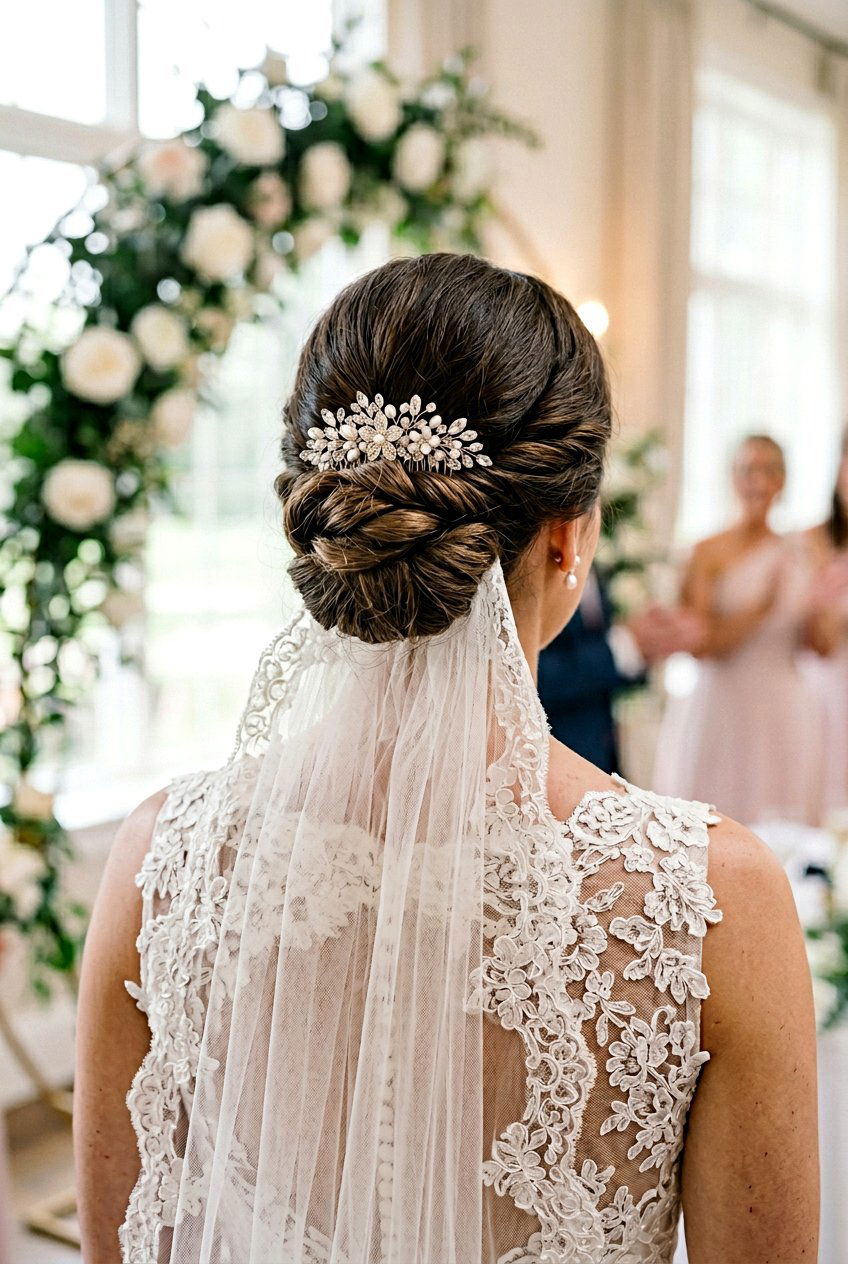
Pairing a twisted low bun with a veil creates a classic bridal silhouette that feels timeless and balanced. Begin with a textured or smooth twisted low bun placed right at or slightly above the nape of the neck so there is room to secure the veil comb. Once the bun is pinned, slide the veil comb just above or slightly into the base of the bun, angling it so the veil falls smoothly down the back. Ensure the twist and bun are still visible from the sides by leaving some volume at the crown and avoiding overly high placement. A few curled tendrils around the face keep the look soft from the front, even when the veil is down. This setup works beautifully with fingertip, chapel, or cathedral-length veils and stays comfortable through ceremonies, photos, and dancing.
17. Twisted Low Bun With Middle Part

A middle part gives a twisted low bun a clean, modern feel that suits minimalist outfits and symmetrical features. Start by parting hair down the center and smoothing both sides with a brush and light styling cream. Gather the hair into a low ponytail at the nape, keeping the tension even on both sides so the part stays straight. Twist the ponytail into a bun and secure with pins, then gently soften the crown by lightly tugging sections upward for a touch of volume without losing the sleek effect. This layout frames the face evenly, which looks especially good on oval and heart-shaped faces. Finish with a shine spray for a glossy, glassy finish that feels very current and works for everyday wear, meetings, or minimal bridal looks.
18. Twisted Low Bun For Short Hair
Shorter hair can absolutely work in a twisted low bun when you use clever pinning and a bit of texture. If your hair grazes the shoulders or is slightly shorter, start by adding texture spray to give grip, then gather the back sections into a low mini ponytail or secured base at the nape. Twist this shorter ponytail into a small bun, pinning as you go and tucking in ends. For the front and side pieces that may not reach, twist or loosely pin them back toward the bun, allowing some shorter strands to fall softly for an intentional, lived-in look. This creates the illusion of a full updo even when your hair length is limited. It is a smart choice for events or workdays when you want your shorter cut off your neck but still styled in a chic, grown-up way.
19. Twisted Low Bun With Volume At Crown
Adding volume at the crown changes the silhouette of a twisted low bun, making it feel more formal and elongating the overall profile. Section off the top of your hair from temple to temple and lightly backcomb the underside, then smooth the top layer over without crushing the height. Pin this lifted section in place, then gather the remaining hair into a low ponytail at the nape. Twist the ponytail into a bun and secure, making sure the volume above flows smoothly into the bun without a harsh line. This structure works particularly well for weddings, evening events, or anytime you want a bit of red-carpet elegance. Use a flexible hairspray to hold the crown lift and a few extra pins for security, especially if your hair is fine or naturally straight.
20. Twisted Low Bun For Everyday Wear
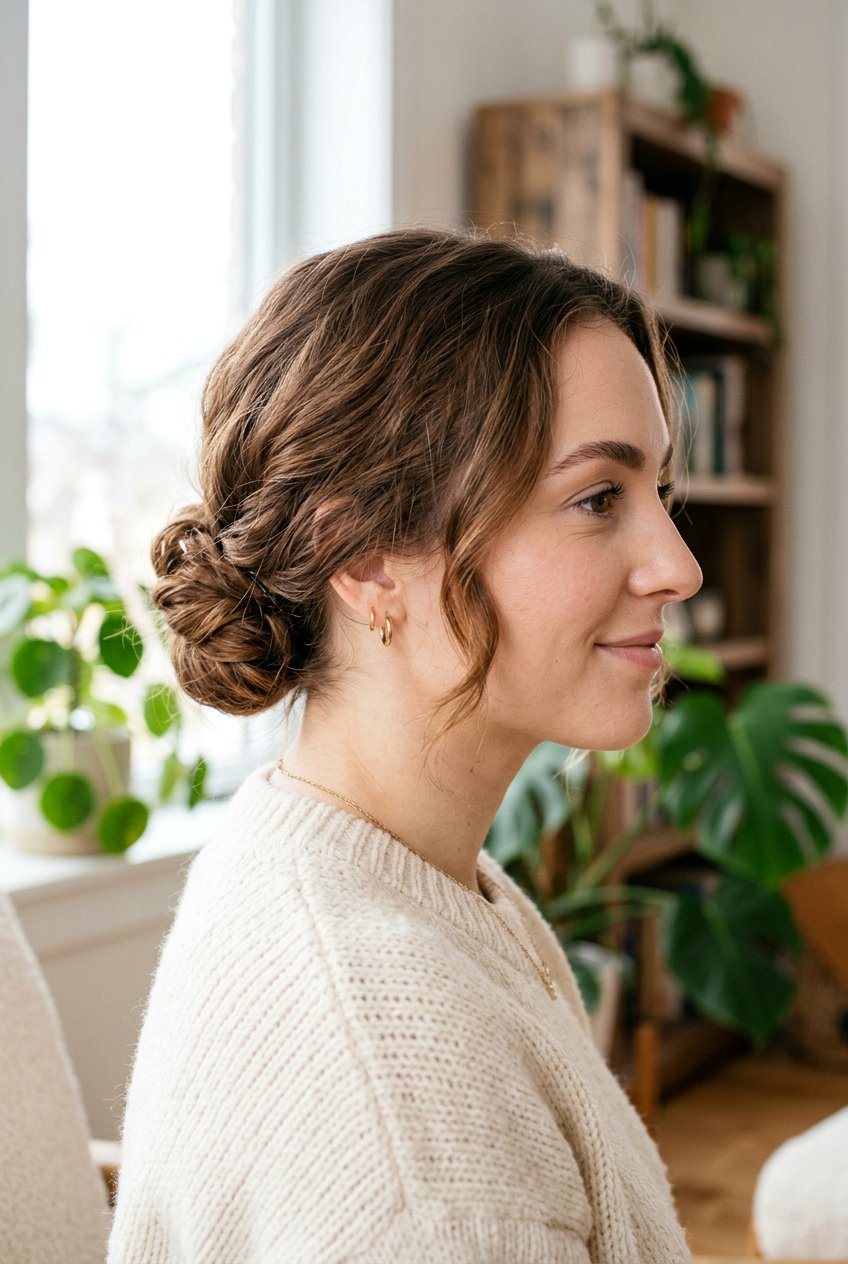
For everyday life, a simple twisted low bun should be quick, comfortable, and easy to tweak on the go. Start with brushed or slightly textured hair, gather it into a low ponytail with your fingers for a softer look, and twist it into a basic bun. Use a few bobby pins rather than a lot, focusing on the base and key points so the style feels secure but not overly tight. Leave a couple of light strands around the hairline if you like softness, or keep everything tucked for a cleaner finish. This bun takes just a few minutes and works for errands, school, commuting, or casual brunches while still looking more intentional than a plain ponytail. A light mist of hairspray or a touch of cream on the ends will keep frizz down without making hair feel stiff or coated.
Conclusion:
Twisted low bun hairstyles offer a huge range of looks, from sleek and minimal to soft and romantic or detailed and formal, all built on the same low, twisted base. By adjusting parting, texture, accessories, and how tightly you twist and pin, you can tailor the bun to thin, thick, straight, wavy, or curly hair without much extra effort. These buns work for everyday errands, long office days, weddings, and special events, making them one of the most versatile updos in current trends. They also photograph beautifully from every angle, especially when you add subtle volume, face-framing pieces, or delicate hairpins. With the twenty versions in this guide, you can match your twisted low bun to your outfit, mood, and schedule while keeping your routine simple enough to recreate at home. Once you get comfortable with the basic twist and pin technique, experimenting with new variations becomes quick, fun, and surprisingly low-maintenance.
You'll Like These Styles:
Leave a Reply