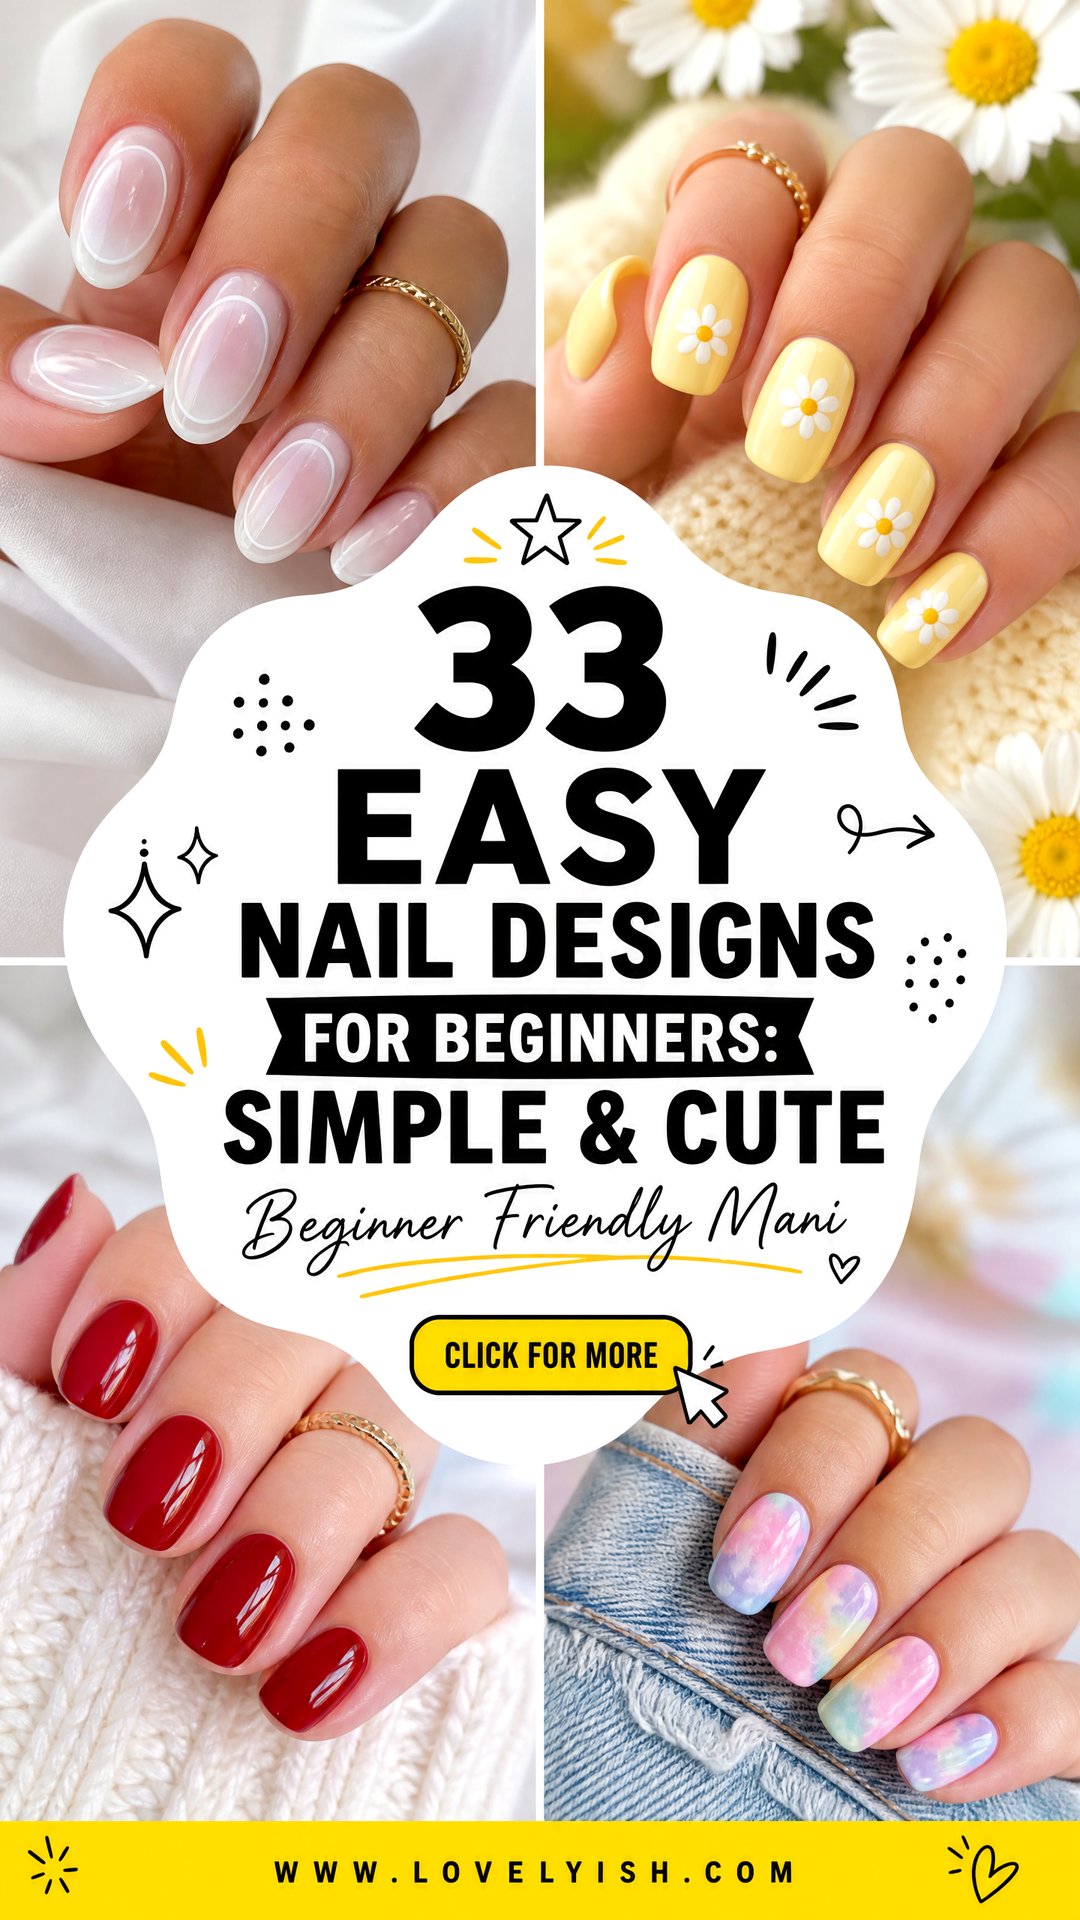
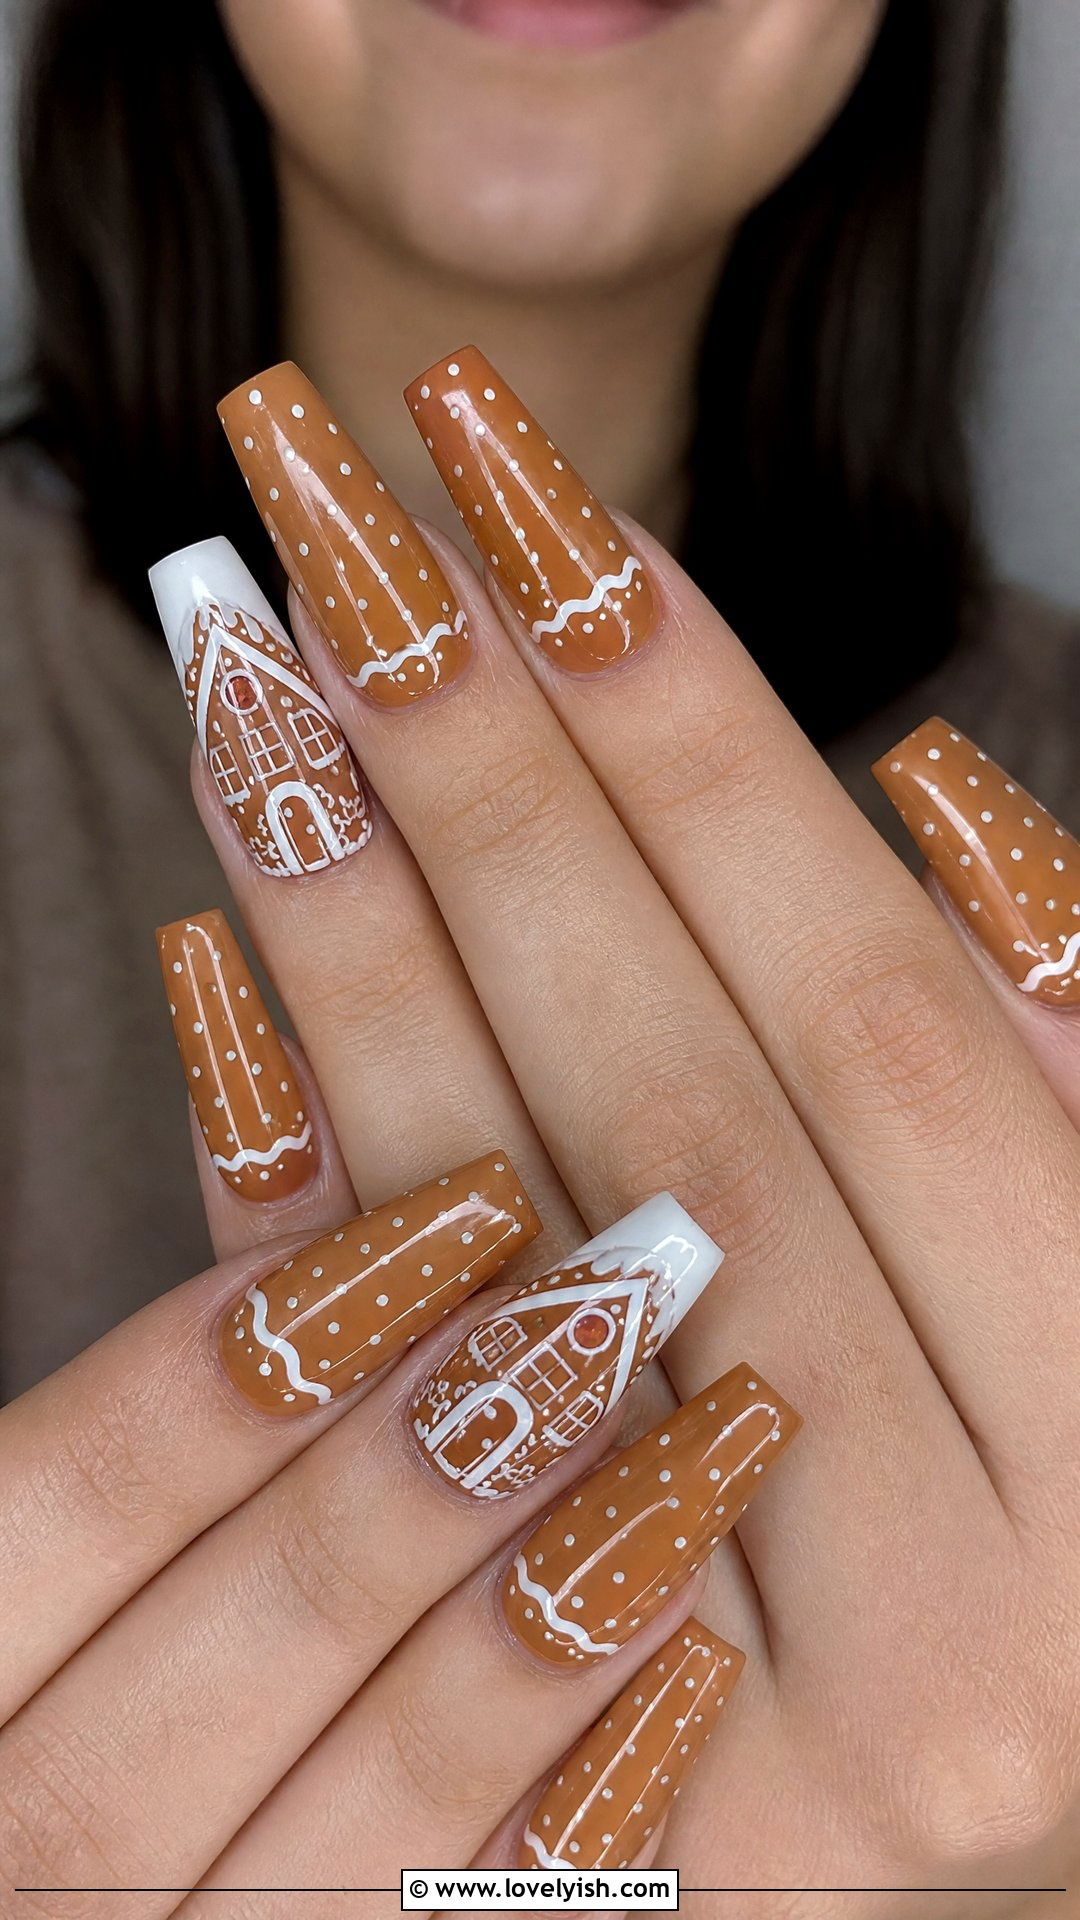
Starting your nail art journey doesn’t require professional tools or salon-level skills. With a few basic supplies like a dotting tool, striping tape, and a steady hand, you can recreate cute, polished looks right at home. This roundup of 33 easy nail designs for beginners covers everything from classic French tips and dainty florals to playful polka dots and trendy aura nails. Each look is forgiving, simple to copy, and works on any nail length or shape. Whether you’re prepping for a casual weekend or just want to practice on a lazy afternoon, these beginner-friendly ideas prove that gorgeous manicures don’t need complicated techniques. Grab your favorite polishes, settle in, and let’s explore designs that look way harder than they actually are.
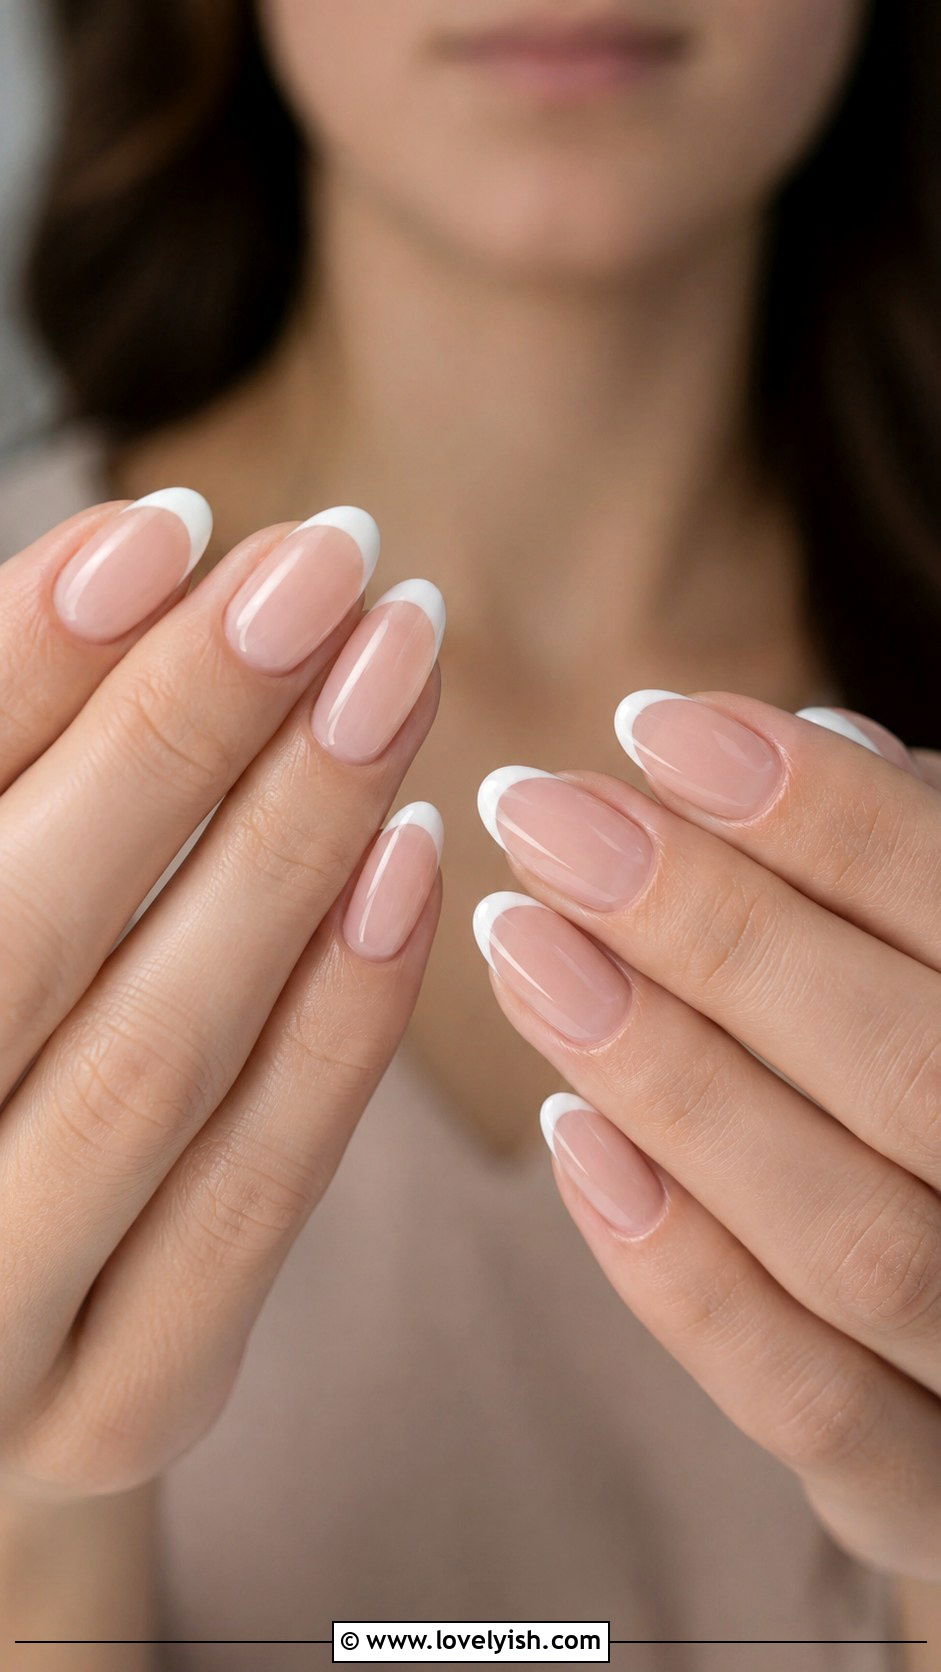
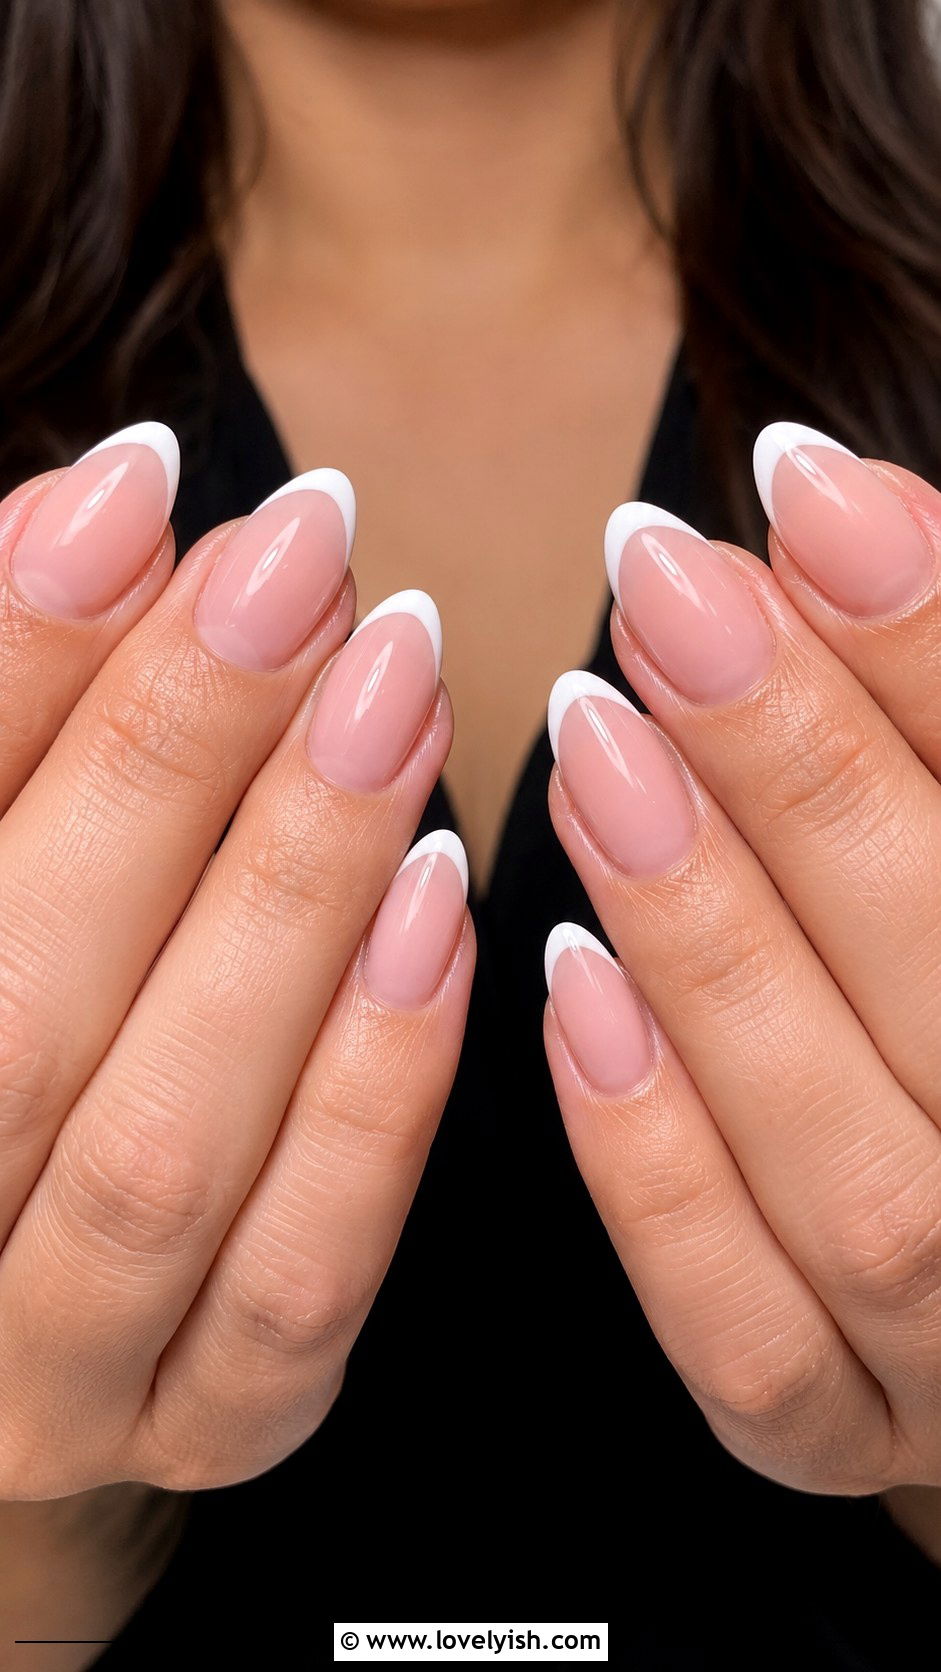
1. Classic White French Tip Nails

The white French tip is the gold standard for beginners because it’s clean, timeless, and works with any outfit. Start with a sheer pink or nude base, then use a thin striping brush or guide stickers to paint a crisp white line along the edge of each nail. Don’t stress about perfection—a slightly rounded tip looks soft and modern. A glossy topcoat smooths out small wobbles and adds a salon-finish shine. This look flatters every skin tone and nail shape, from short squares to long almonds. If you want a fresh twist, try thinner micro tips or swap white for soft pastel for a playful update. It’s an effortless design that always looks expensive.
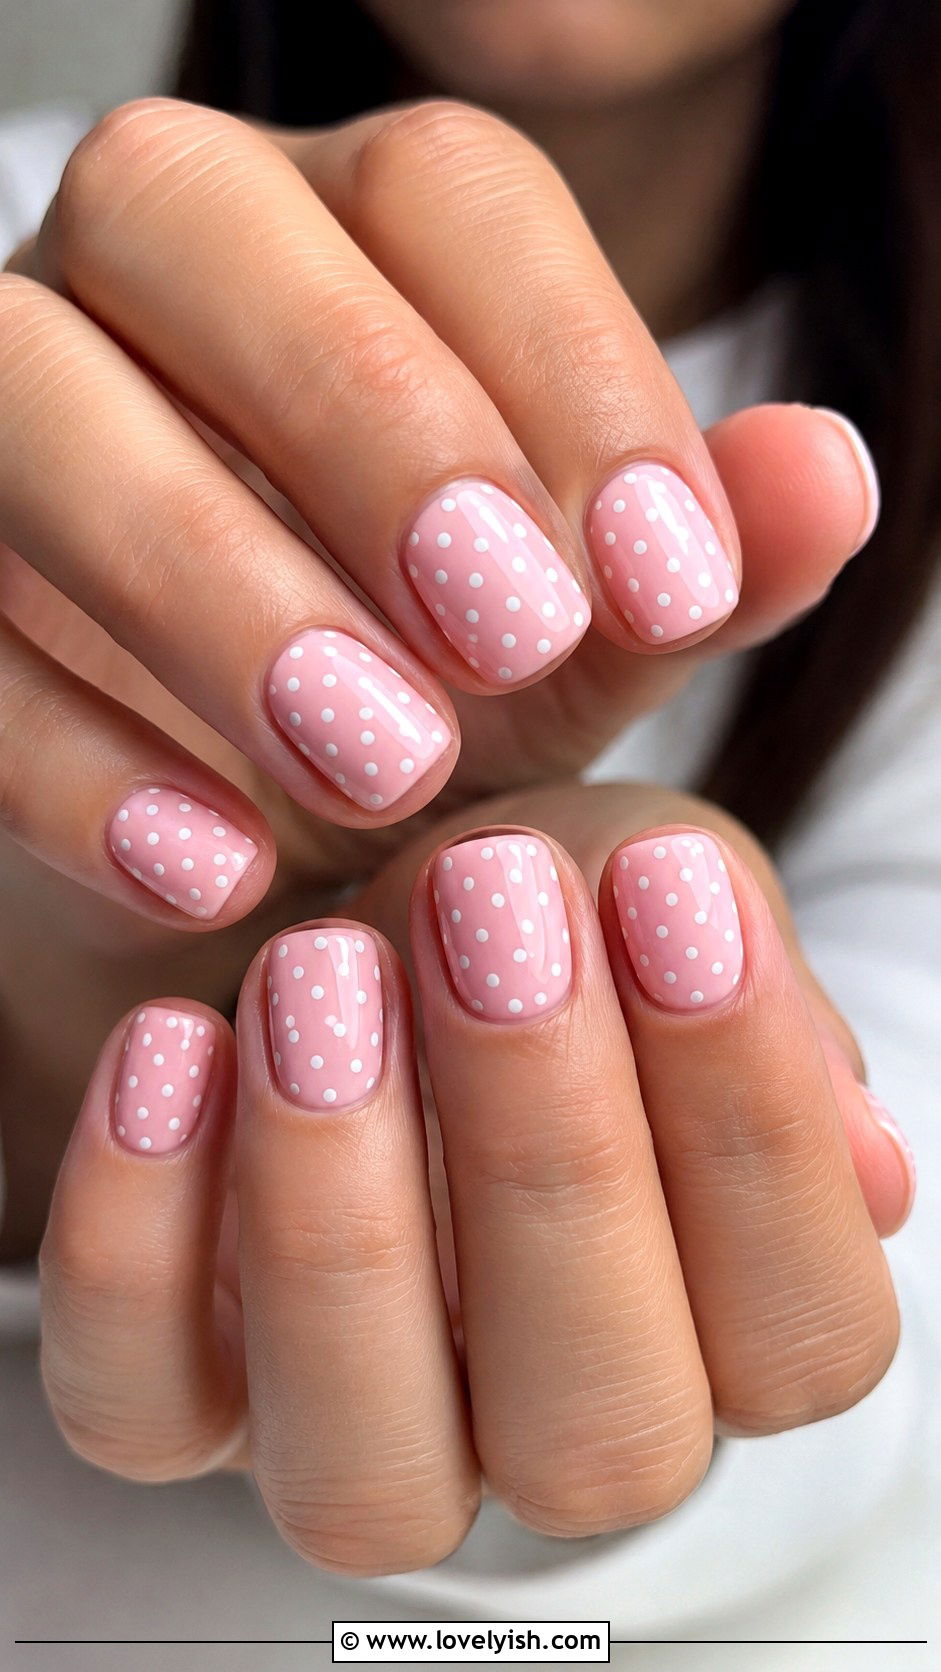
2. Pastel Pink Polka Dot Nails
Polka dots are practically foolproof, which makes them perfect for first-timers. Paint each nail in a creamy pastel pink, let it dry fully, then dip a dotting tool (or the back of a bobby pin) into white polish and press evenly spaced dots across each nail. The dots don’t need to be uniform—slight variation actually looks charming and intentional. You can keep all five nails dotted or alternate plain pink nails with dotted ones for balance. Seal it with a glossy topcoat to lock everything in. This design feels sweet, retro, and youthful without leaning too cute. It’s especially flattering on short to medium nails and pairs effortlessly with everyday casual looks.
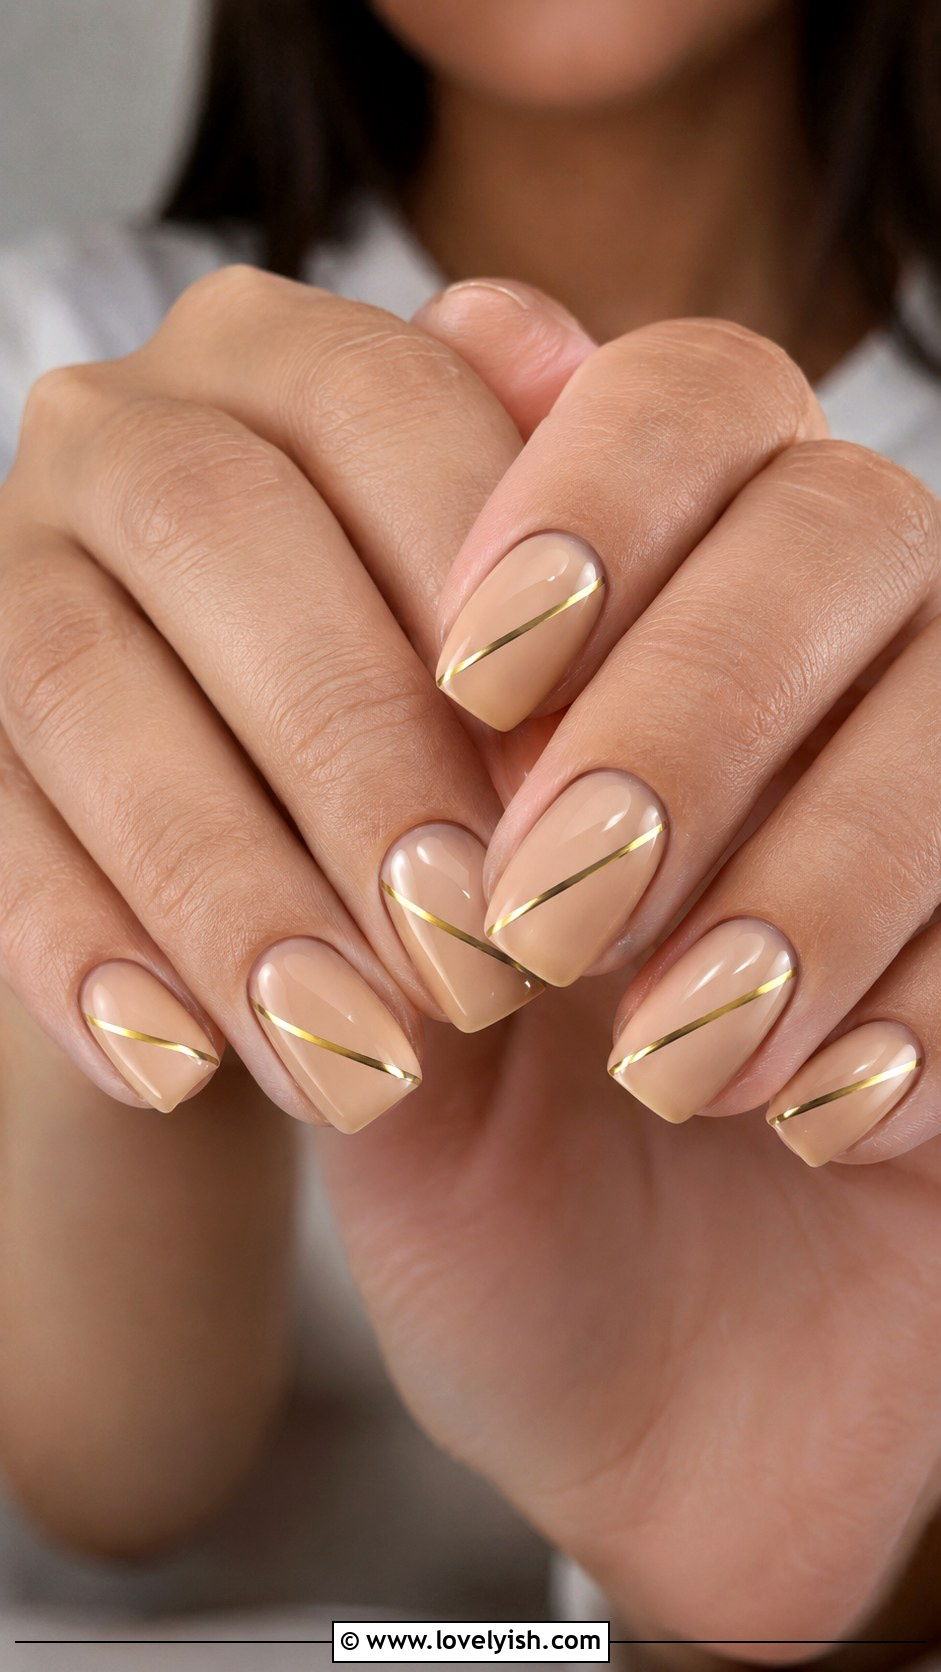
3. Nude Nails With Gold Stripe

A single thin gold stripe transforms basic nude nails into something quietly luxurious. Begin with two coats of a warm nude or beige polish that complements your skin tone. Once dry, peel a strip of striping tape and lay it diagonally or horizontally across each nail. Paint over with metallic gold polish, then carefully peel the tape while still wet for a clean line. If tape feels tricky, use a fine liner brush dipped in gold for a freehand version. Finish with a high-shine topcoat. The result is a minimalist, old-money-inspired manicure that works for offices, brunches, or weddings. It’s proof that one tiny detail can elevate the simplest base color beautifully.
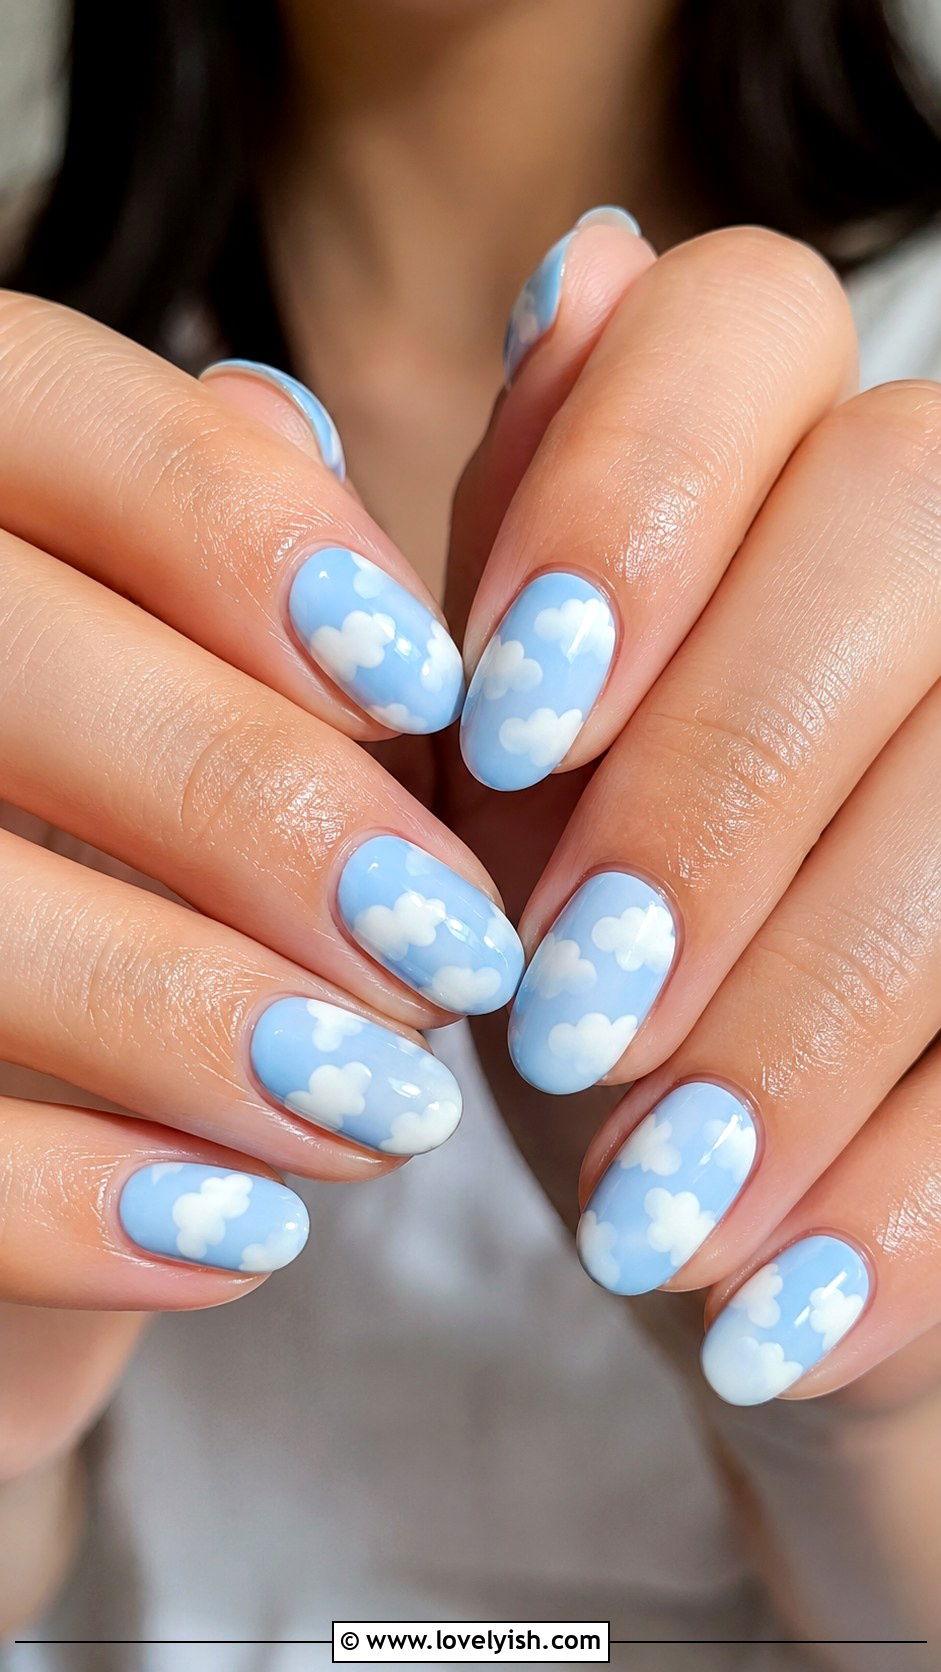
4. Baby Blue Cloud Nails
Cloud nails went viral for good reason—they’re dreamy, easy, and surprisingly forgiving. Paint your nails in a soft baby blue base and let them dry completely. Then, using a small dotting tool or thin brush dipped in white polish, draw small overlapping cloud shapes (think bumpy ovals) across each nail. The puffy, irregular shape means mistakes blend right in. Add a glossy topcoat to make the clouds pop against the sky-blue background. This look is whimsical and playful, perfect for spring or summer days. It works best on medium-length oval or almond nails but adapts well to short squares too. It’s a fun, dreamy design that feels like wearing a tiny piece of the sky.
5. Milky White Aura Nails
Aura nails look like soft glowing halos and require zero airbrush skills. Start with a sheer milky white base on each nail. While slightly tacky, dab a tiny amount of pastel pink, peach, or lavender polish onto a small makeup sponge and gently press it into the center of each nail. The sponge naturally diffuses the color into a soft circular glow. Build up the intensity in light layers until the aura is exactly how you want it. Seal with a glossy topcoat to smooth everything out. This trendy beginner design hides imperfections beautifully because the blurry effect is the whole point. Try different center colors per nail for a rainbow aura set.
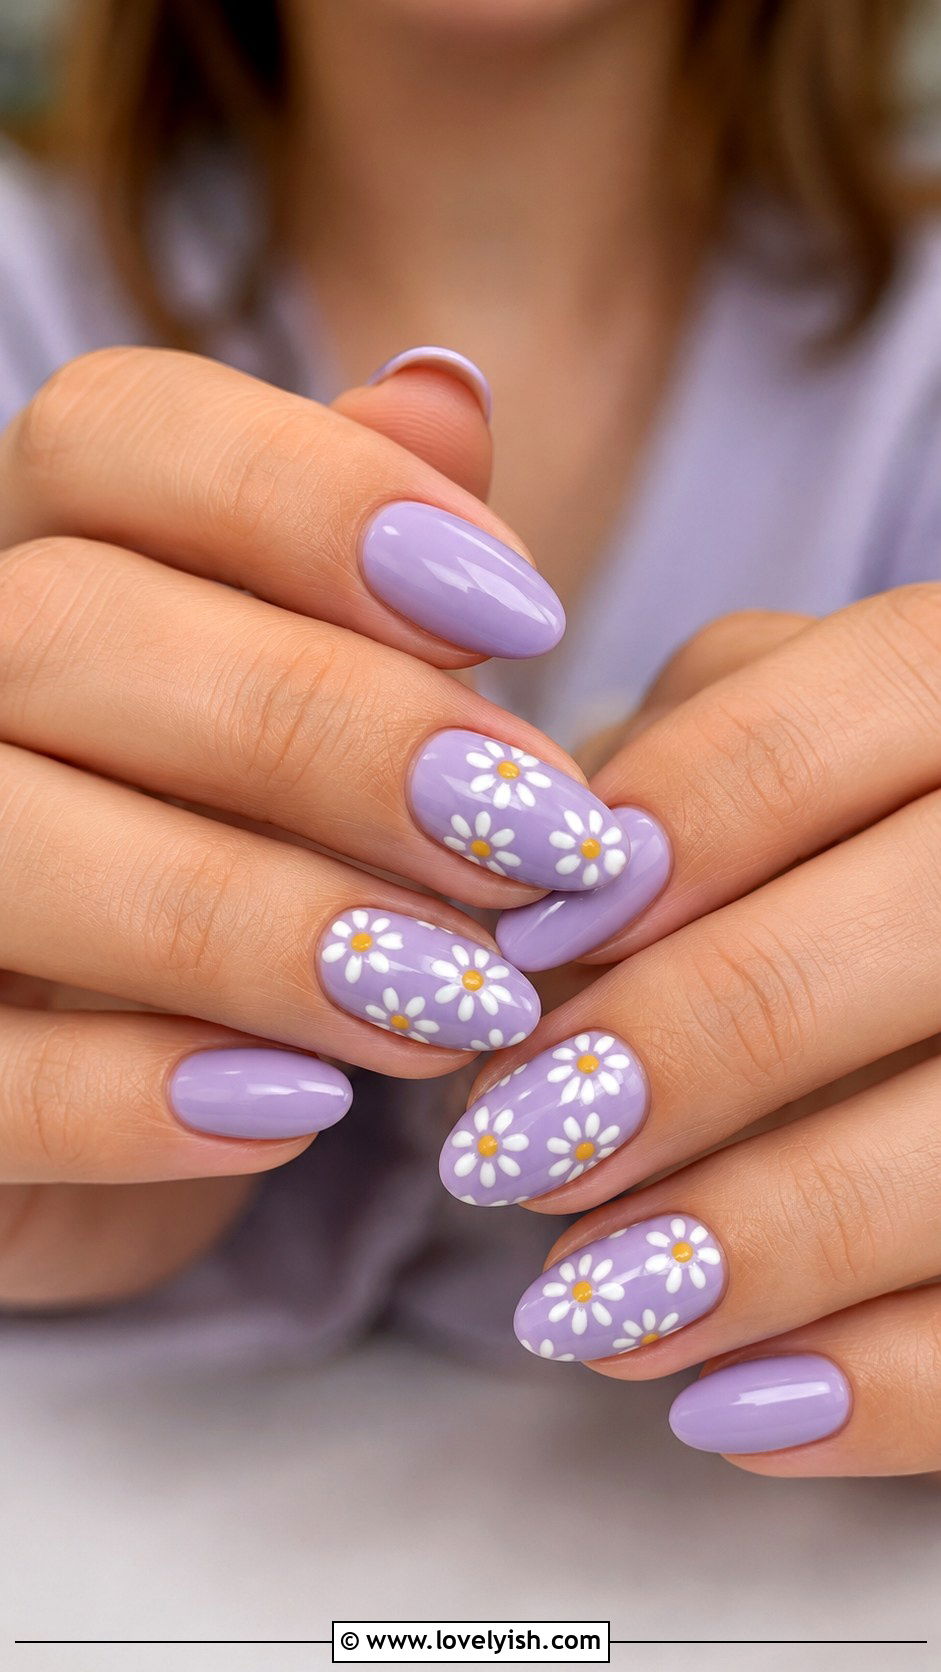
6. Lavender Daisy Flower Nails
Tiny daisies look intricate but are honestly just five small dots arranged in a circle. Paint your nails in a soft lavender shade for a fresh, springy base. Once dry, dip a dotting tool in white polish and place five dots in a circle on one or two nails to form daisy petals. Add a yellow dot in the middle of each flower for the daisy center. Keep the rest of the nails plain lavender for balance. A glossy topcoat melts everything together. This design is sweet, garden-inspired, and beginner-friendly because flowers don’t need to be perfect to look pretty. It’s a gorgeous choice for spring brunches, picnics, or any easy daytime occasion.
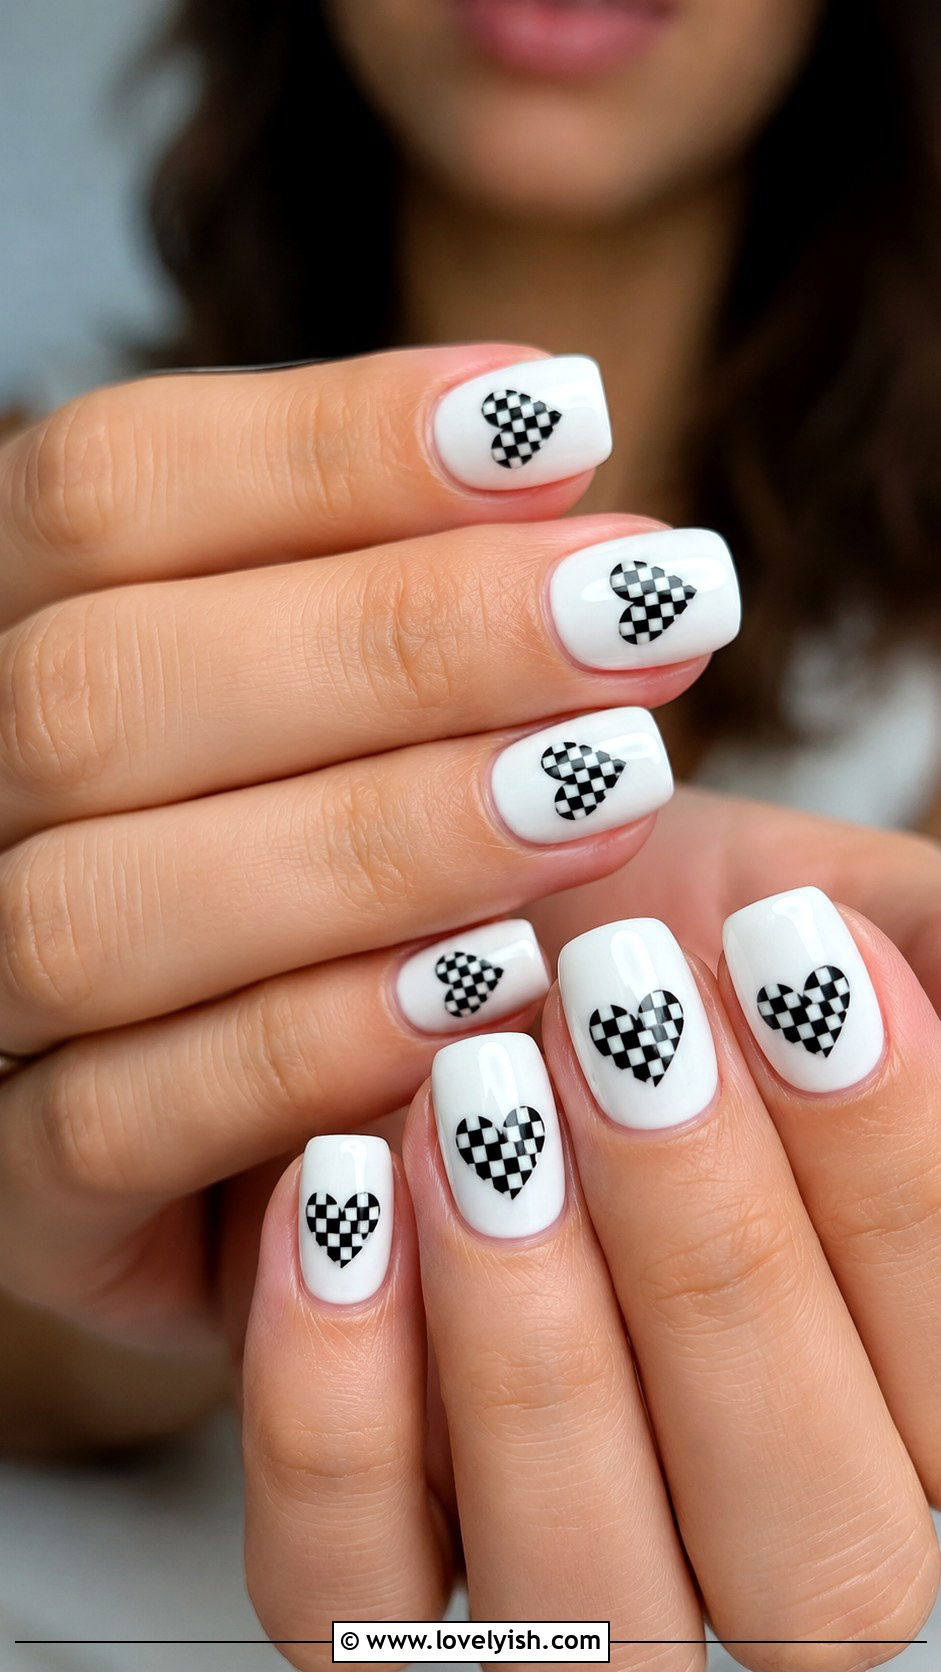
7. Black and White Checkerboard Nails
Checkerboard nails feel edgy and graphic but only need two polishes and patience. Start with a clean white base across all nails. Once fully dry, use a fine liner brush dipped in black polish to draw a tic-tac-toe grid on one or two accent nails. Fill in alternating squares with black to create the classic checker pattern. Keep the remaining nails solid white for a clean, modern feel. A topcoat smooths the lines and adds gloss. The trick is letting each layer dry completely before moving on. This look is bold, retro, and surprisingly versatile—wear it with streetwear or even dress it up. It’s a fun way to practice steady-hand line work as a beginner.
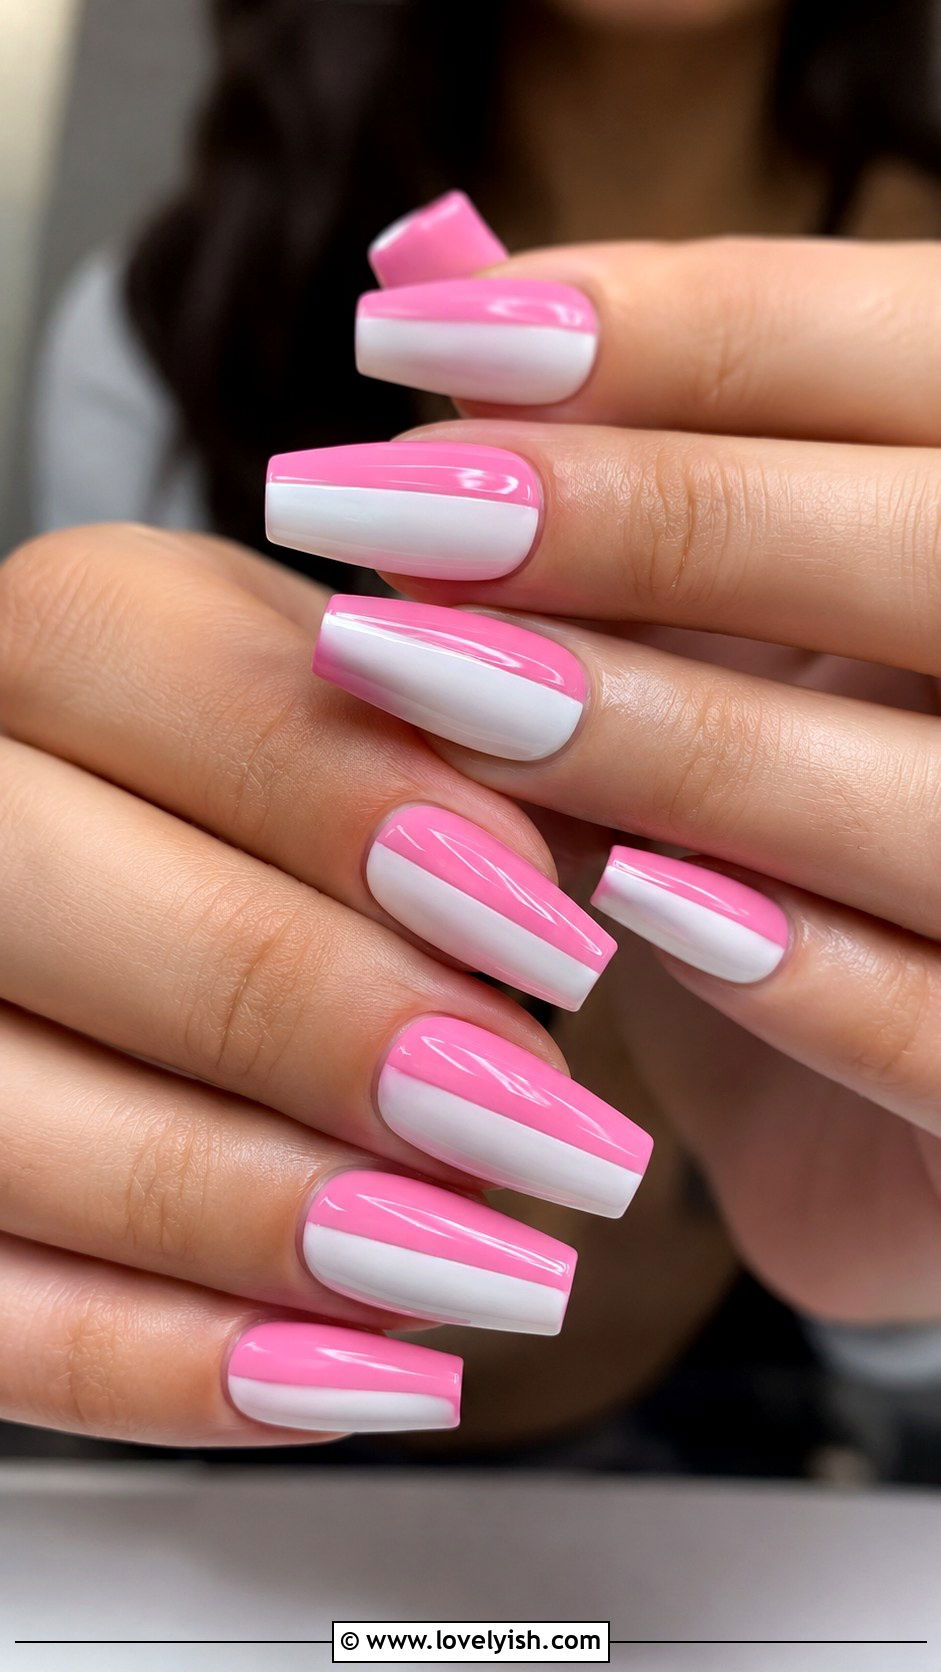
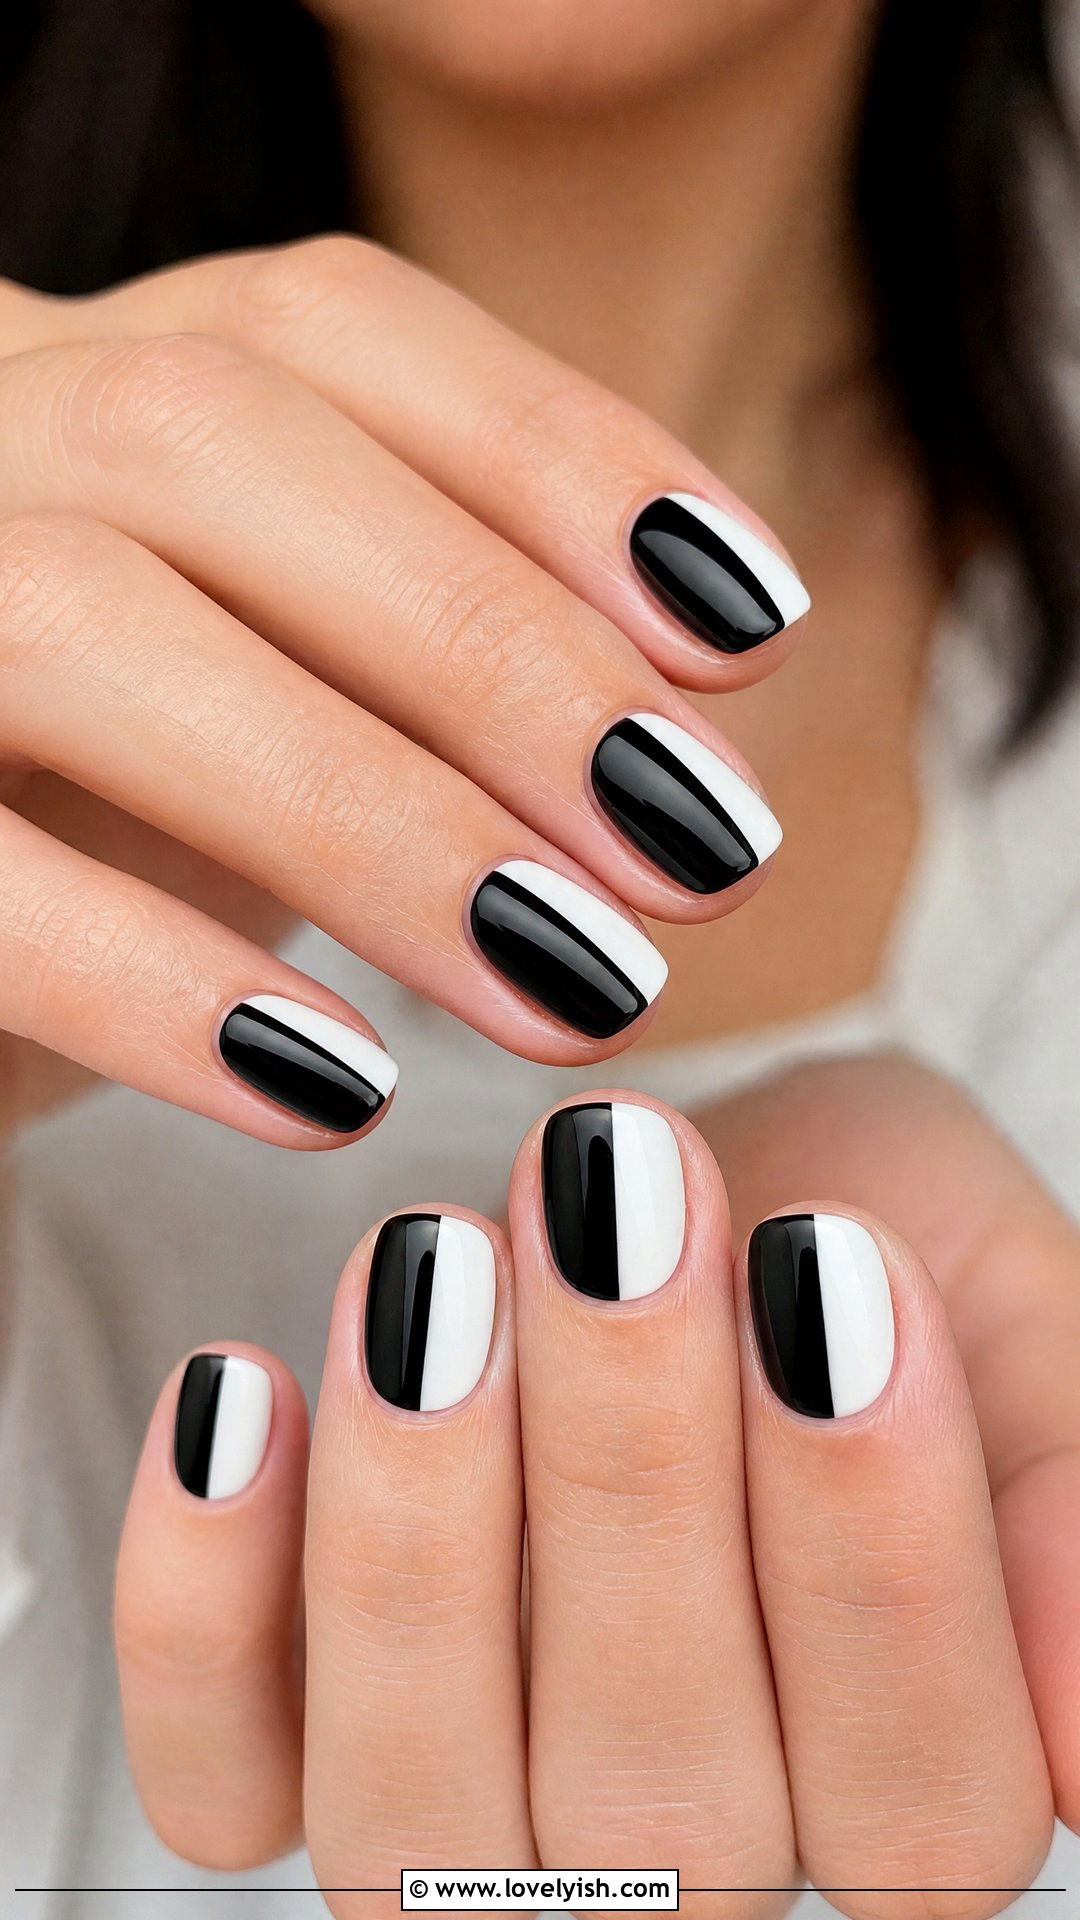
8. Pink and White Color Block Nails
Color blocking is one of the easiest ways to create high-impact nail art. Paint half of each nail in soft white and the other half in bubblegum pink, splitting them either vertically down the middle or diagonally. Use striping tape if you want crisp lines, or freehand it for a softer look. The two colors don’t need to meet perfectly—a slightly imperfect divide actually feels modern. Finish with a glossy topcoat to blend any tiny gaps. This design is bold, cheerful, and feels straight off Pinterest. Mix up which side is pink versus white on different fingers for extra visual interest. It’s a perfect summer go-to for beginners who want something graphic but uncomplicated.
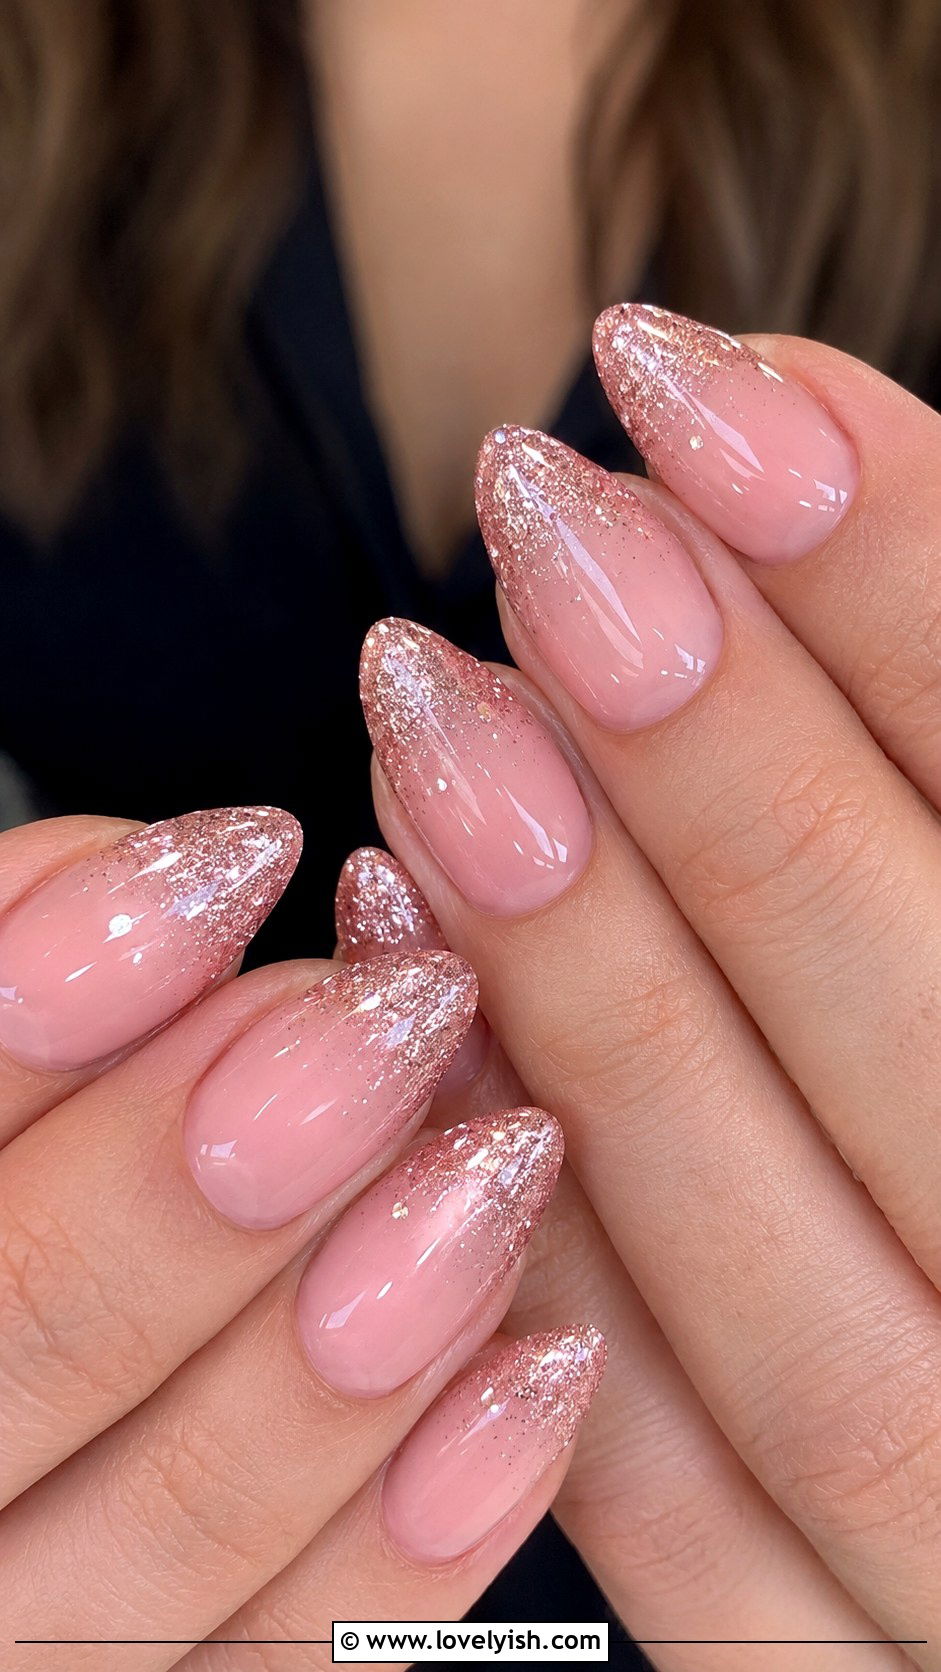
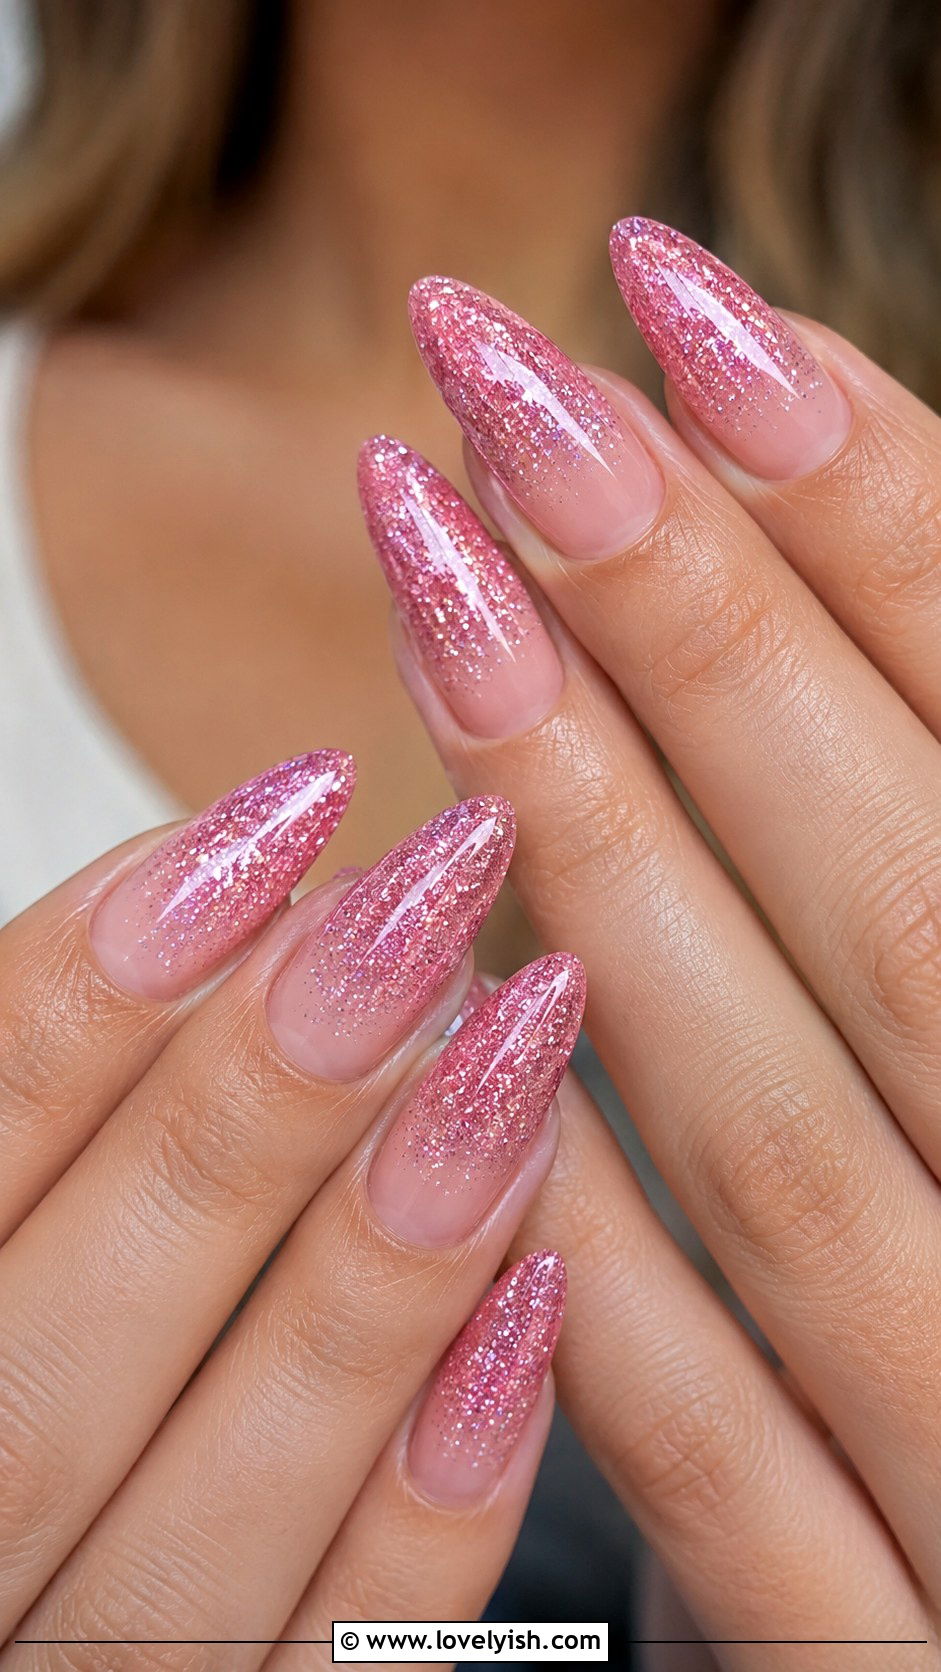
9. Pink Glitter Tip Nails
Glitter is incredibly forgiving, which makes glitter tips ideal for nail art newbies. Paint each nail in a sheer pink or nude base for a clean canvas. Once dry, dip a small flat brush or sponge applicator into fine pink or rose-gold glitter polish and press it onto the very tip of each nail. Build up the intensity with two to three layers until you get a soft glittery fade. The sparkle naturally disguises any wobbly edges. Seal with a thick glossy topcoat to smooth the texture. This design looks dreamy, romantic, and party-ready without requiring any precise lines. It’s a beginner favorite because glitter tips work on every nail length and skin tone effortlessly.
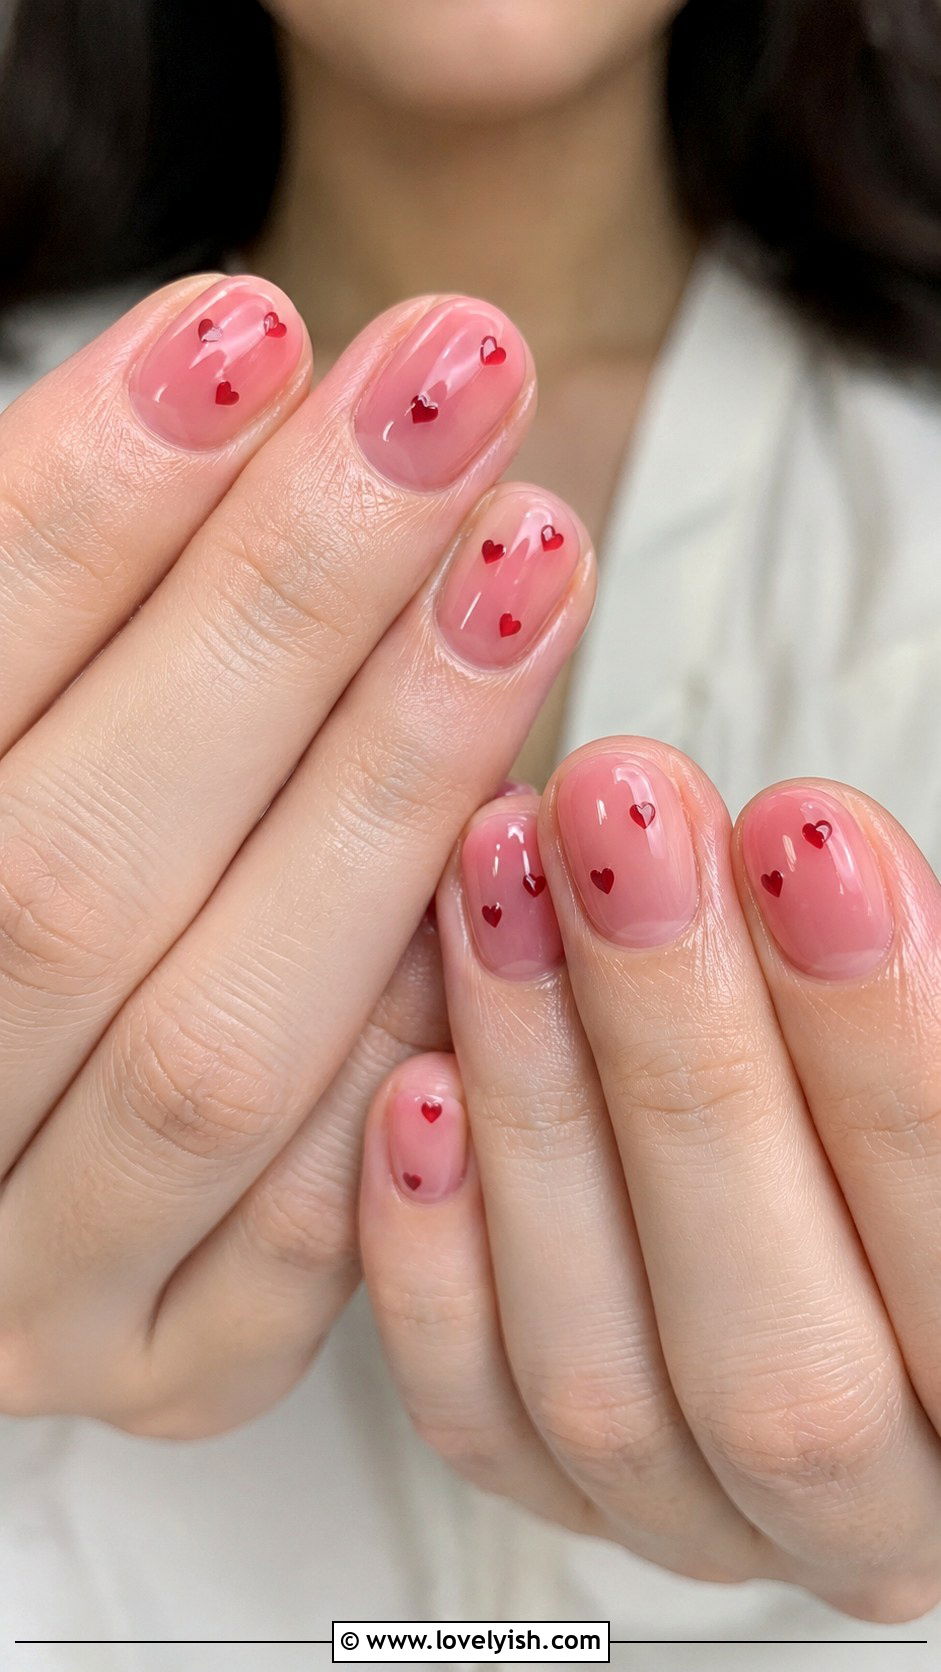
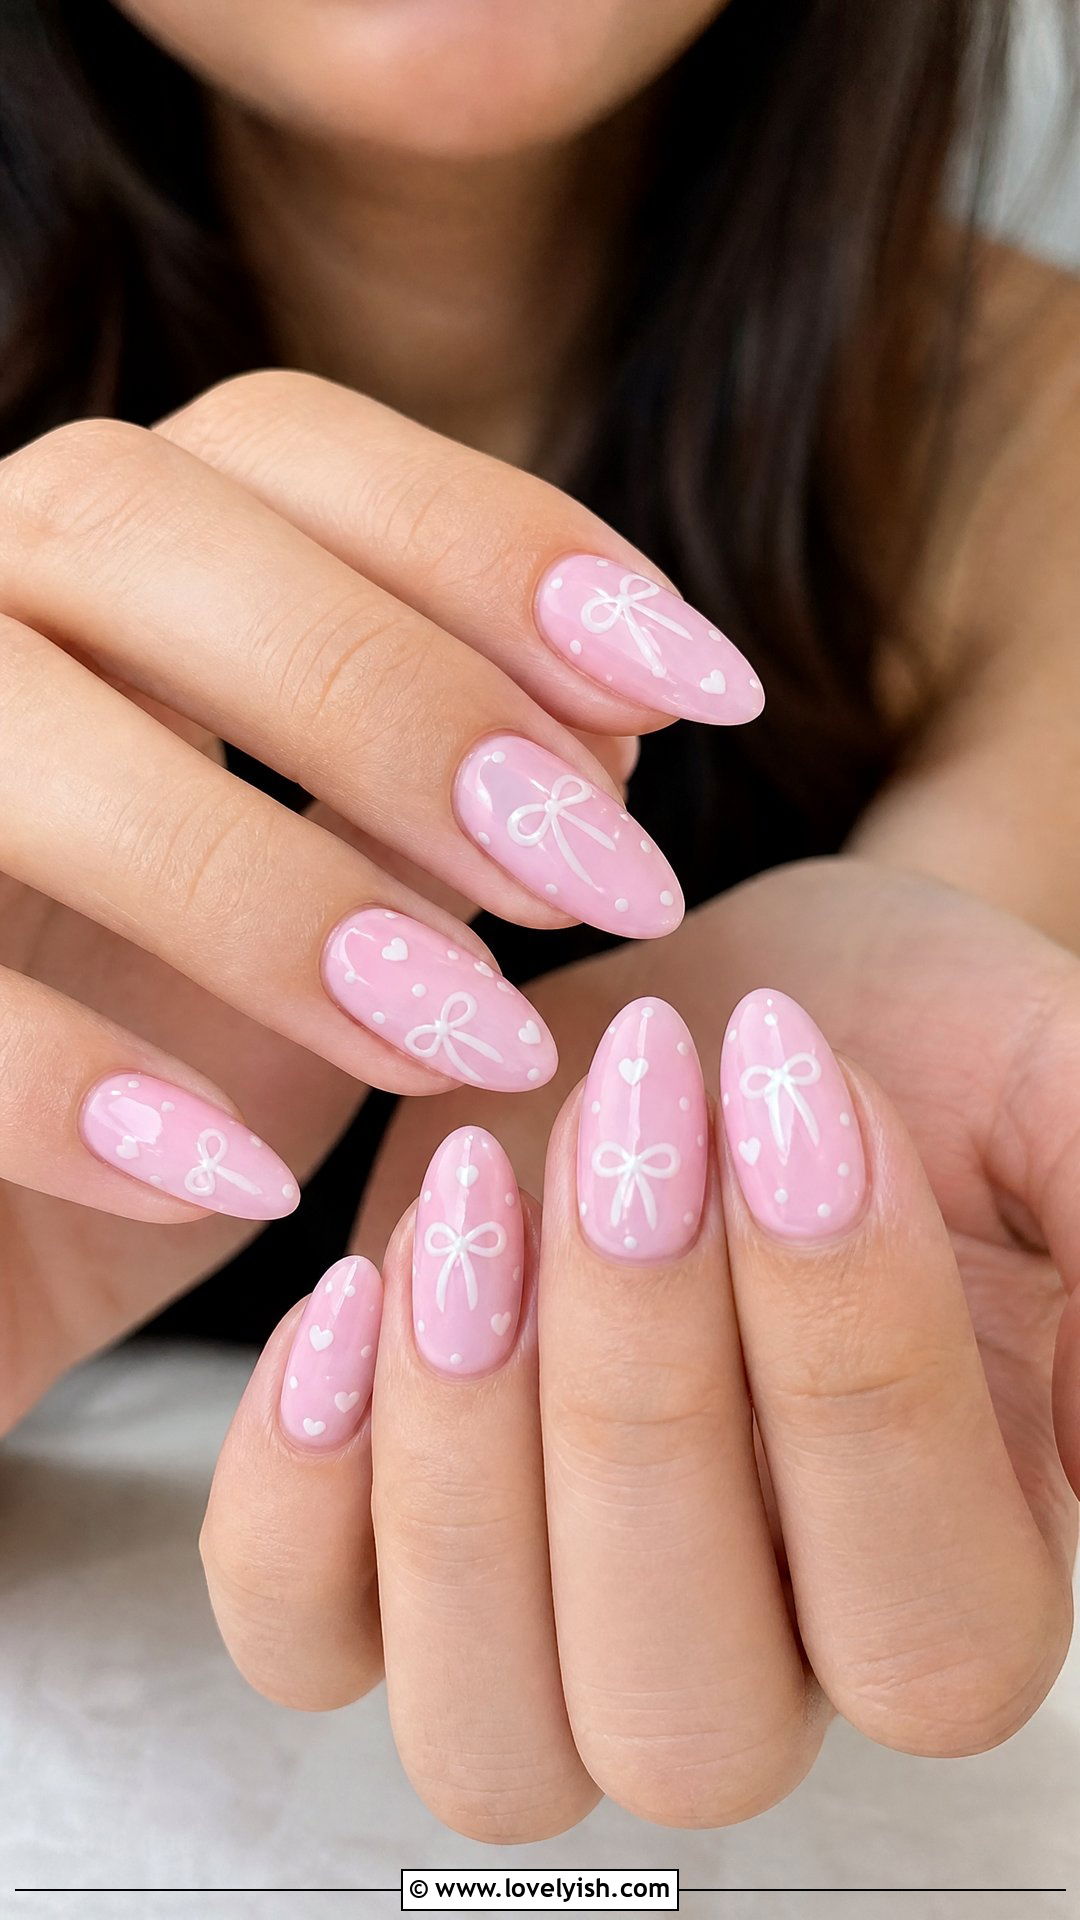
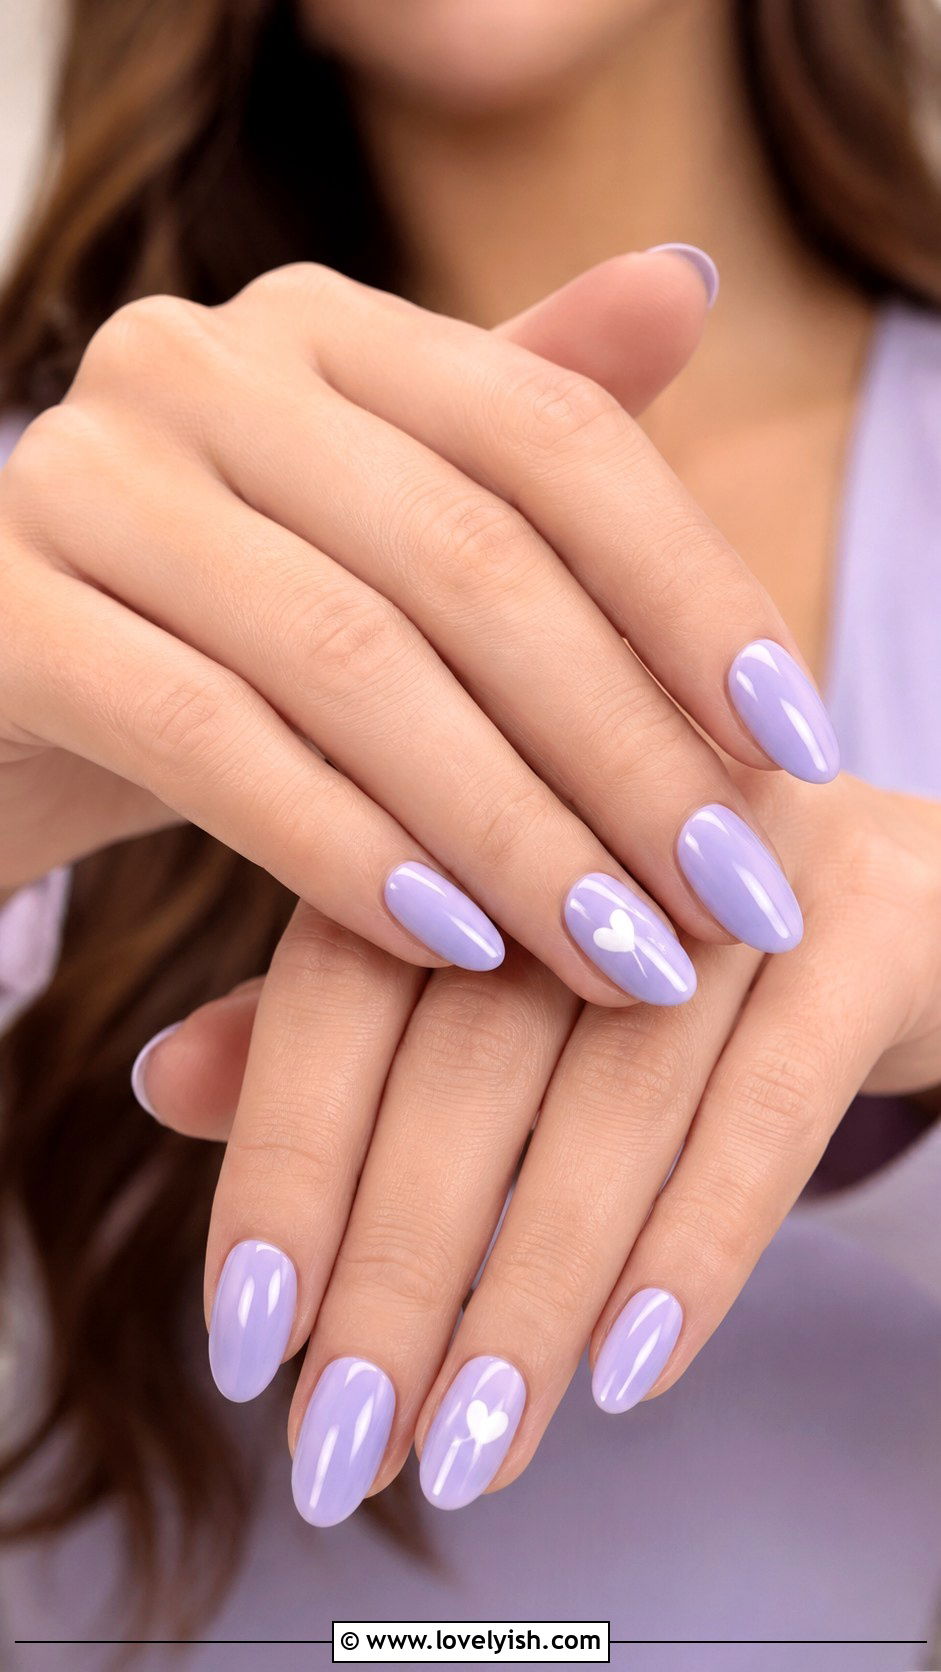
10. Sheer Pink Heart Nails
Tiny heart accents bring an instant cute-girl charm to a basic manicure. Start with a sheer pink jelly base on all nails for that glossy, glass-like finish. Once dry, use a dotting tool dipped in red or hot pink polish to make two small dots side by side, then drag the polish down into a V-shape to form a heart. Place one heart on the ring finger as an accent, or scatter mini hearts across all nails. A glossy topcoat seals everything beautifully. The sheer base hides imperfections while the hearts add personality. This look is sweet, simple, and works for everyday wear, especially in spring and summer when soft pinks feel right at home.
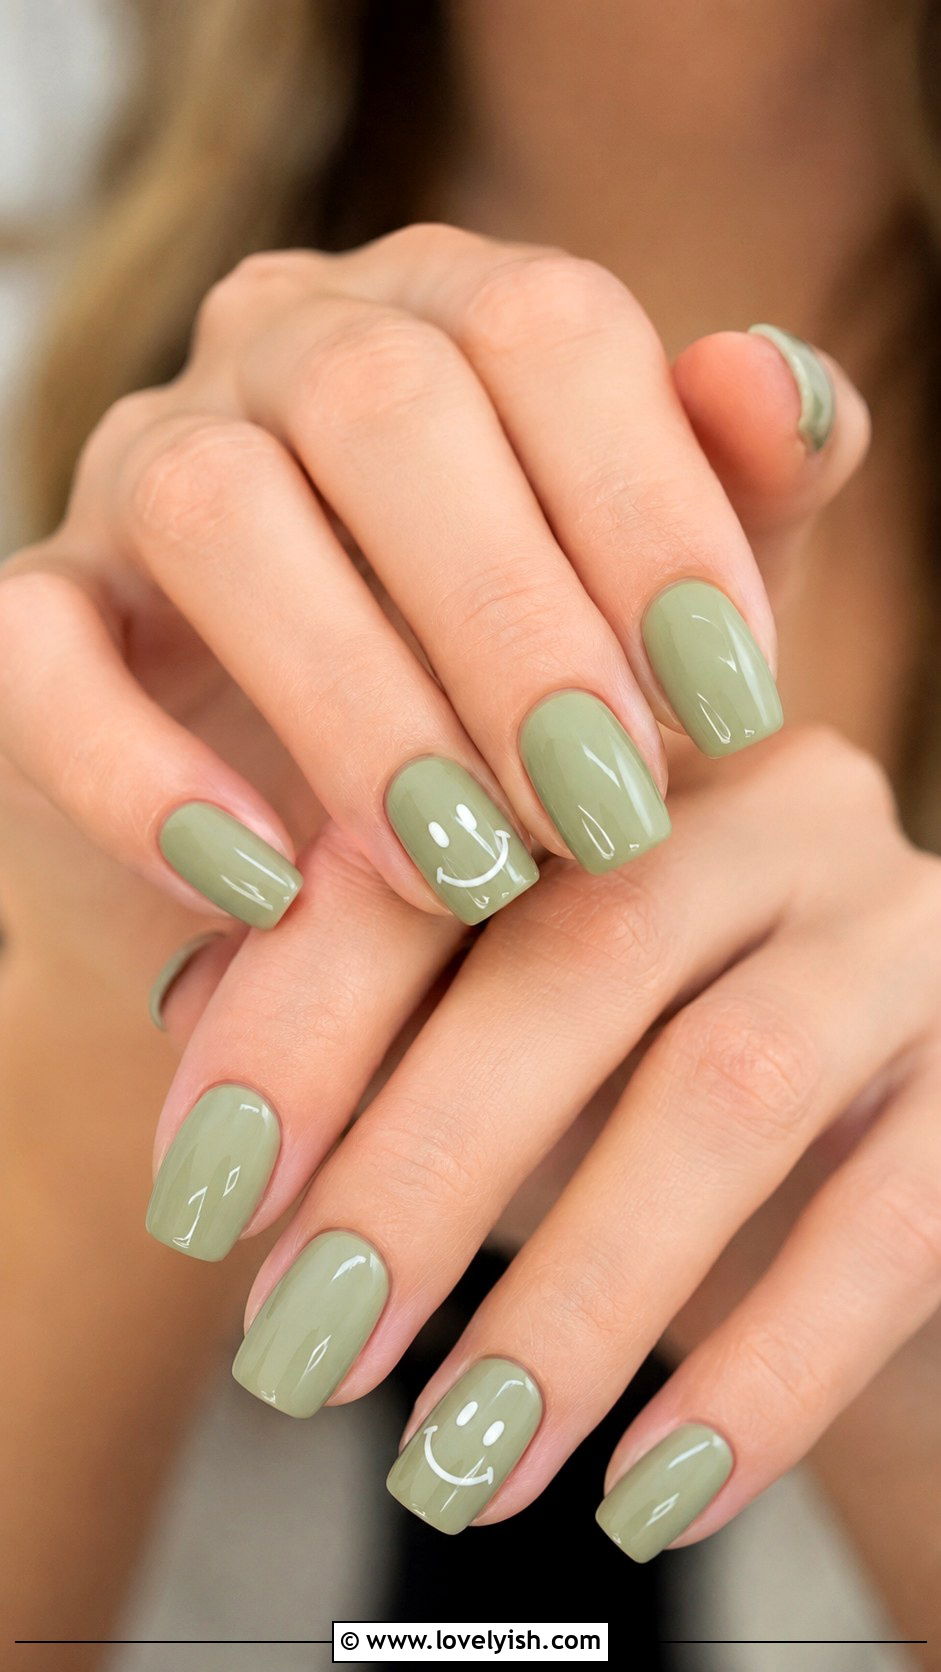
11. Sage Green Smiley Face Nails

Smiley face nails are a Y2K-inspired favorite that’s incredibly easy to recreate. Paint each nail in a soft sage green base and let it dry. Using a dotting tool or fine liner brush dipped in white or yellow polish, place two small dots for eyes on one accent nail. Then draw a curved U-shape underneath for the smile. Keep the other nails plain sage green or add a tiny dot detail for cohesion. Top with a glossy finish to lock it in. The smiley doesn’t need to be perfectly symmetrical—part of the charm is its hand-drawn feel. This design is upbeat, nostalgic, and fun, making it a top pick for beginners wanting personality without complexity.
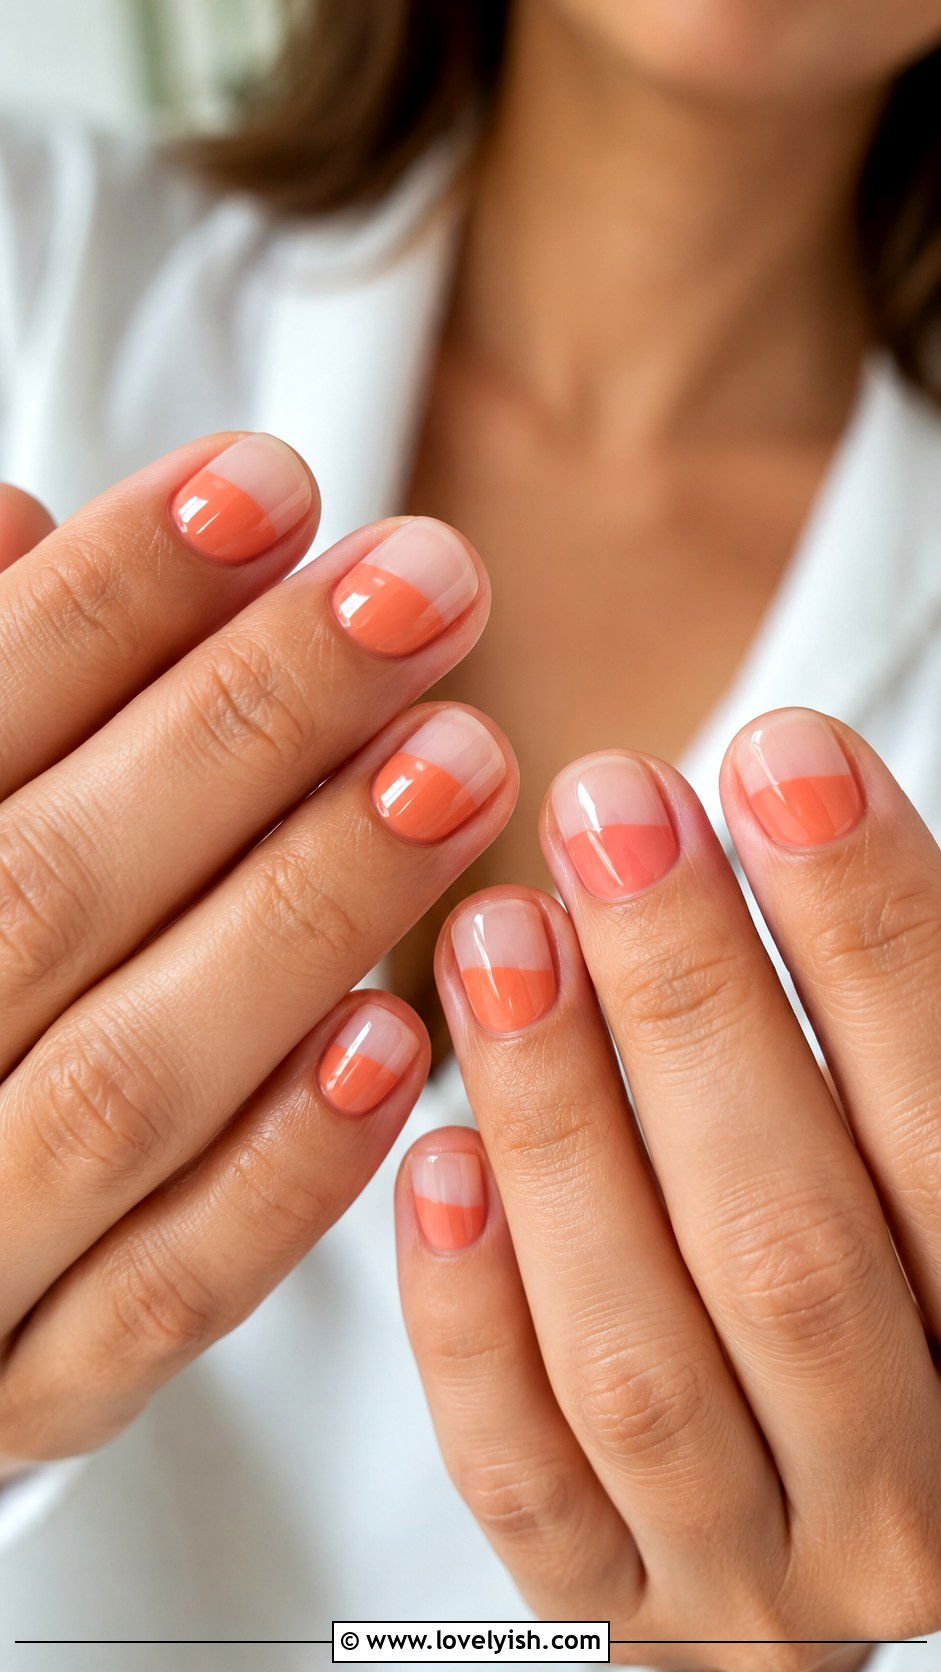
12. Coral Negative Space Nails
Negative space designs let your natural nail show through, which means less polish and easier execution. Buff your nails clean and apply a clear base coat. Then paint a coral or warm peach polish only on the lower half of each nail, leaving the tip and a small section near the cuticle bare. You can angle the painted area diagonally for a modern twist. Use striping tape for sharper edges if you’d like. Finish with a clear topcoat over the whole nail. This minimalist style feels editorial and artsy without requiring detailed work. It flatters short and medium nails especially well and is a fantastic beginner project for anyone who loves clean, modern aesthetics.
13. Nude Nails With Black Line Art
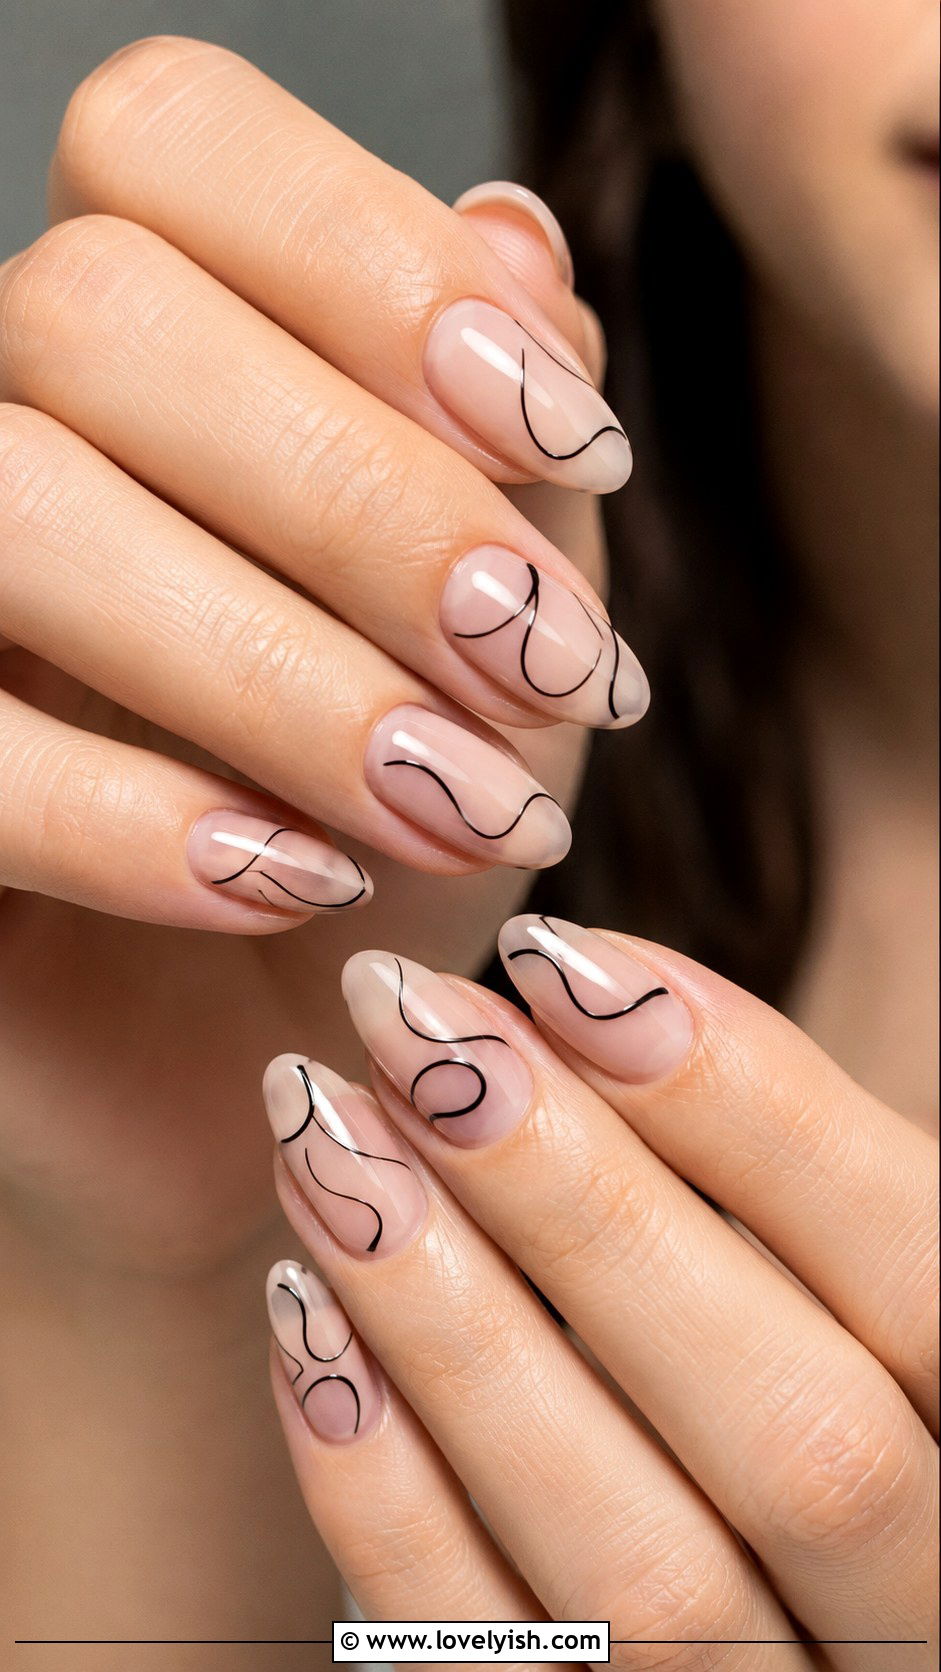
Abstract line art looks like a gallery piece but takes minimal skill. Paint each nail in a creamy nude base that suits your skin tone. Once dry, dip a thin liner brush into black polish and draw simple squiggles, single curves, or one continuous line across one or two accent nails. Don’t overthink the shapes—wonky, freehand lines look intentionally artsy. Keep the rest of the nails plain nude to let the design breathe. Seal with a glossy topcoat. This look feels modern, minimalist, and chic, perfect for anyone who loves clean aesthetics. It’s also a great way to practice brush control. Try one bold line per nail for a cohesive abstract set that feels gallery-worthy.
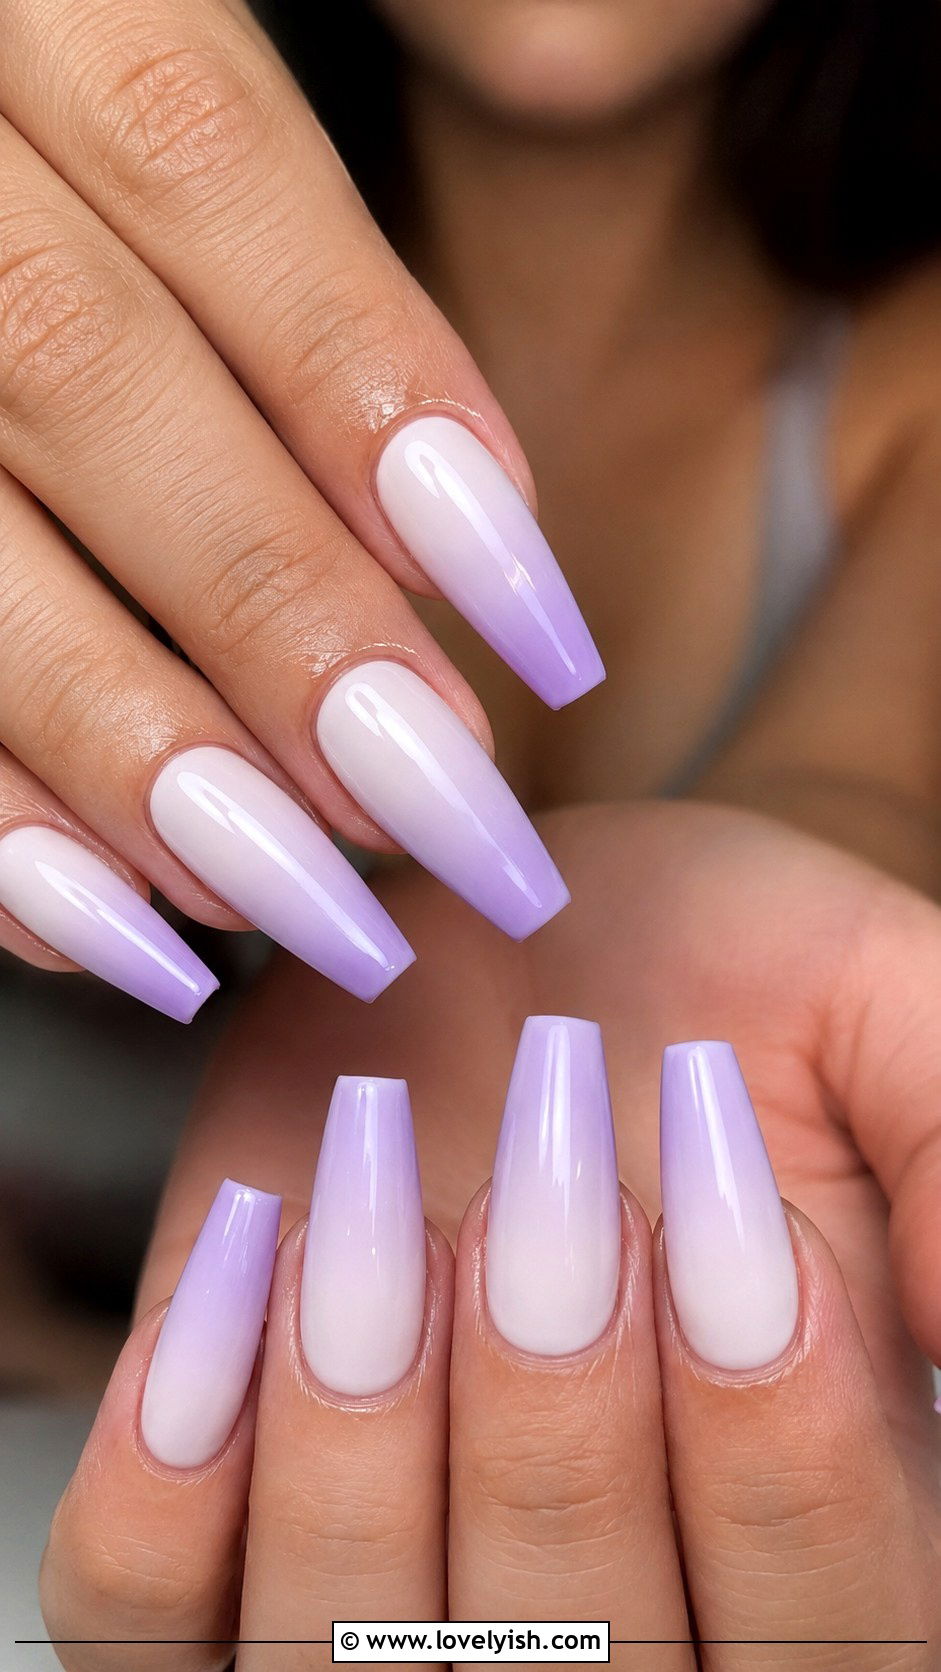
14. Lilac Ombre Nails
Ombre nails look professional but only need a sponge and two polishes. Start with a white base coat on each nail to make the colors pop. Paint two stripes—white and lilac—next to each other on a small makeup sponge. Press the sponge gently onto the nail, slightly rocking it back and forth to blend the colors. Repeat the process two or three times until the gradient looks smooth. Clean up any polish on the skin with a small brush dipped in remover. Finish with a glossy topcoat to merge everything together. The blurred transition hides mistakes naturally, making this technique a beginner favorite. Lilac feels soft, dreamy, and incredibly flattering across all skin tones.
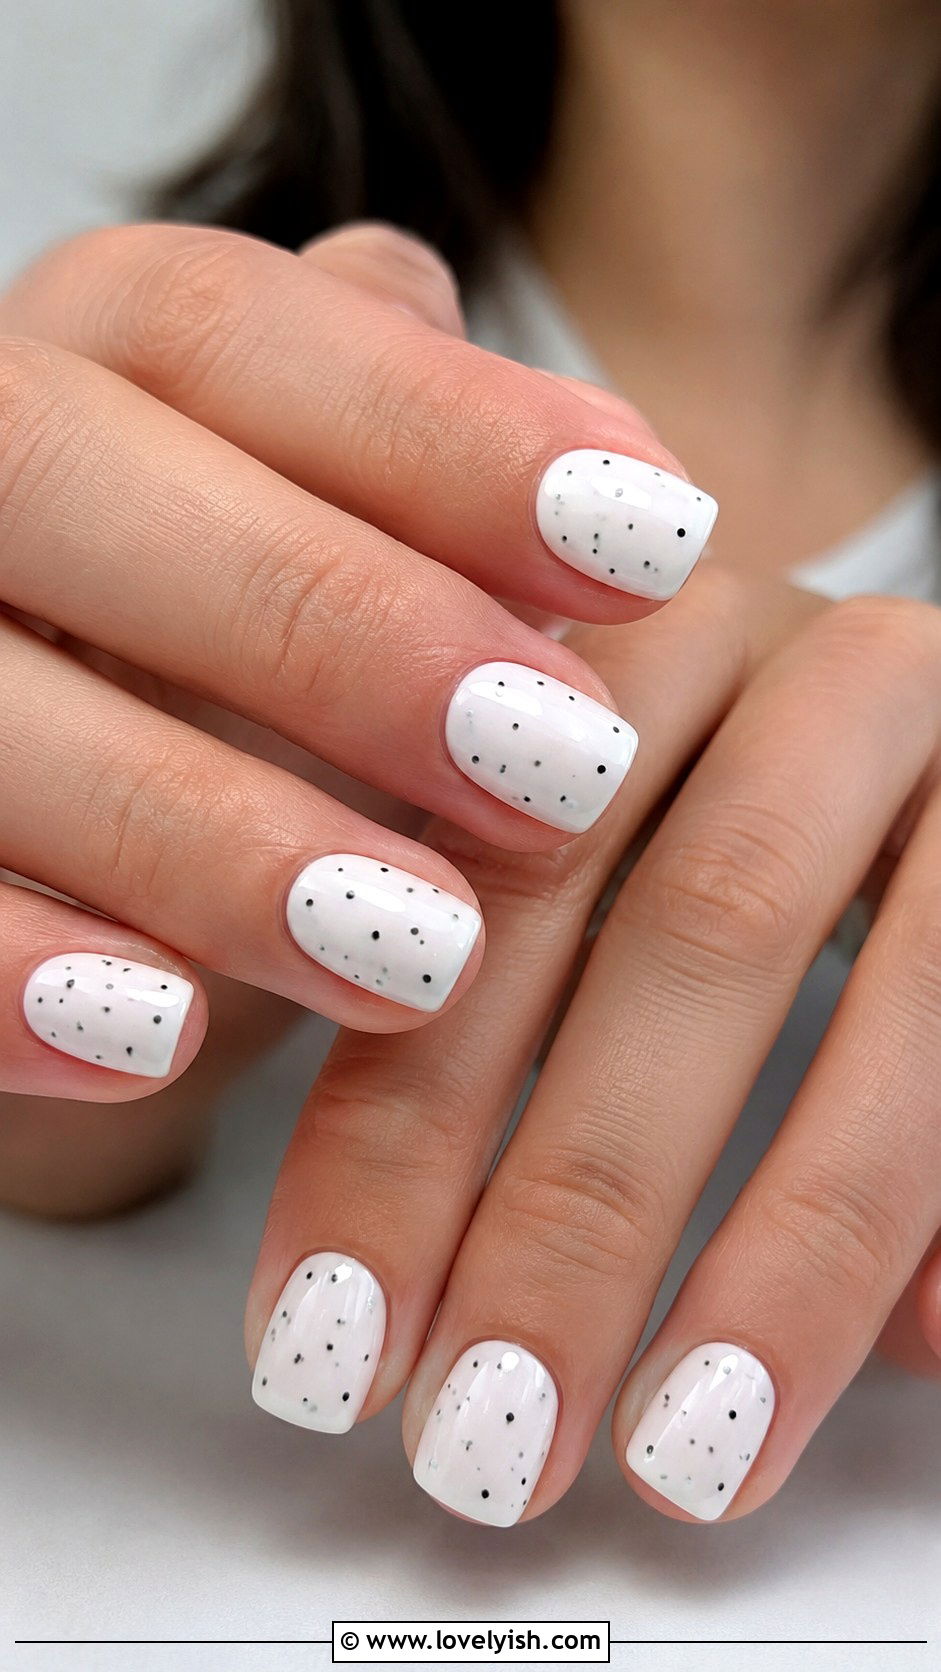
15. White Nails With Black Micro Dots
Micro dots are the easiest way to add interest to plain nails. Paint each nail in a clean white base and let it dry fully. Dip the tip of a toothpick or fine dotting tool into black polish and place tiny scattered dots randomly across each nail. The size and spacing don’t need to be exact—random placement looks intentional. Keep the dots small and minimal for a modern minimalist vibe. Seal with a glossy topcoat. This monochrome look is graphic, clean, and feels like high fashion despite being incredibly simple. It works beautifully on short squares or medium almonds and pairs with literally any outfit. A perfect starter design for anyone nervous about freehand work.
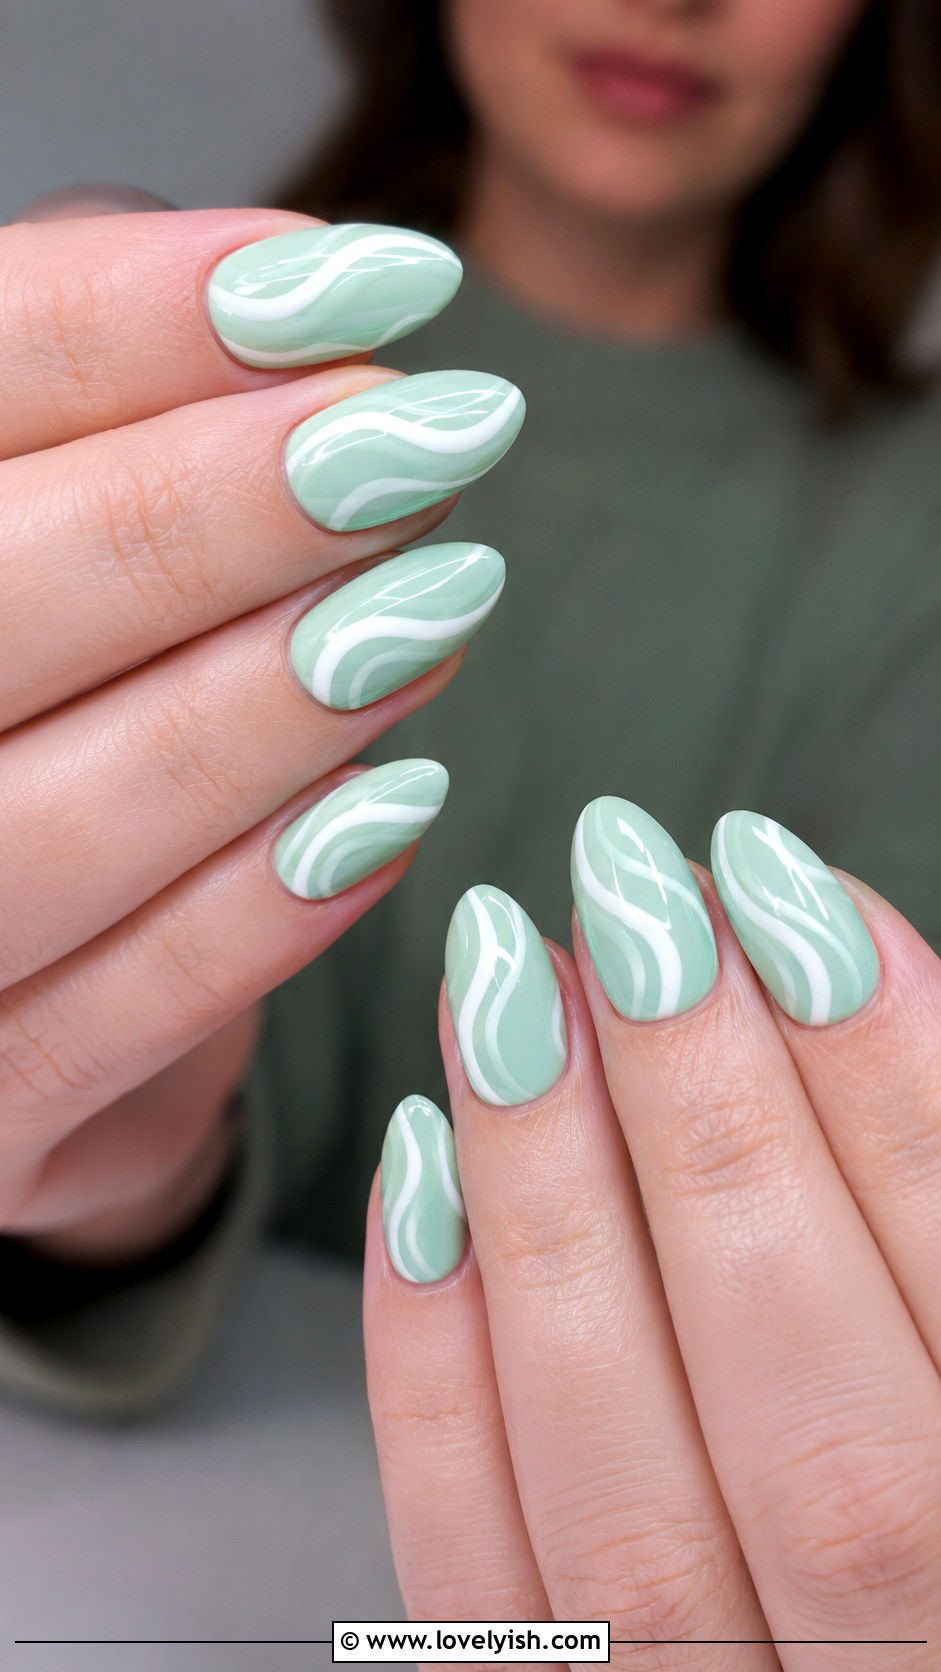
16. Mint Green Swirl Nails
Swirls are surprisingly easy because they’re meant to look loose and freehand. Paint each nail in a soft mint green base and let it dry. Using a thin liner brush or striping brush dipped in white polish, draw an S-shaped curve across each nail in one steady motion. The line can swoop diagonally or wave gently—wherever your hand naturally goes. Don’t worry about thickness varying; it adds character. Top everything with a glossy finish for a sleek look. Mint green feels fresh, springy, and unique without being too bold. This design is breezy, playful, and incredibly photogenic. It’s a fan favorite among beginners because swirls forgive shaky hands better than almost any other technique.
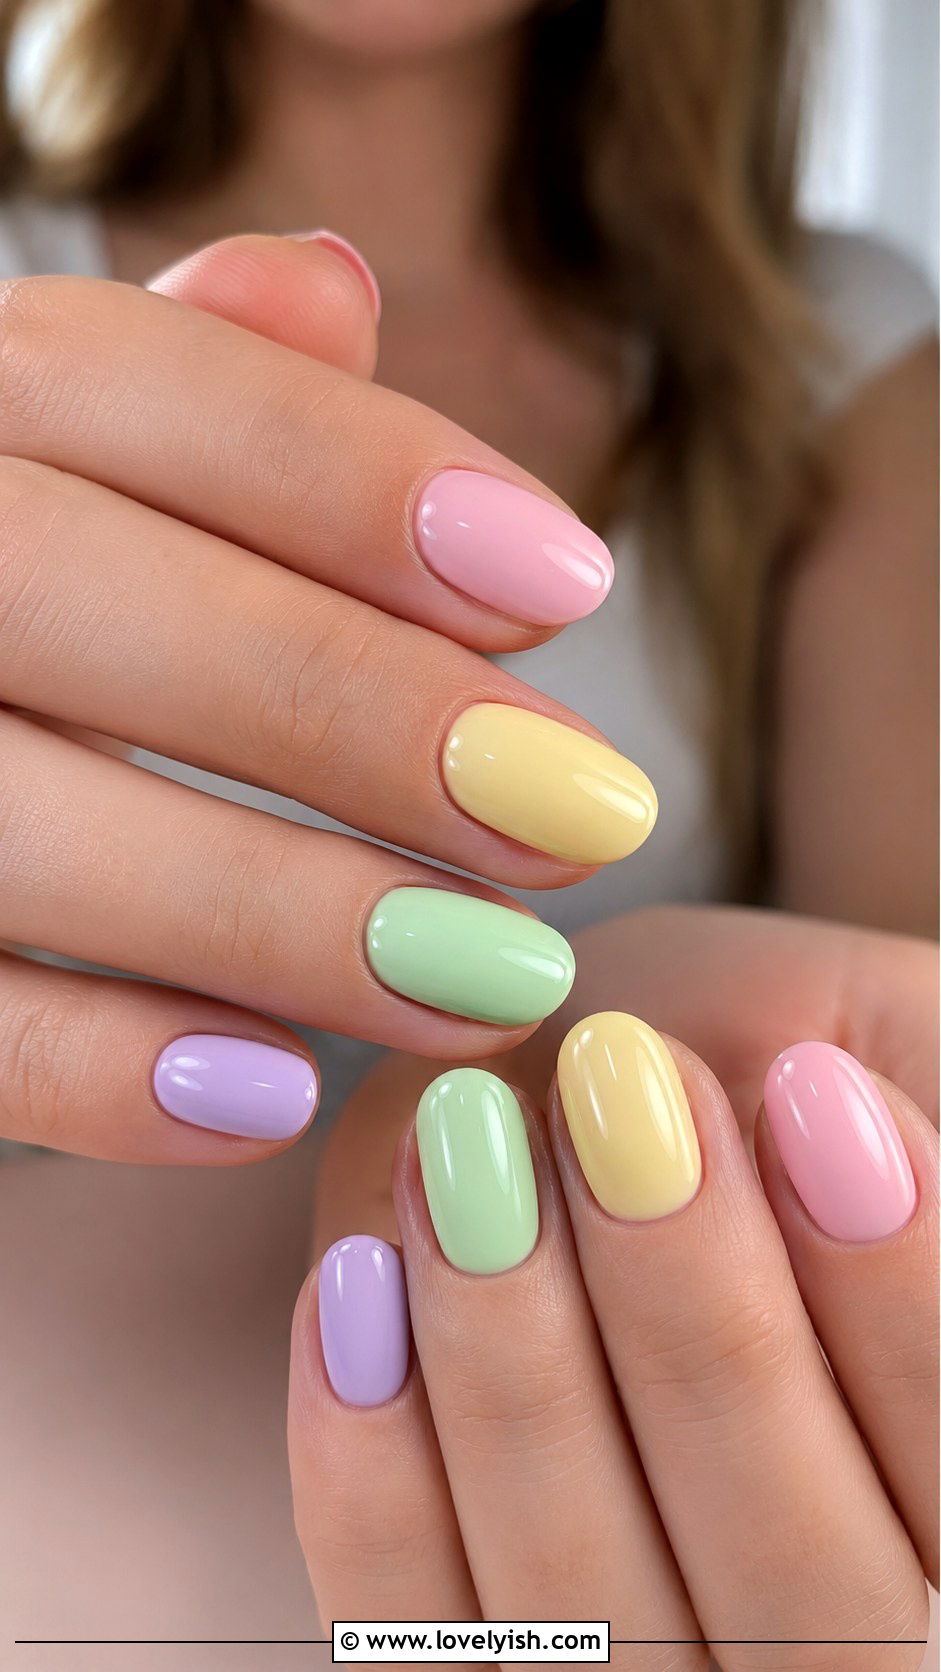
17. Pastel Rainbow Nails
A pastel rainbow set is bright, cheerful, and great for practicing color combos. Paint each nail a different soft pastel shade—try pink, peach, yellow, mint, and lavender—for a sweet rainbow lineup. The trick is choosing tones with similar saturation so they look cohesive rather than clashing. Two coats of each polish give the cleanest finish. Add a glossy topcoat to every nail for a unified shine. This style is endlessly flattering because the soft tones suit any skin tone and any season. Beginners love it because there’s zero detailed art involved—just multiple polishes lined up. Try matte topcoat instead for a chalky, modern look. It’s a simple, mood-boosting manicure for sunny days.
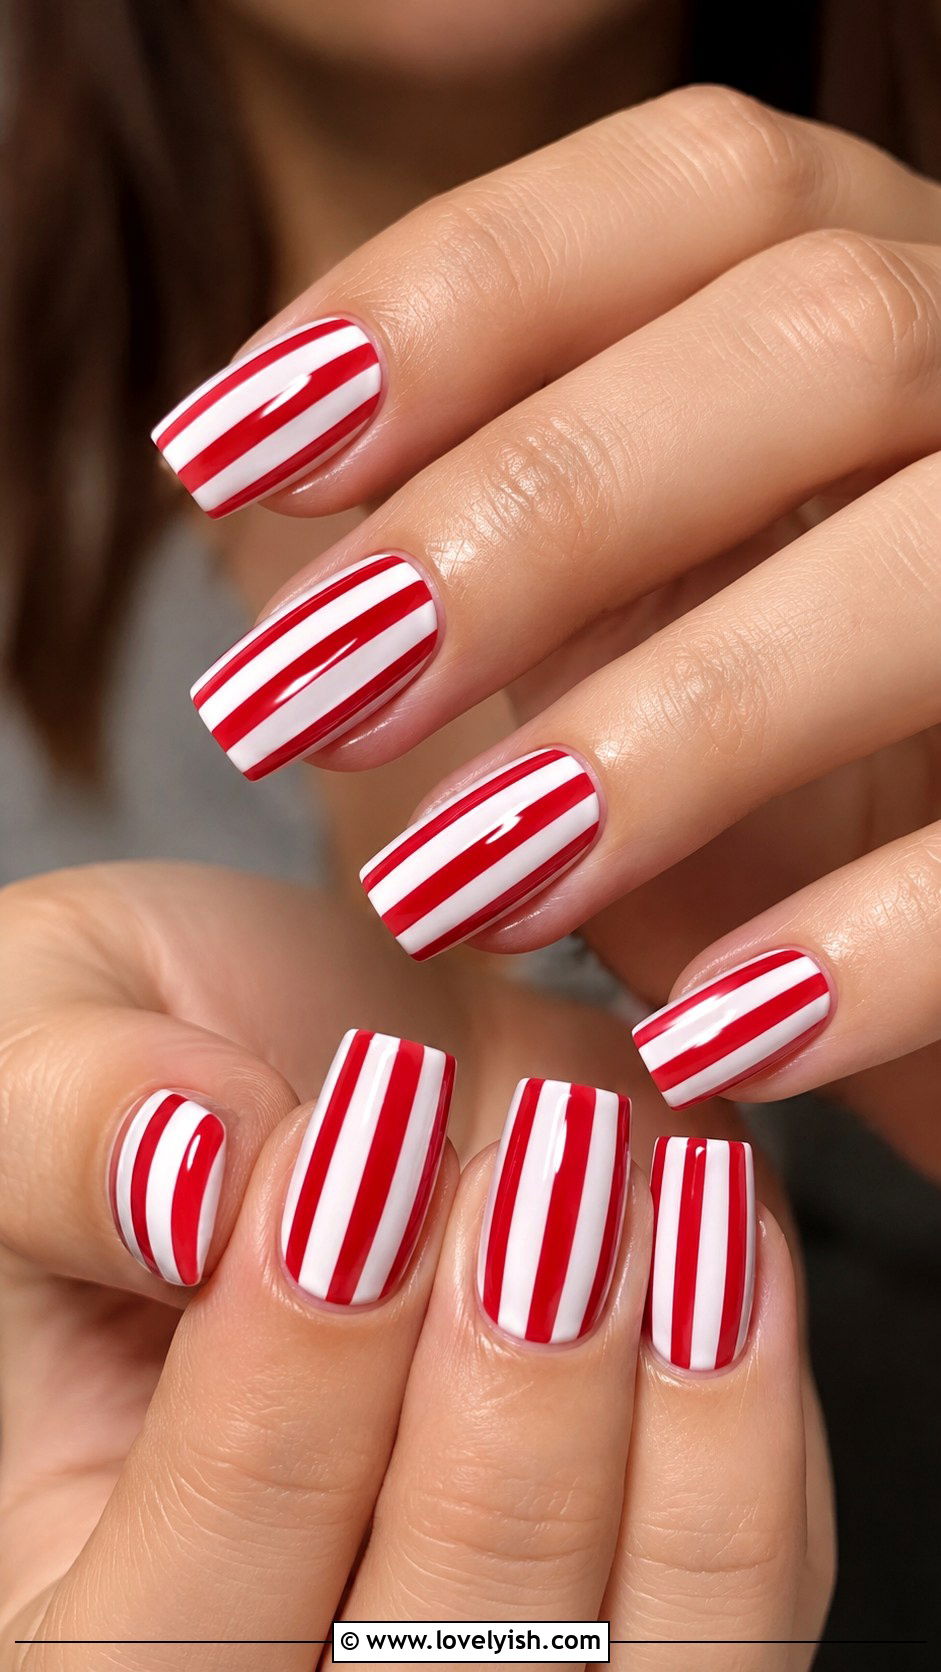
18. Red and White Candy Stripe Nails
Candy stripes channel retro charm and only need striping tape. Paint each nail in a clean white base and let dry completely. Place thin strips of striping tape vertically or diagonally across each nail, leaving small spaces between each strip. Paint over with classic red polish, then peel the tape while the polish is still wet for crisp lines. If you don’t have tape, a thin liner brush works too. Top with a glossy finish. This look is bold, playful, and feels like a pop-art moment on your fingertips. It’s also a fantastic introduction to using nail tape, which opens up many future designs. Red and white never goes out of style.
19. Peach Half Moon Nails
Half-moon nails put a small twist on classic French tips by reversing the design. Paint each nail in a peach or warm coral polish as the base. Once dry, place a small round sticker or hole-reinforcer near the cuticle to create a curved guide. Paint over the exposed area with a contrasting white or nude polish, then peel the sticker before it dries. The curved line near the cuticle gives a vintage, retro vibe. Seal with a glossy topcoat. This style is unexpected yet elegant, perfect for beginners ready to try something beyond regular tips. It works especially well on oval or almond shapes and instantly feels polished and a little Old Hollywood.
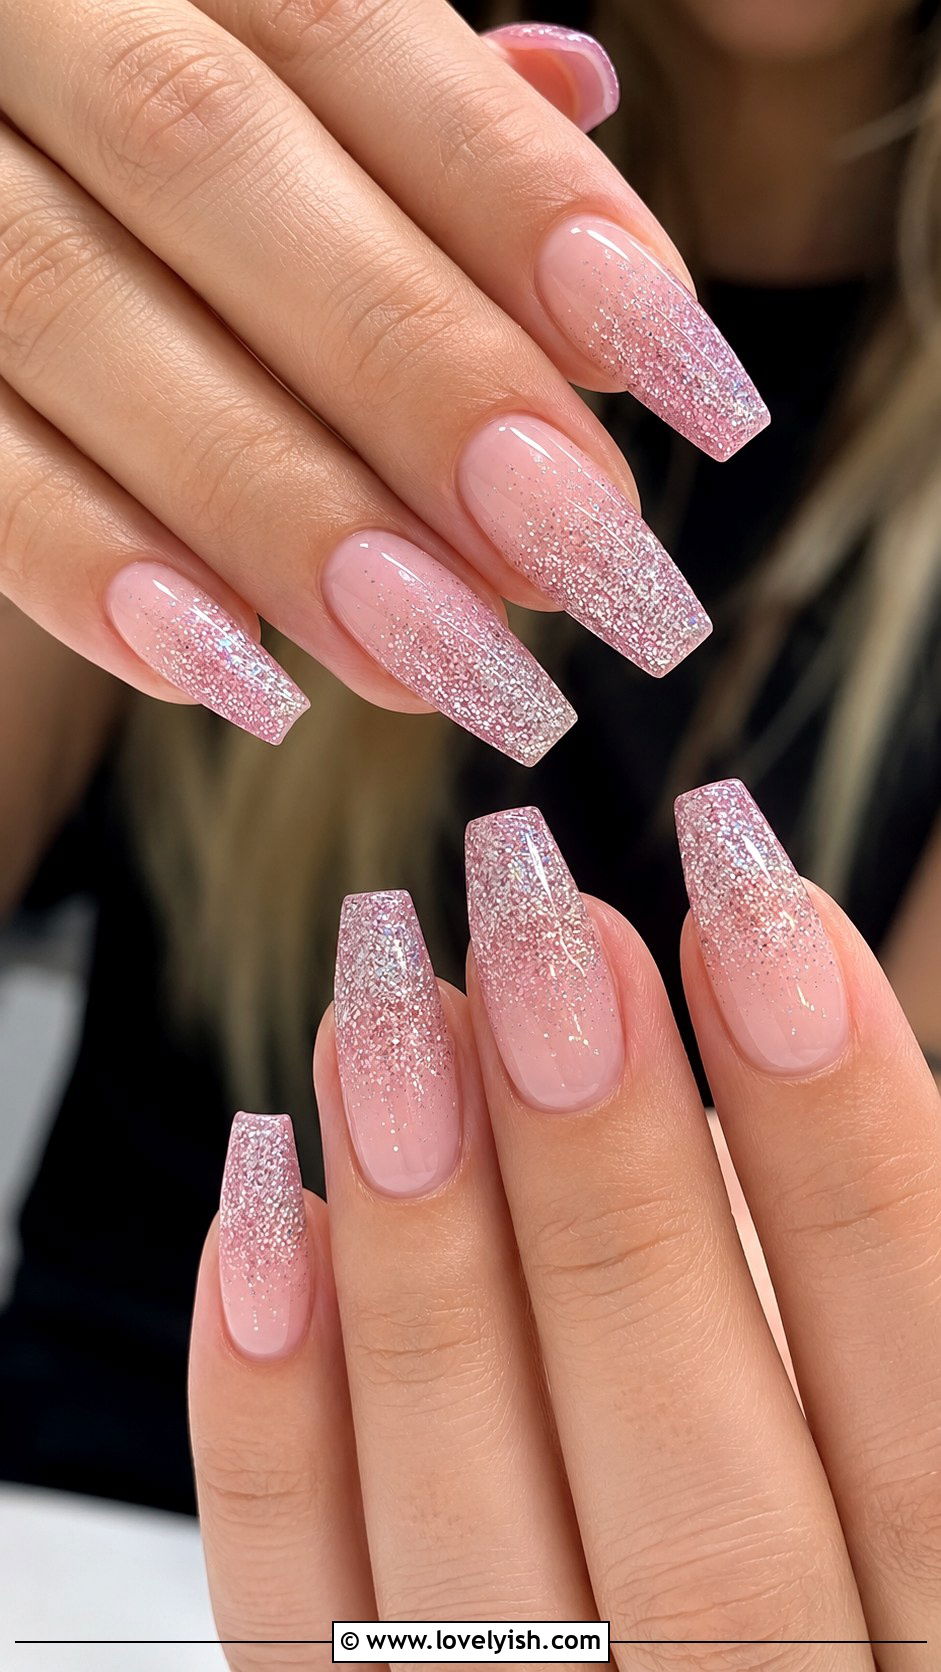
20. Pink Glitter Ombre Nails
Glitter ombre combines two beginner-friendly techniques into one stunning look. Paint each nail in a sheer pink or nude base and let it dry. Dip a small makeup sponge into a fine pink glitter polish and press it onto the tip of each nail, fading the sparkle toward the middle. Build the glitter density gradually by repeating the sponge press. The natural fade hides any uneven spots. Seal with a thick glossy topcoat to smooth the texture and add shine. This design feels romantic, dreamy, and dressy, making it a popular pick for events or special occasions. It’s also surprisingly low effort and works on all nail lengths and shapes effortlessly.
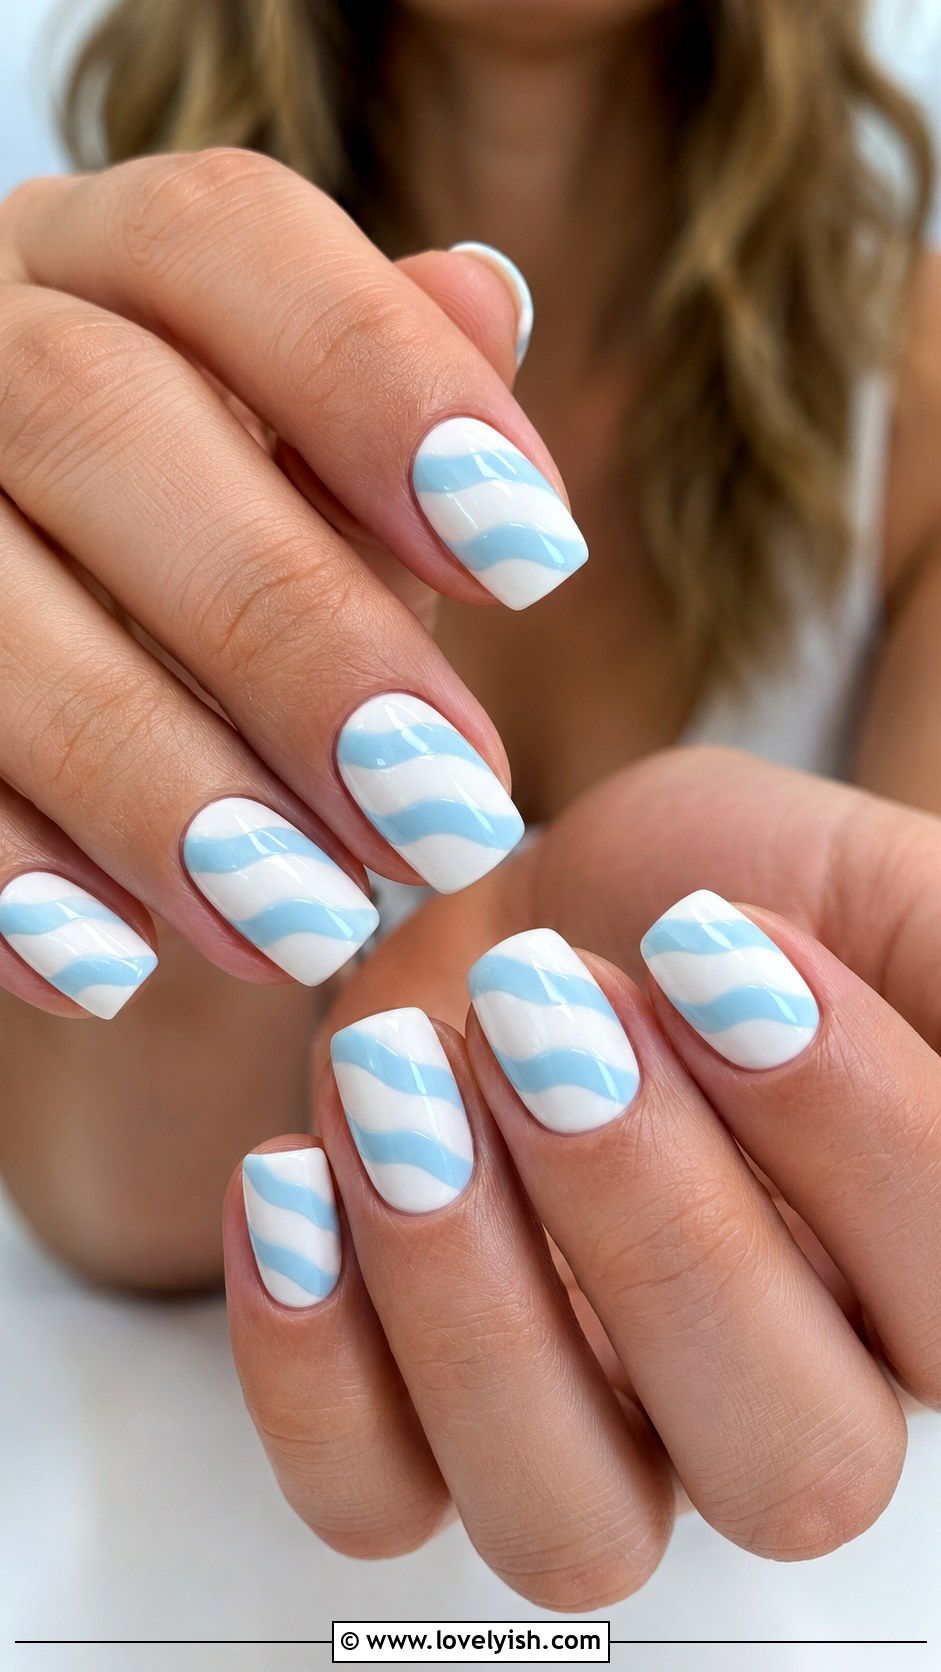
21. Light Blue Wave Nails
Wave nails feel beachy, fun, and refreshingly easy to draw. Paint each nail in a clean white base and let it dry. Using a thin liner brush dipped in light blue polish, draw a gentle wavy horizontal line across the middle of each nail—think a soft S-curve repeated side to side. Add a second wave above or below if you want layers. The line doesn’t need to be precise; uneven waves look more natural anyway. Top with a glossy coat to finish. This design captures coastal vibes and feels especially perfect for summer. It’s a great way to practice freehand line work because waves are forgiving by nature. The result feels breezy, modern, and effortlessly cool.
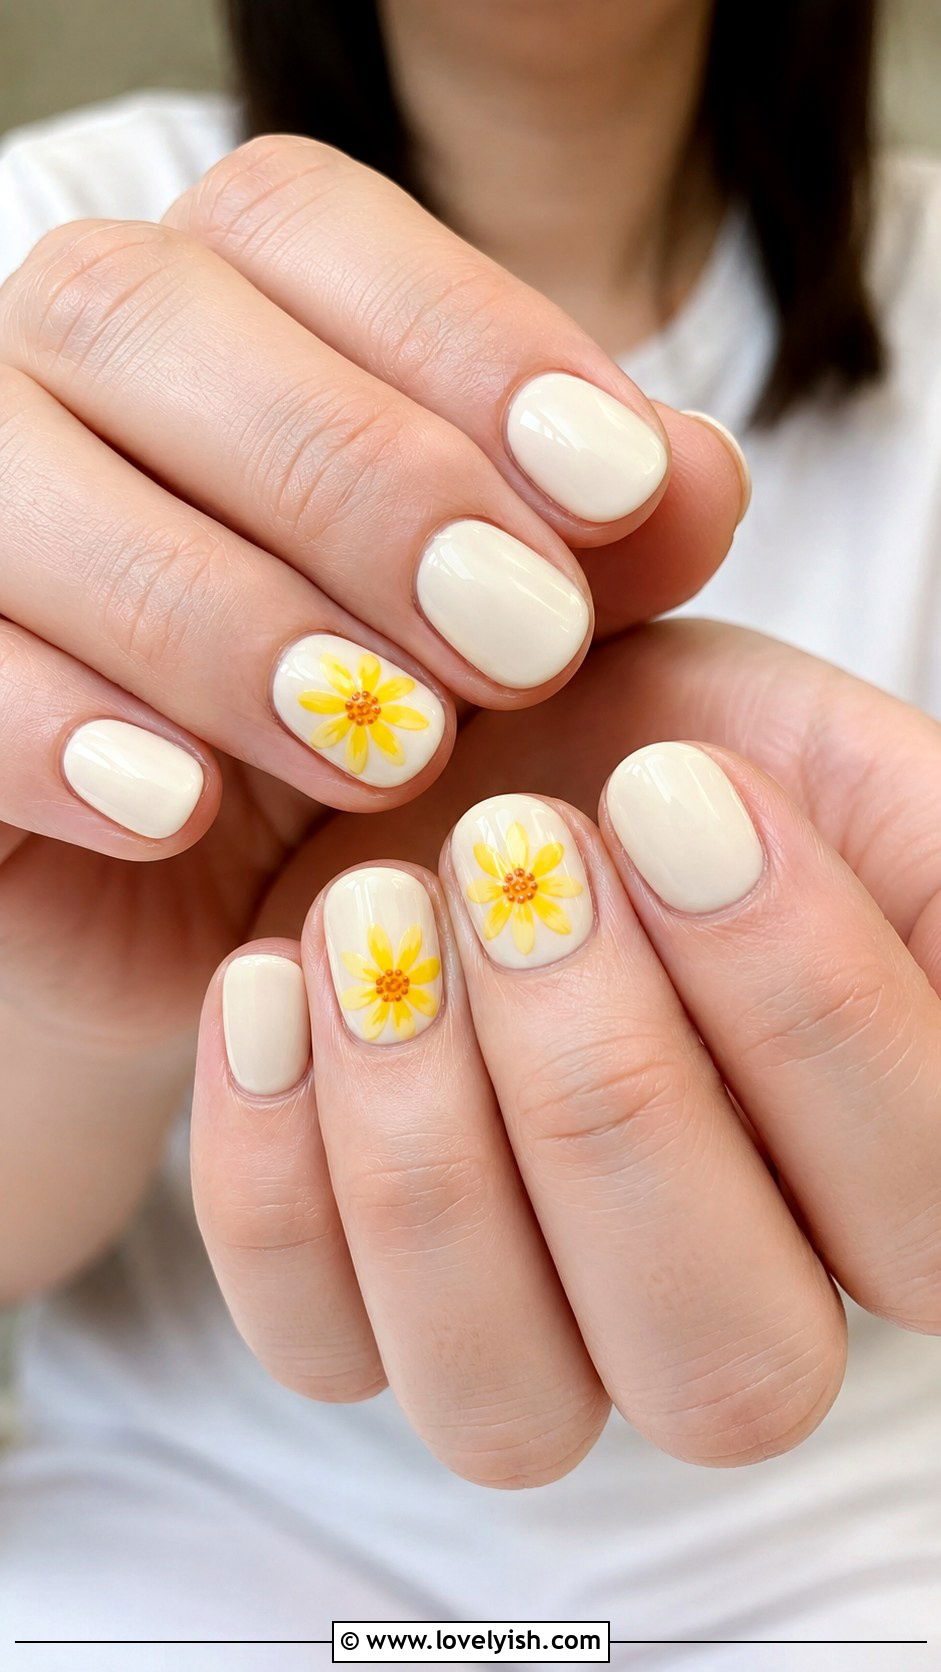
22. Yellow Daisy Nails
Yellow daisies bring sunshine to your fingertips with very little effort. Start with a creamy white or pale ivory base on each nail. Once dry, use a dotting tool dipped in bright yellow polish to make five small dots arranged in a circle on one or two accent nails. Add a tiny white or orange dot in the center of each flower. Keep the remaining nails plain ivory for balance. Seal everything with a glossy topcoat. This sweet floral look feels cheerful and spring-ready, perfect for sunny weekend brunches or picnics. The dot-based flowers are incredibly forgiving since petals don’t need to be perfect circles. It’s an iconic beginner design that always looks adorable.
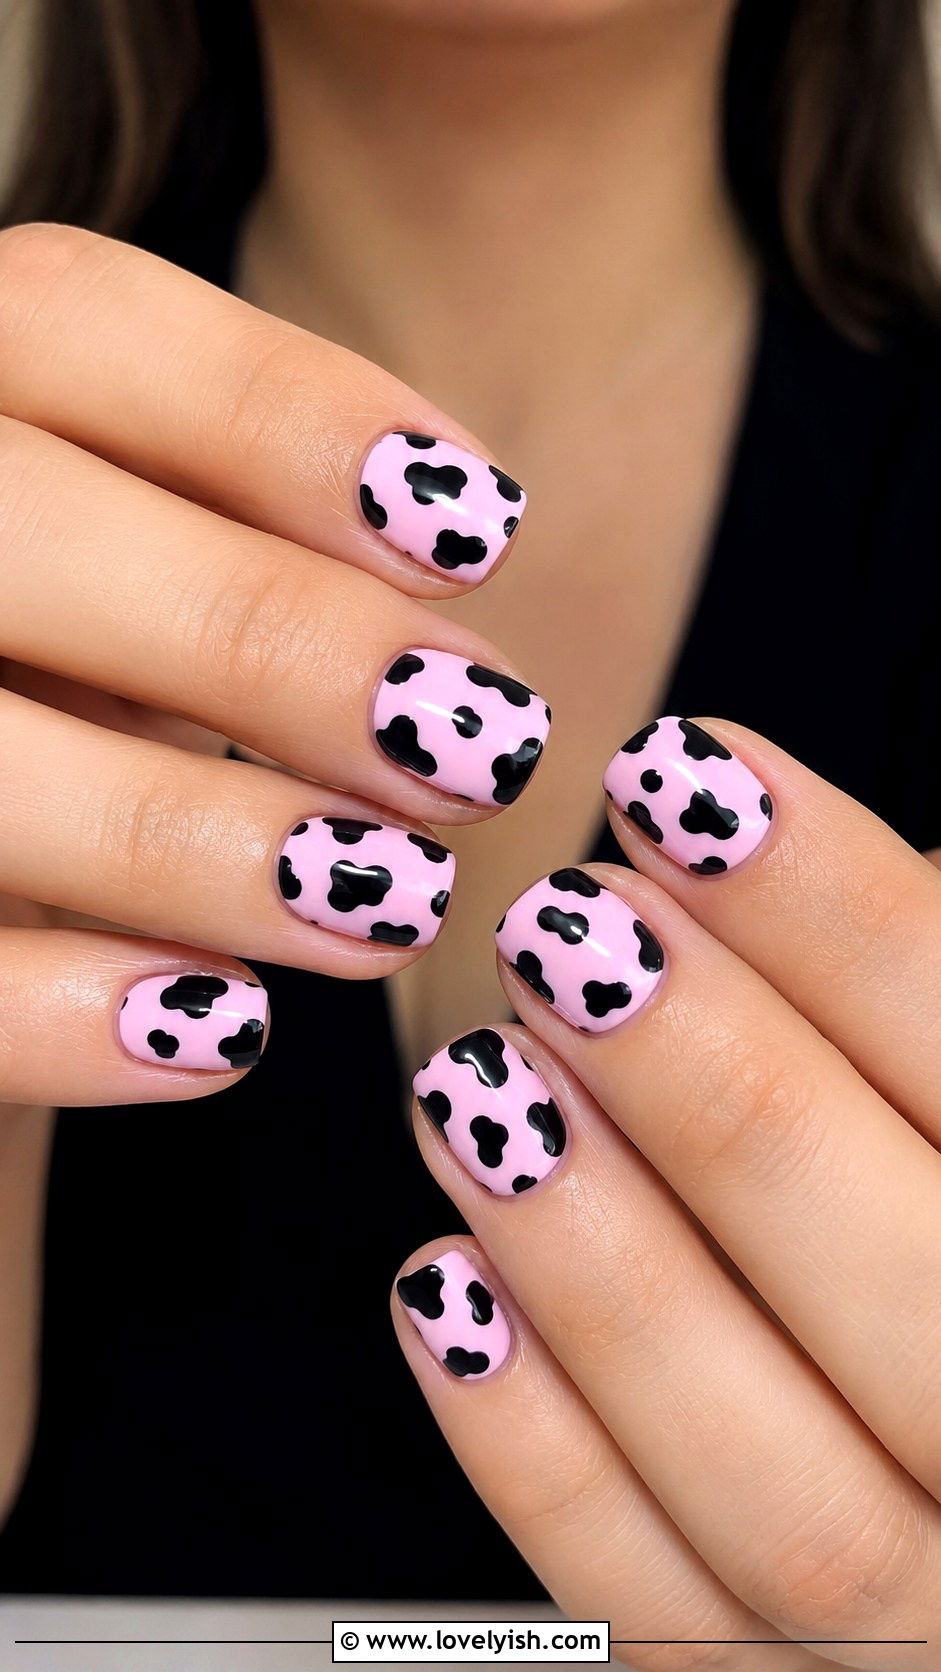
23. Pink Cow Print Nails
Cow print nails are trendy, fun, and surprisingly easy to recreate. Paint each nail in a soft baby pink base. Once dry, use a small dotting tool or the rounded tip of a bobby pin dipped in black or dark brown polish to make irregular blob shapes scattered across each nail. The blobs should vary in size and have organic, uneven edges—think rounded splotches. Don’t aim for symmetry because real cow print is naturally random. Seal with a glossy topcoat to smooth everything out. This playful design has been all over social media and looks great on short or medium nails. It’s a fun, statement-making manicure that’s perfect for beginners experimenting with patterns.
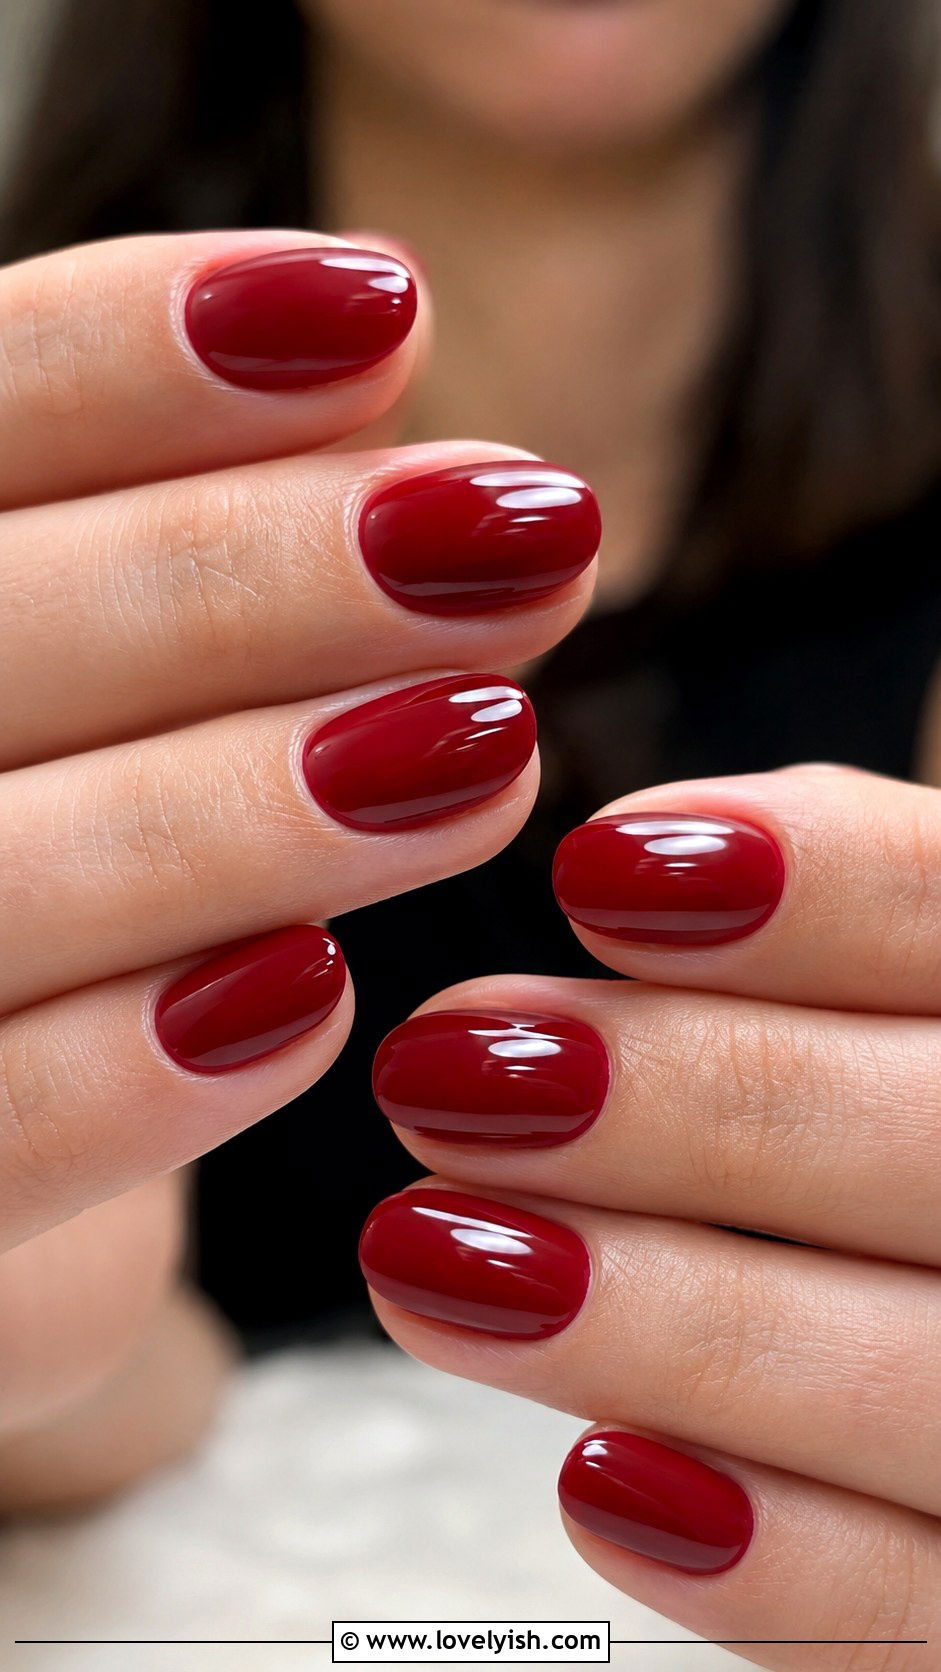
24. Glossy Cherry Red Nails
Sometimes the easiest beginner manicure is a classic, well-executed solid color. Cherry red is the ultimate confidence-boosting choice. Start with a clear base coat to protect your nails. Apply two even, thin coats of a true cherry red polish—thinner coats prevent streaks and dry faster. Take your time near the cuticle and clean up any mistakes with a small brush dipped in remover. Seal with a thick glossy topcoat for that high-shine, lacquered look. This design proves you don’t need any nail art to make a statement. Glossy cherry red flatters every skin tone and feels timeless across every season. It’s a beginner essential that pairs with absolutely everything you wear.
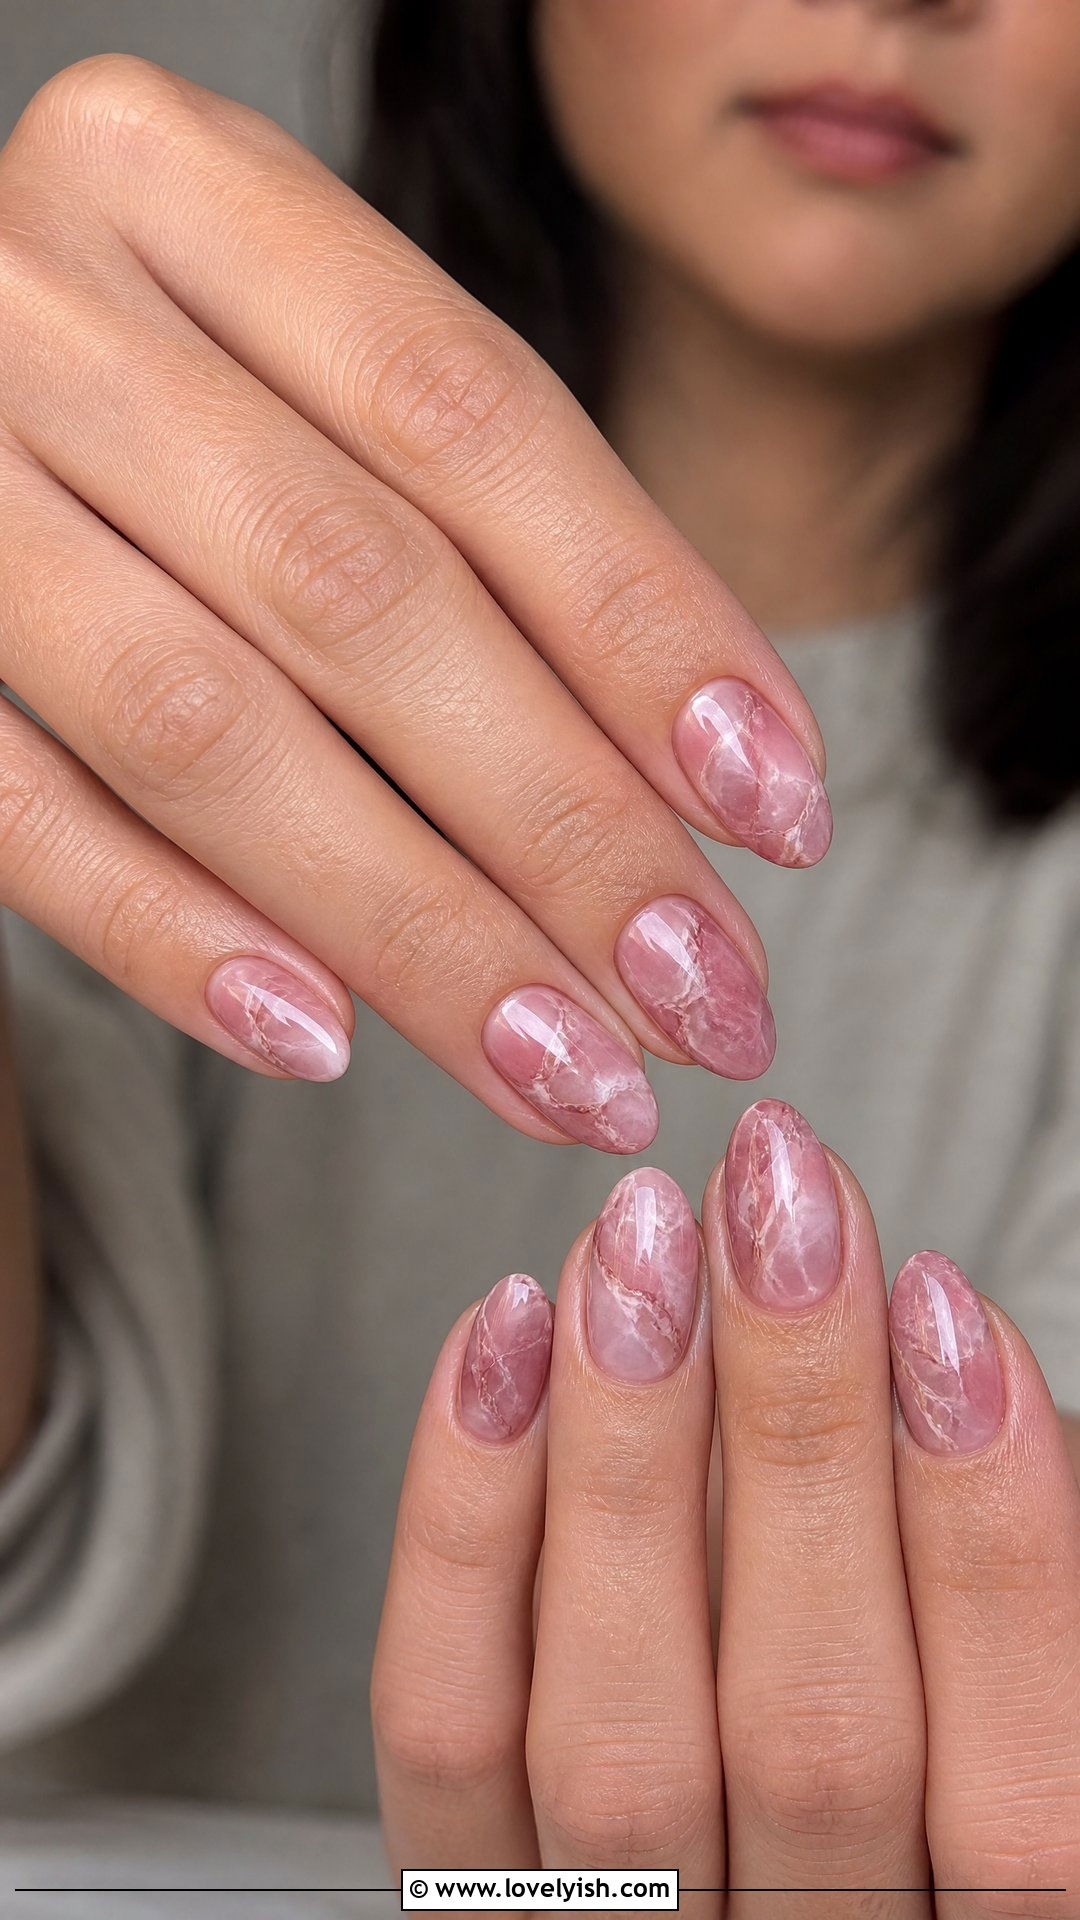
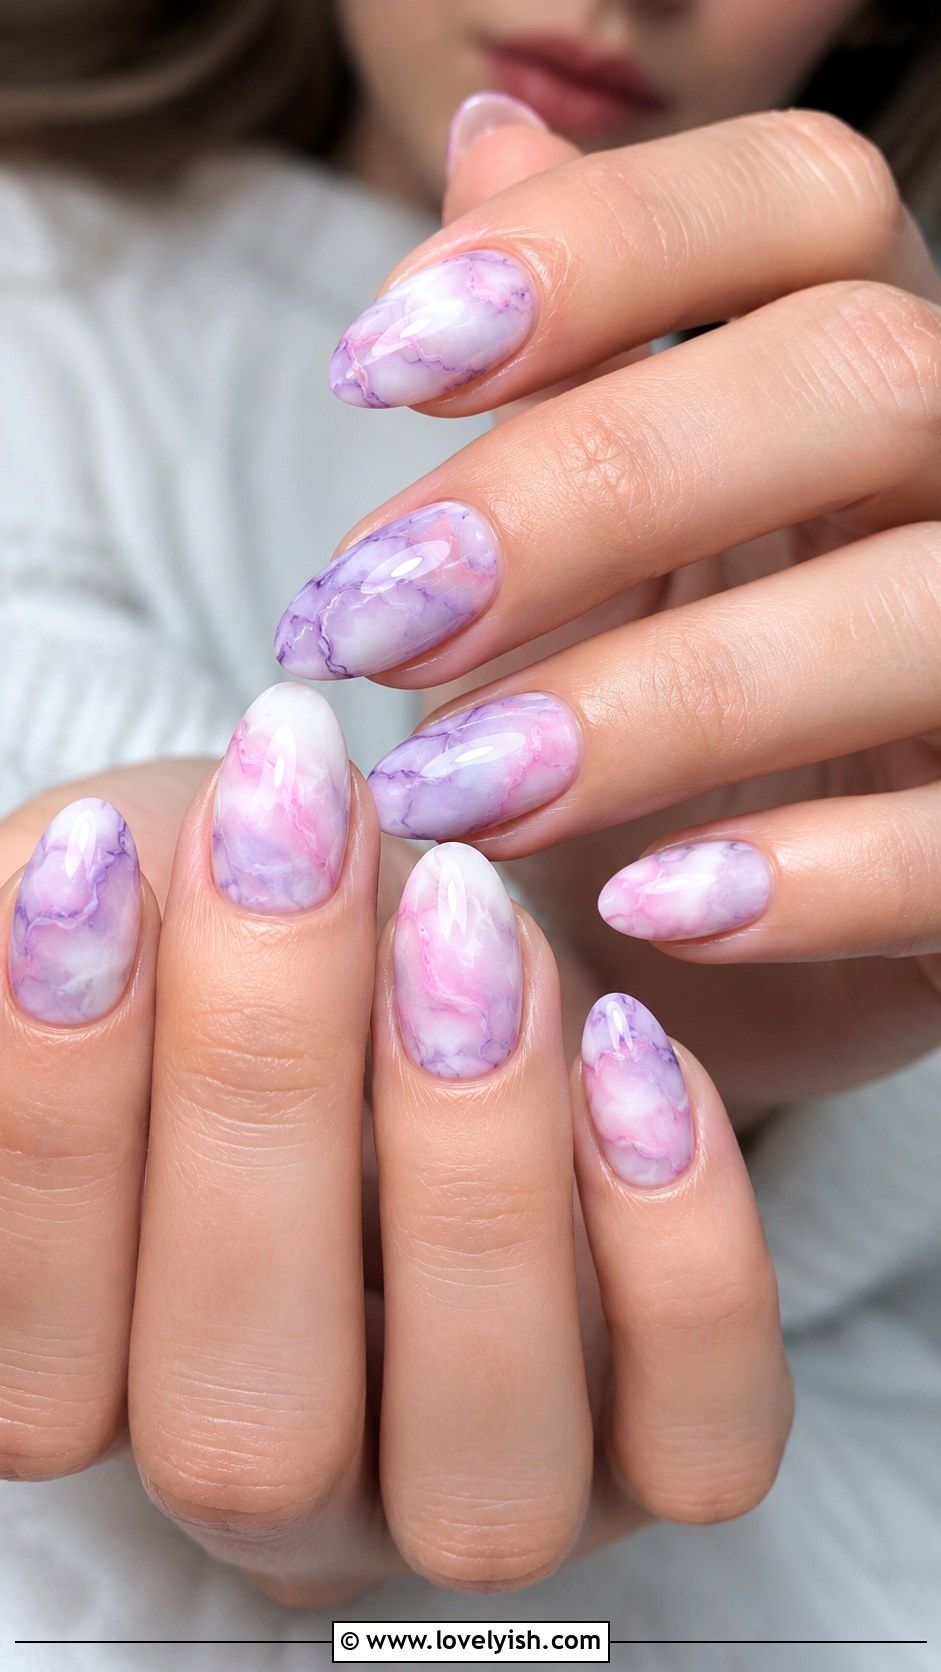
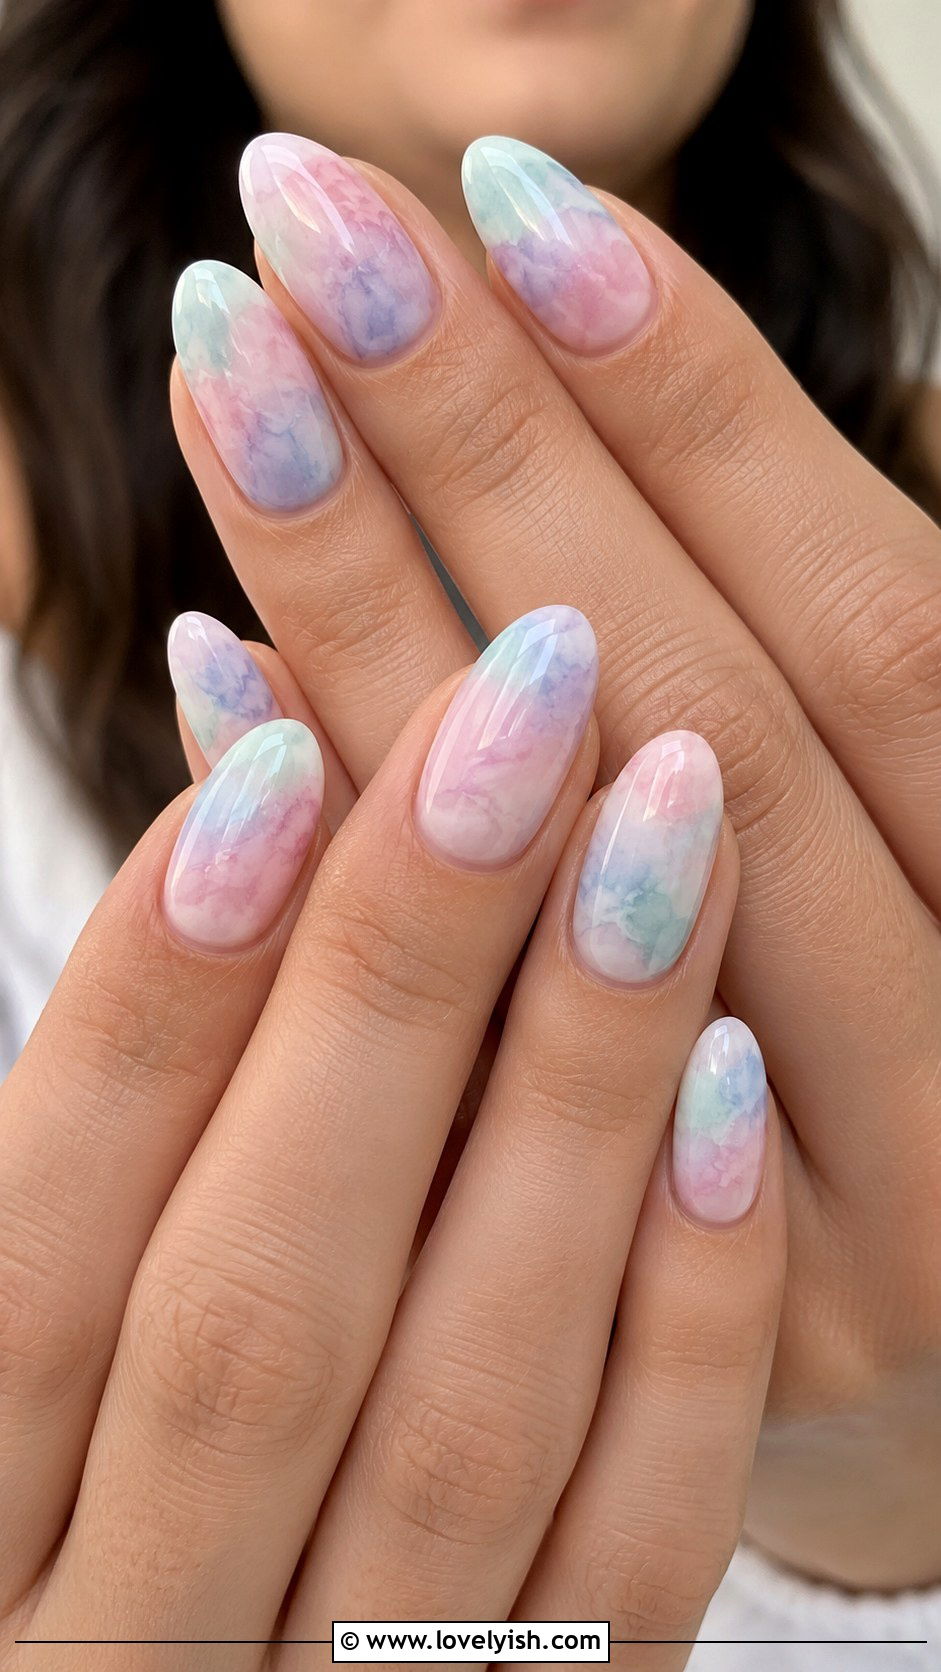
25. Pastel Marble Nails
Marble nails look complicated but are honestly just blended polish swirls. Paint each nail in a soft white or cream base. While slightly tacky, drop tiny dots of two pastel colors (like lavender and pink) randomly on the nail. Use a toothpick or thin dotting tool to gently swirl the colors together in loose figure-eight motions, creating a soft marbled effect. Don’t overwork it—too much swirling muddies the pattern. Seal with a glossy topcoat to lock in the look. This marble technique is incredibly forgiving because the design is meant to look organic and varied. Each nail will look slightly different, which is exactly the appeal of this dreamy beginner-friendly style.
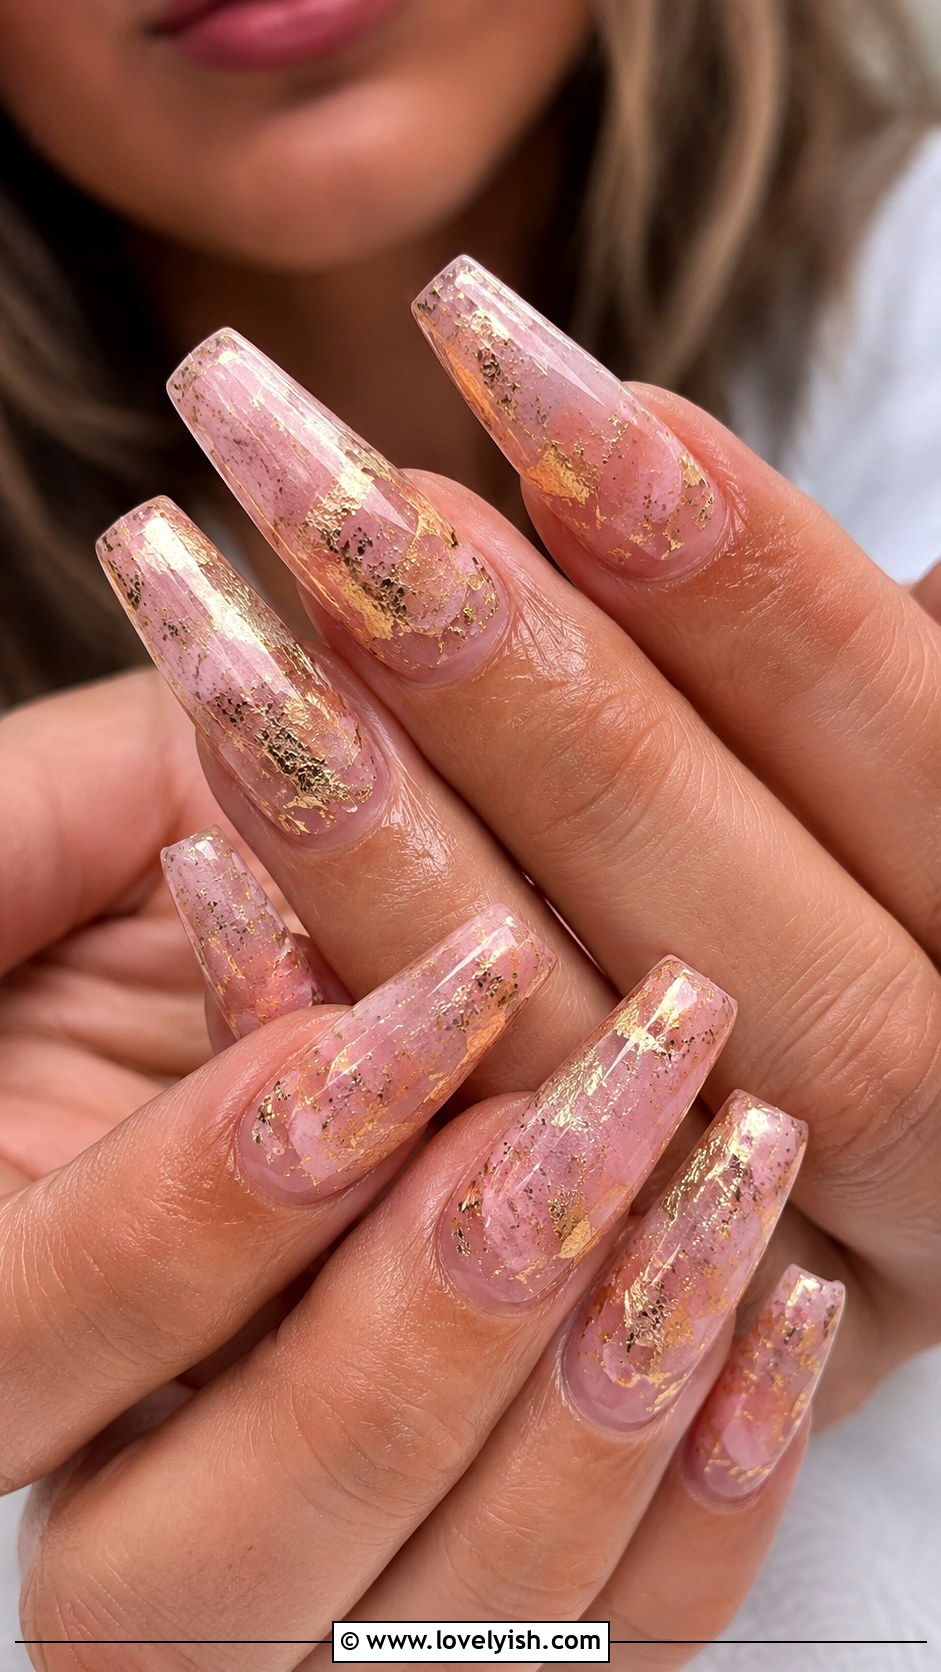
26. Pink and Gold Foil Nails
Gold foil flakes instantly elevate any manicure with zero precision required. Paint each nail in a soft pink polish for a feminine base. While the topcoat is still wet, use tweezers or a small applicator to press tiny gold foil pieces onto random spots across the nail. The foil sticks naturally to the wet polish. Don’t overthink placement—scattered, irregular foil looks intentional and editorial. Add another layer of glossy topcoat to seal the foil flat and prevent snagging. The combination of soft pink and shimmering gold feels luxurious and dreamy. This design is perfect for events, birthdays, or anytime you want extra sparkle. Foil flakes are a beginner’s secret weapon for high-impact nail art.
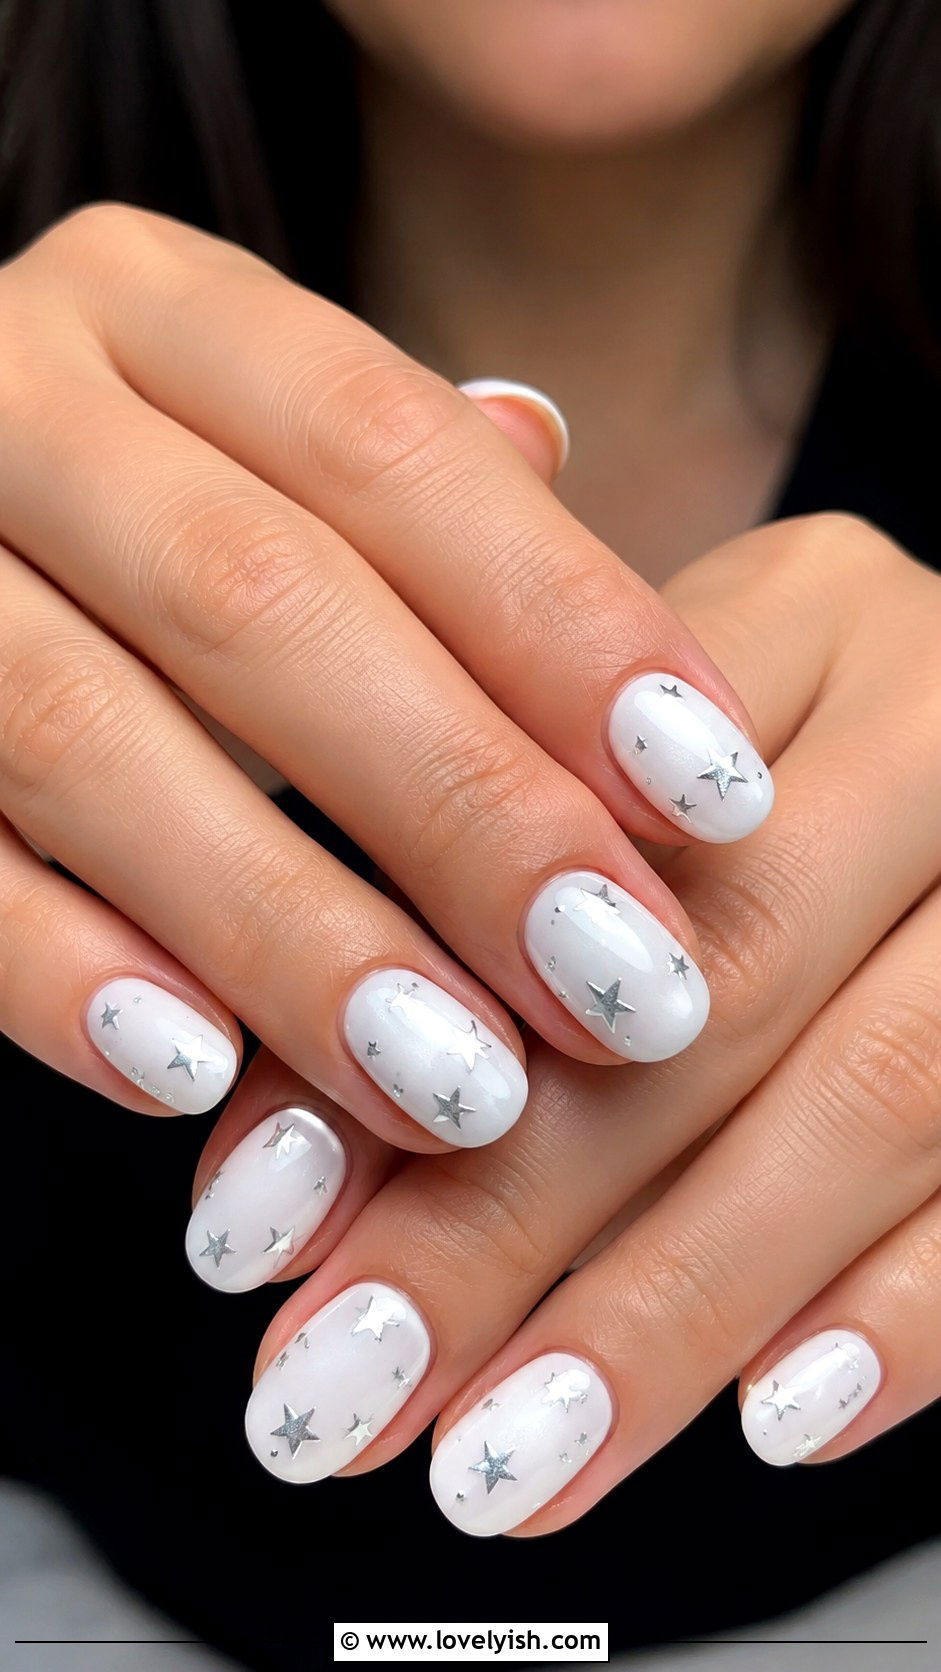
27. White and Silver Star Nails
Star accents add a touch of celestial magic to any manicure. Paint each nail in a clean white base. Once dry, use a small dotting tool dipped in silver polish to create tiny five-point stars on one or two accent nails. The easiest method is making one dot, then dragging four small lines outward to form points. Alternatively, tiny star-shaped nail stickers work just as well. Keep the rest of the nails plain white for a clean, balanced look. Seal with a glossy topcoat. This design feels dreamy, whimsical, and slightly mystical, perfect for night-sky lovers. It’s a beginner favorite because stars don’t need to be perfect to look magical. Try gold instead of silver for warmer skin tones.
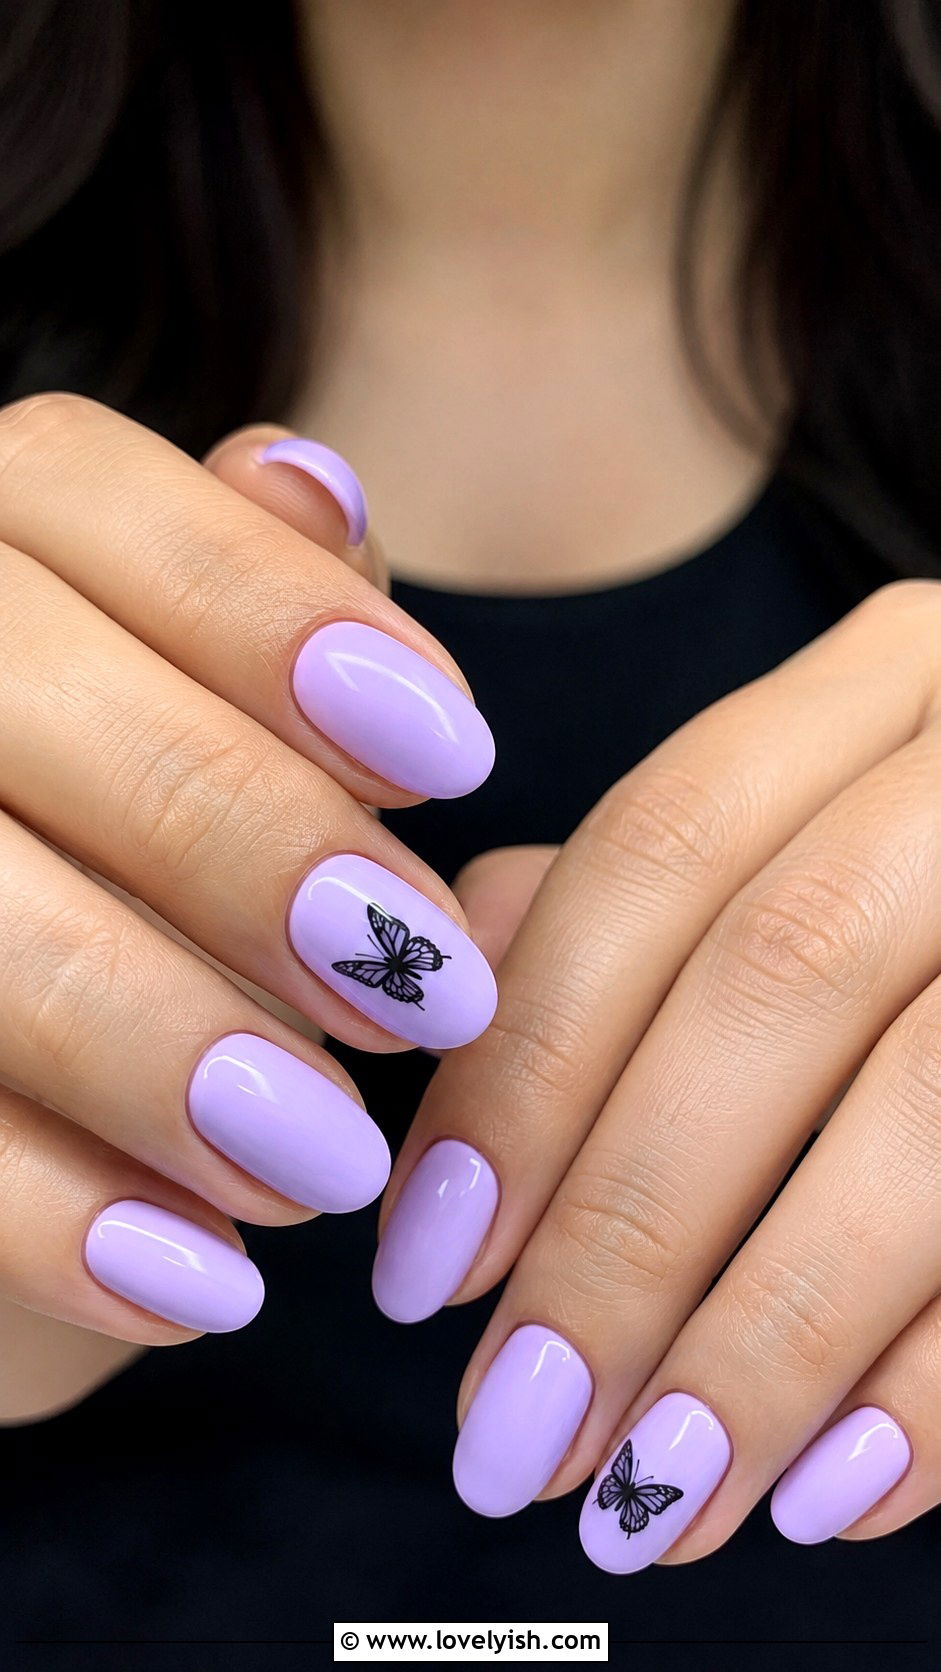
28. Lavender Butterfly Nails
Butterfly nails look intricate but become simple when broken into basic shapes. Paint each nail in a soft lavender base. On one accent nail, use a thin liner brush dipped in white or black polish to draw two small heart shapes side by side—those become the butterfly wings. Add a tiny dot for the body in the middle. Keep the remaining nails plain lavender for balance. Seal with a glossy topcoat. The butterfly doesn’t need detailed wing patterns to look beautiful; the simple silhouette is enough. This design feels feminine, dreamy, and perfect for spring or summer. It’s a charming beginner project that delivers a lot of personality with very minimal brushwork required.
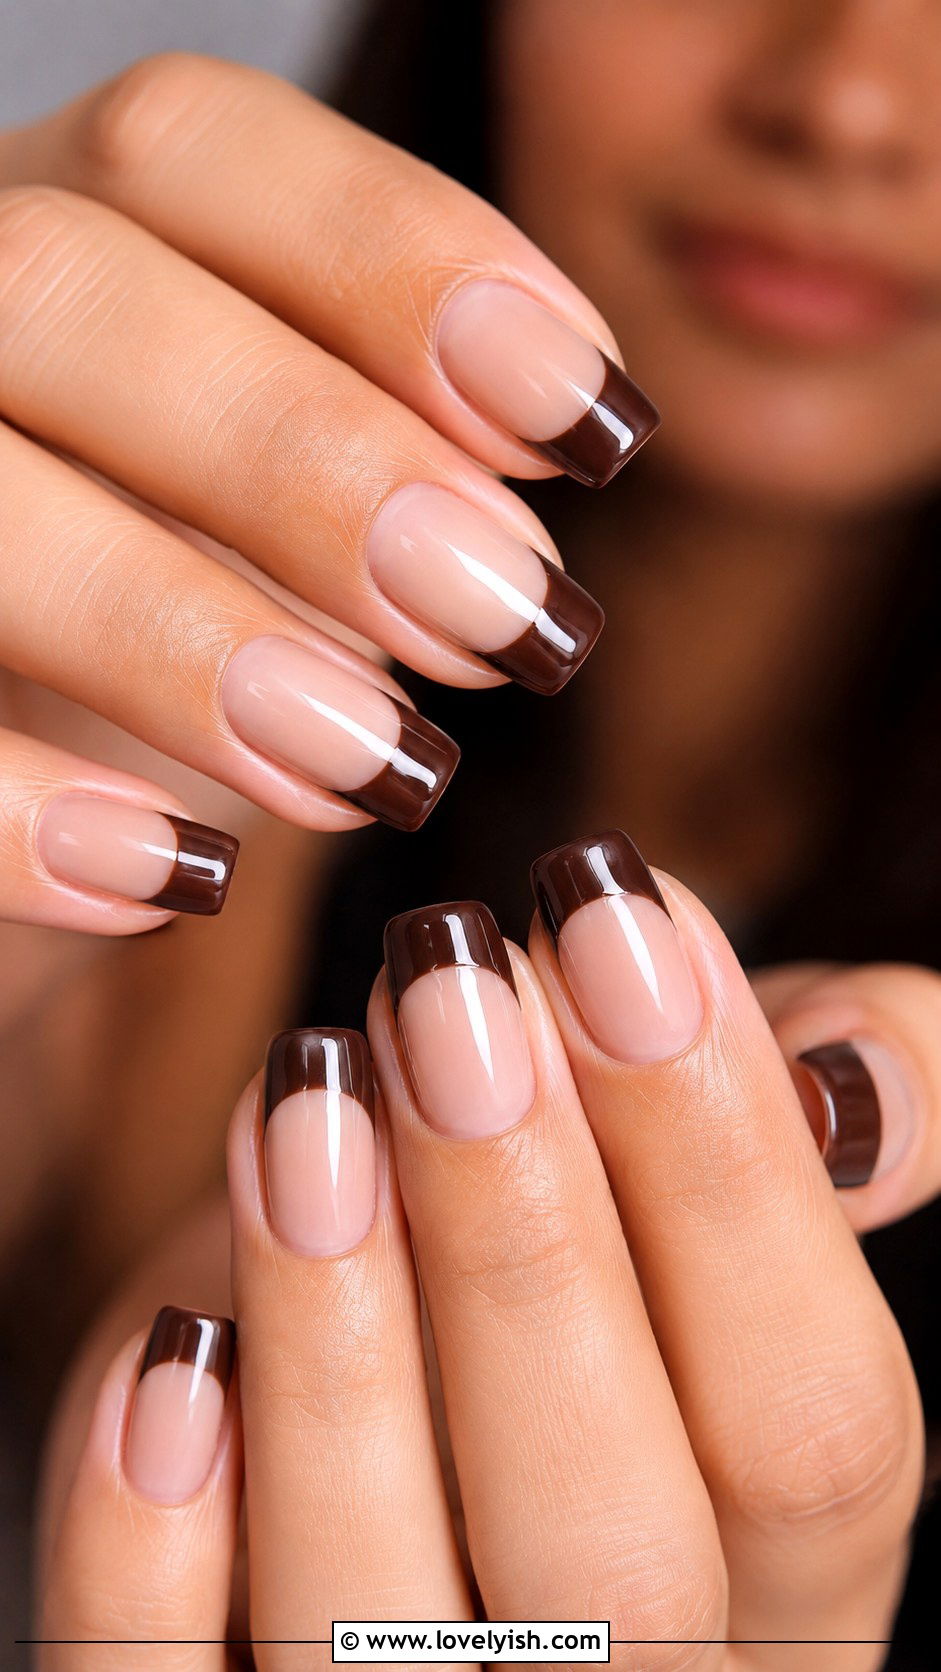
29. Nude Brown French Tip Nails
A warm brown French tip is a richer, cozier twist on the classic version. Paint each nail in a creamy nude or beige base. Once dry, use a thin striping brush dipped in espresso brown or chocolate polish to draw a slightly thicker tip along each nail edge. Don’t aim for hairline thinness—a slightly chunky tip looks modern and intentional. Tip guides or French stickers help if freehand feels intimidating. Seal with a glossy topcoat. This design has a quiet, sophisticated vibe that feels seasonally versatile, especially flattering in fall and winter. Brown tips are also incredibly flattering on deeper skin tones and add warmth to lighter ones. It’s an easy elevated alternative to white tips.
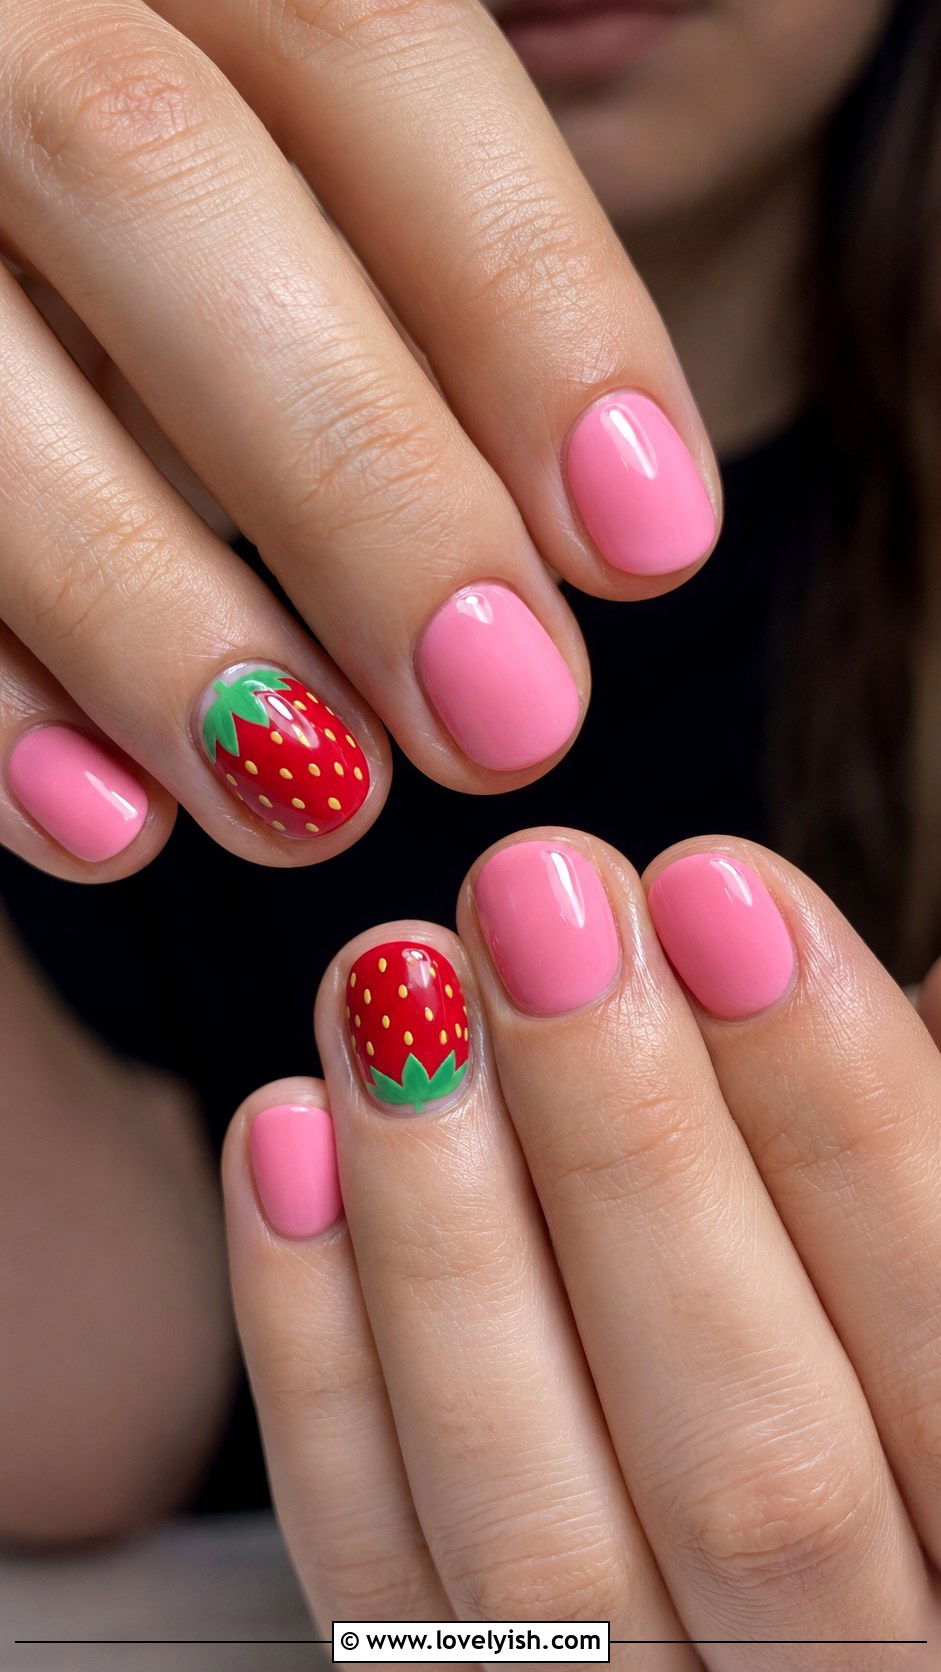
30. Pink Strawberry Nails
Strawberry nails are summery, sweet, and easier than they look. Paint each nail in a creamy white or soft pink base. On one or two accent nails, use a dotting tool dipped in red polish to draw a small rounded strawberry shape near the tip. Add tiny white or yellow dots inside the red shape to suggest seeds. Use a thin brush dipped in green to add a small leafy top. Keep the other nails plain for cohesion. Seal with a glossy topcoat. The hand-drawn fruit charm is what makes this look so adorable—imperfections actually add to the cuteness. It’s a viral favorite, perfect for beginners chasing playful, fruit-inspired summer vibes that always photograph beautifully.
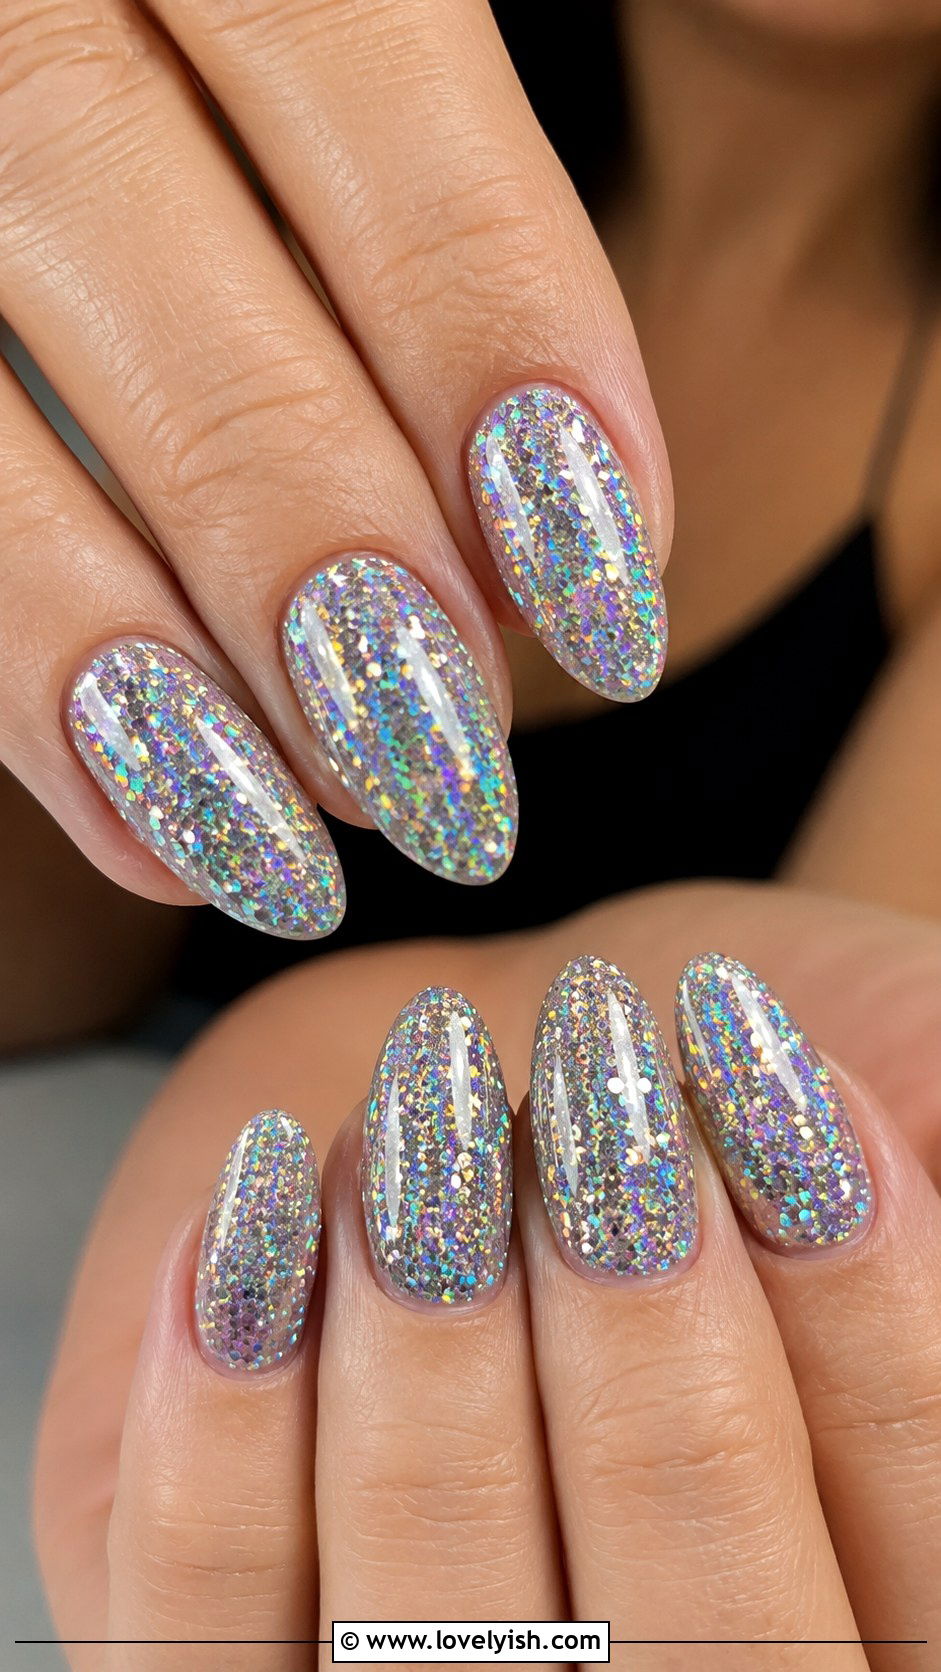
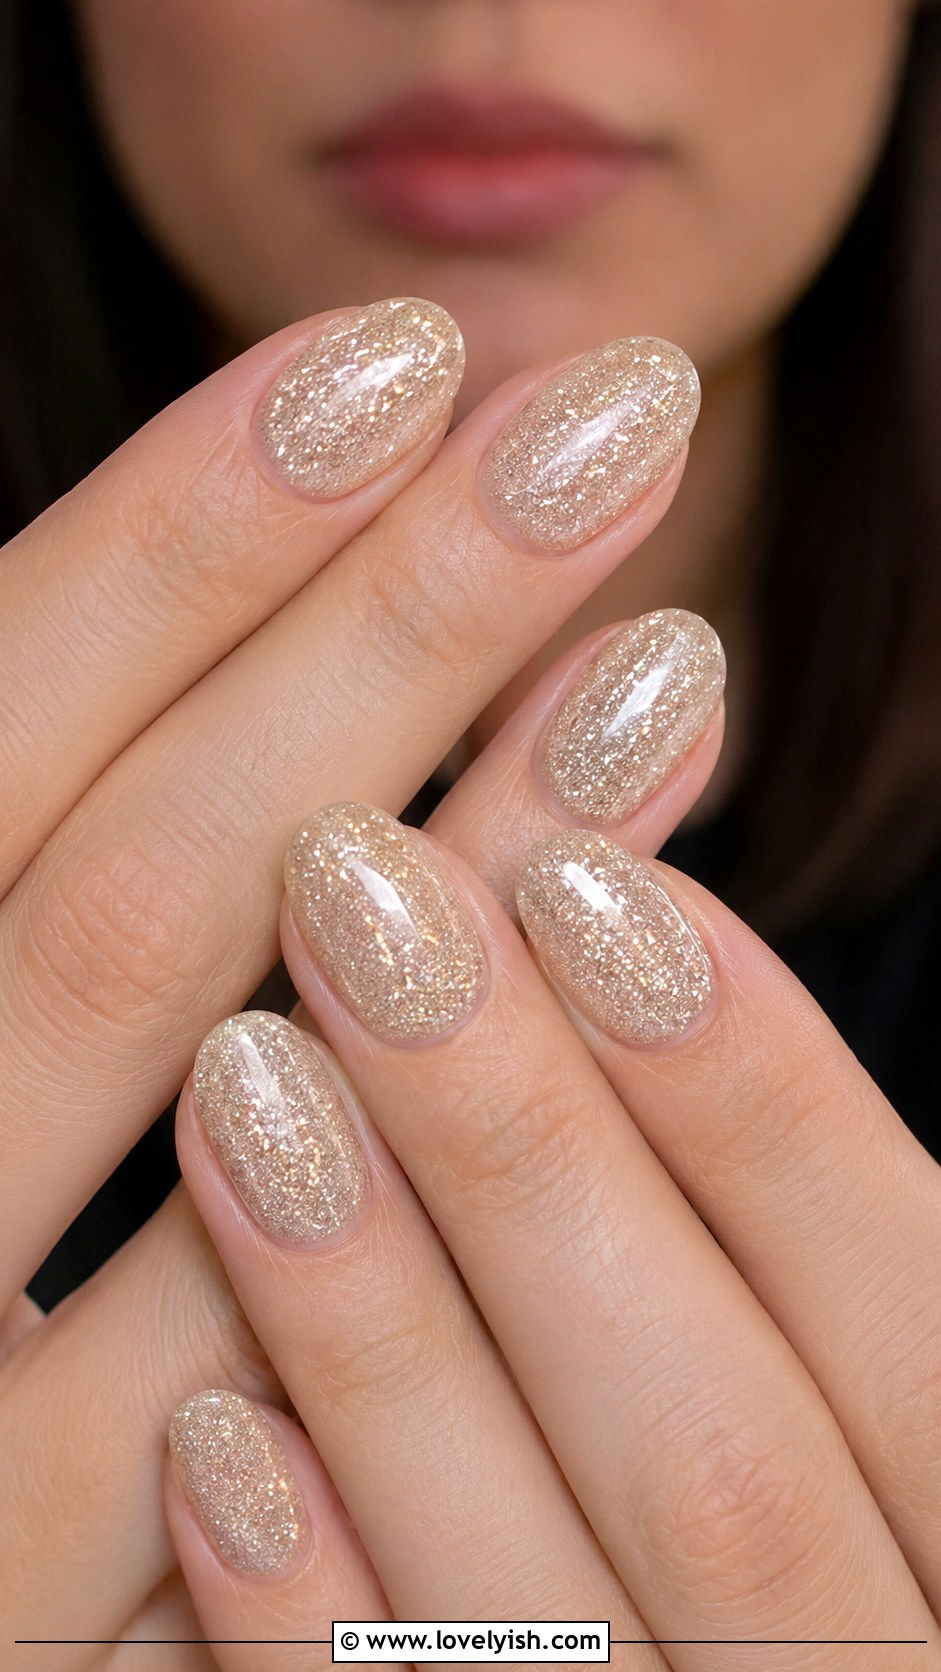
31. Champagne Glitter Nails

Champagne glitter is the ultimate beginner shortcut for glamorous nails. Start with a sheer nude or pale beige base on every nail. Once dry, apply one coat of a fine champagne glitter polish across all nails for an even, all-over shimmer. If you want a subtler look, sponge the glitter heavier toward the tips and lighter near the cuticles. The fine glitter requires no skill to apply and disguises any small wobbles automatically. Finish with a thick glossy topcoat to smooth the texture. This look feels celebratory, polished, and event-ready, perfect for birthdays, holidays, or anytime you want sparkle. It’s a stunning, low-effort design that always feels luxurious without requiring any actual nail art skill.
32. Pastel Tie Dye Nails
Tie-dye nails have a soft, cloudy, dreamlike feel and require almost no precision. Paint each nail in a white base coat. While slightly tacky, drop small dots of two or three pastel colors (try pink, mint, and lavender) onto each nail. Use a toothpick to gently swirl the colors into each other with loose, random motions. The blurry, organic blending is the entire point. You can also use a sponge for an even softer effect. Seal everything with a high-shine topcoat. This look is whimsical, retro, and deeply forgiving because no two nails look the same. It’s a perfect beginner technique for anyone who loves the laid-back, hippie-chic energy of classic tie-dye prints.
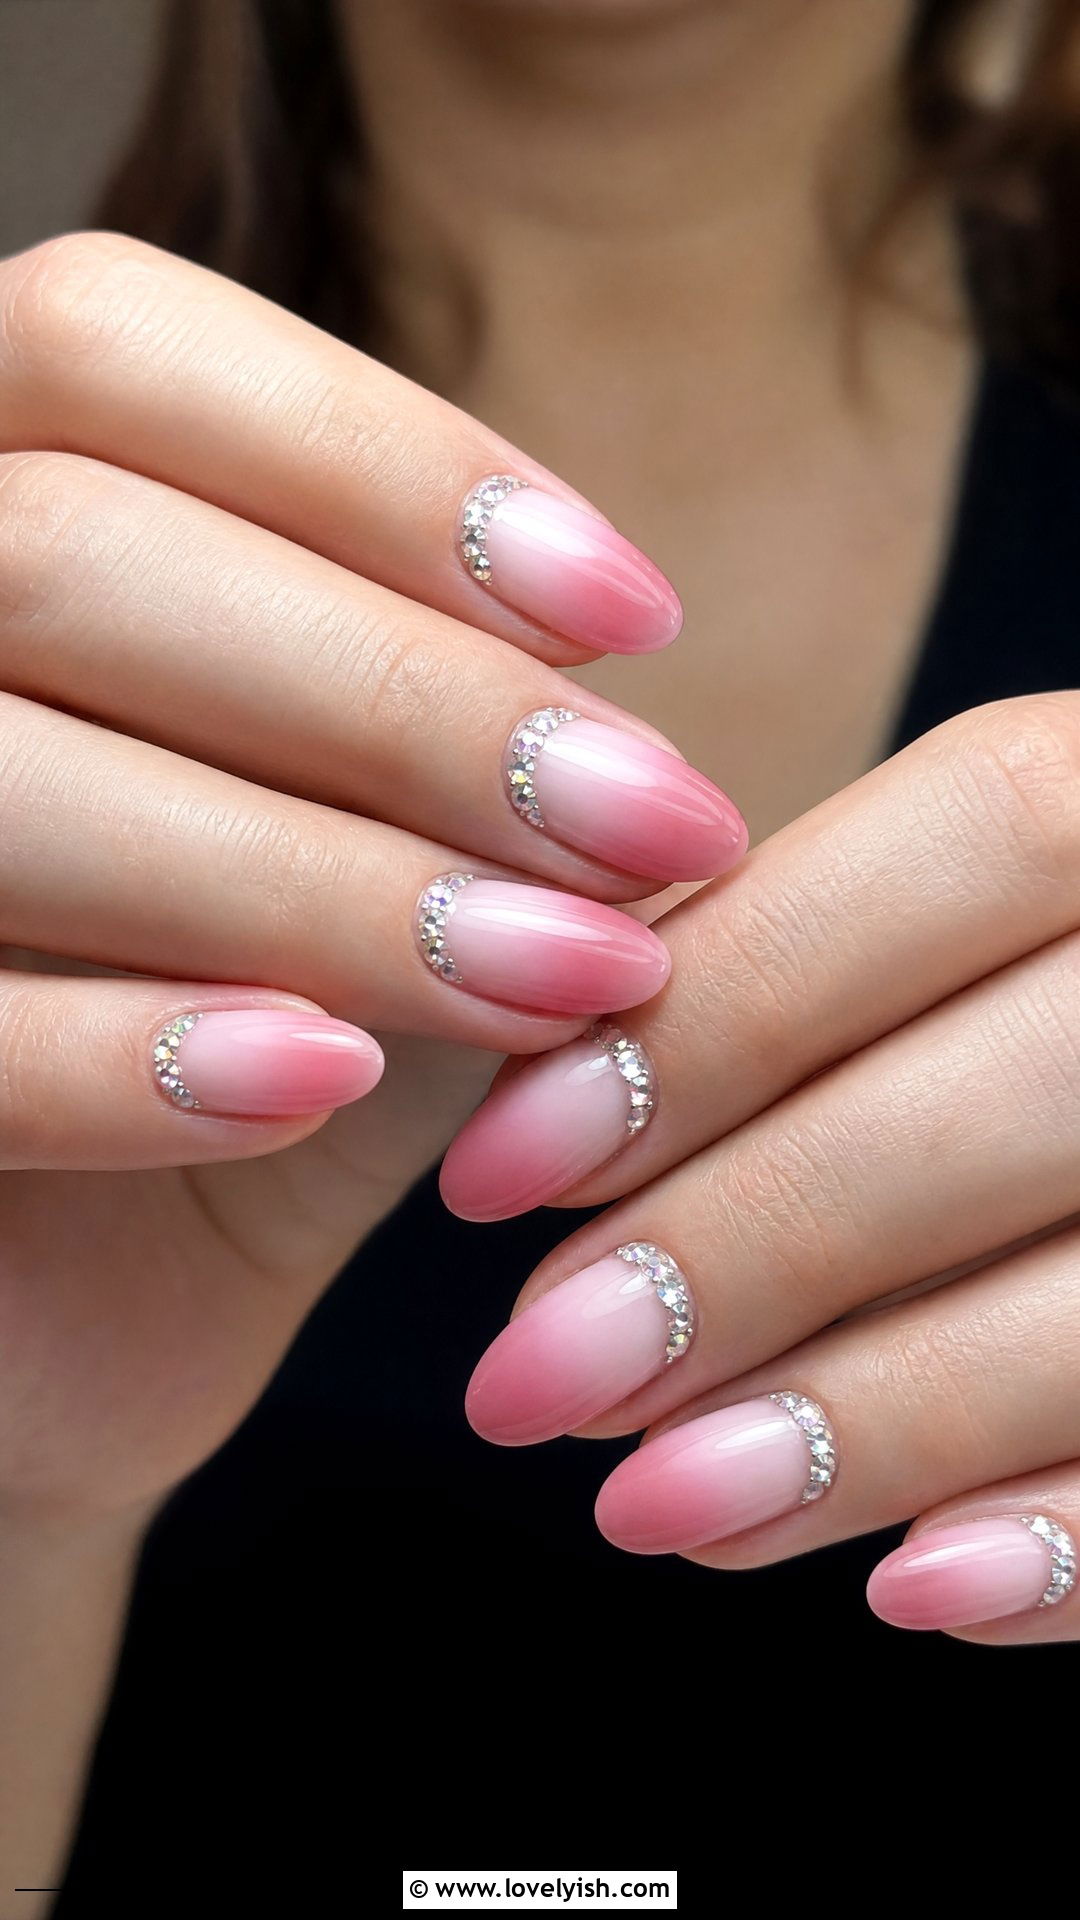
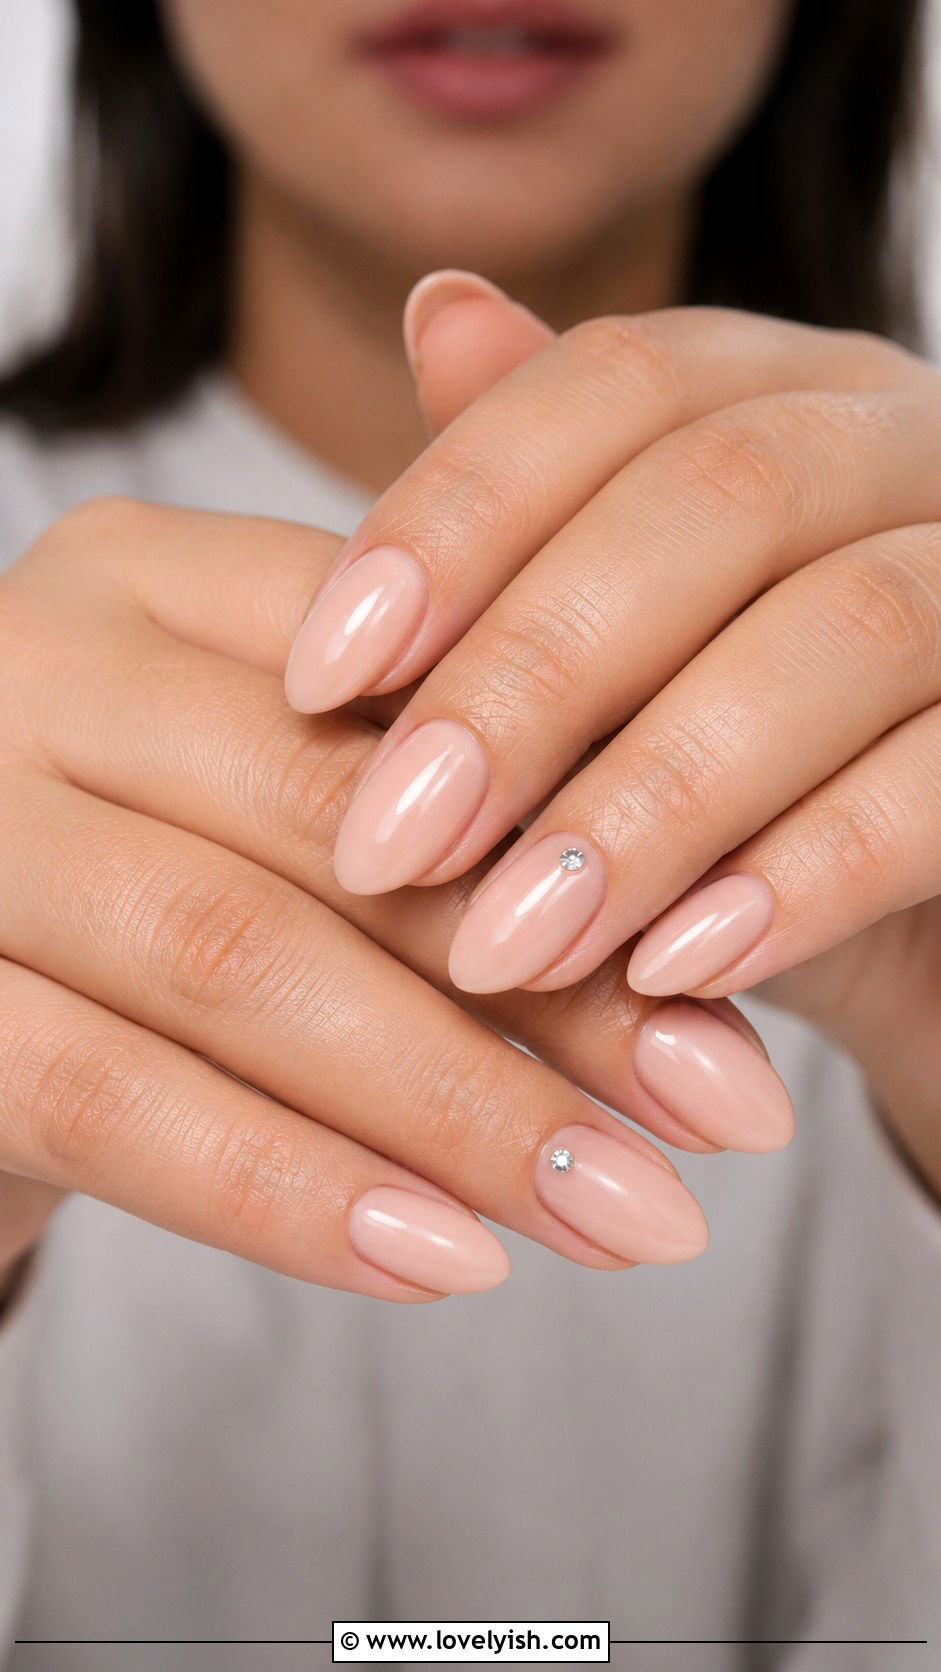
33. Nude Nails With Single Rhinestone
A single rhinestone is the easiest way to add elegance with zero brushwork. Paint each nail in a creamy nude base for a clean, sophisticated canvas. Apply two thin coats for full coverage and let dry. Add a glossy topcoat, and while it’s still wet, use tweezers to place one small clear or pearl rhinestone near the cuticle of one accent nail. The wet topcoat acts as glue. Add another layer of topcoat over the entire nail to lock the gem in place and prevent it from snagging. This minimalist look feels expensive, polished, and bridal-ready. It’s perfect for weddings, events, or anytime you want quiet glam. One small detail makes a huge impact.
Conclusion:
Beginner nail art doesn’t have to be intimidating or expensive. These 33 easy nail designs prove that simple techniques like dotting, sponging, taping, and freehand swirls can create stunning, salon-worthy looks at home. The key is starting with forgiving designs that hide small imperfections—glitter, ombre, abstract lines, and aura effects are your best friends. As you practice, your steady hand and confidence will naturally grow. Mix and match colors, swap finishes, or combine techniques to make each design feel uniquely yours. Whether you prefer minimalist nudes, playful florals, or bold graphic prints, there’s a beginner-friendly look here for every mood, season, and occasion. Happy painting!
You'll Like These Styles:


Leave a Reply