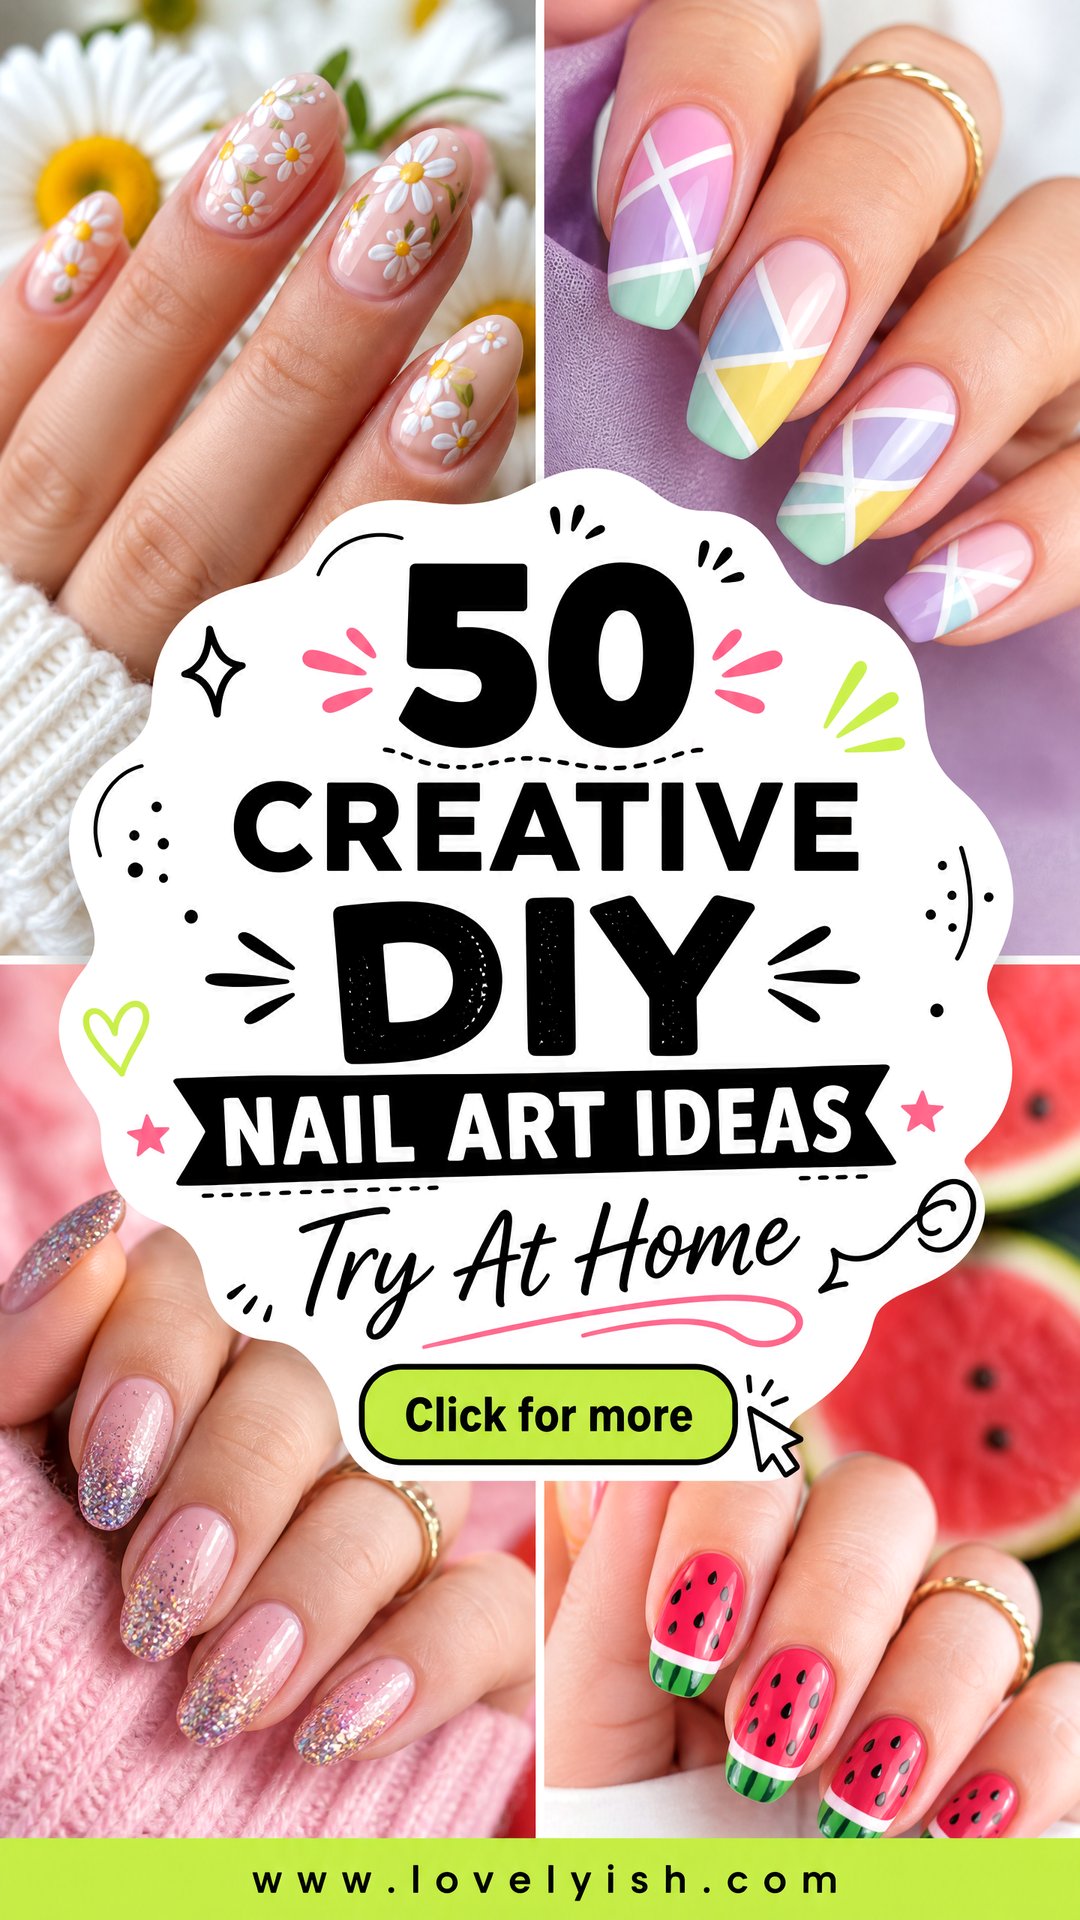
Doing your nails at home is one of the easiest ways to switch up your look without booking a salon appointment. Whether you’re just getting into manicures or you’ve been polishing for years, DIY nail art lets you experiment with color, texture, and patterns at your own pace. From beginner-friendly polka dots to trending chrome finishes, you only need a few basic tools, like toothpicks, tape, sponges, and dotting tools, to create salon-worthy looks at home. This guide rounds up 50 DIY nail art designs that are simple to recreate, fun to wear, and flattering on every nail shape and length. Grab your favorite polishes, set up a comfy workspace, and let’s turn your kitchen table into a mini nail studio.
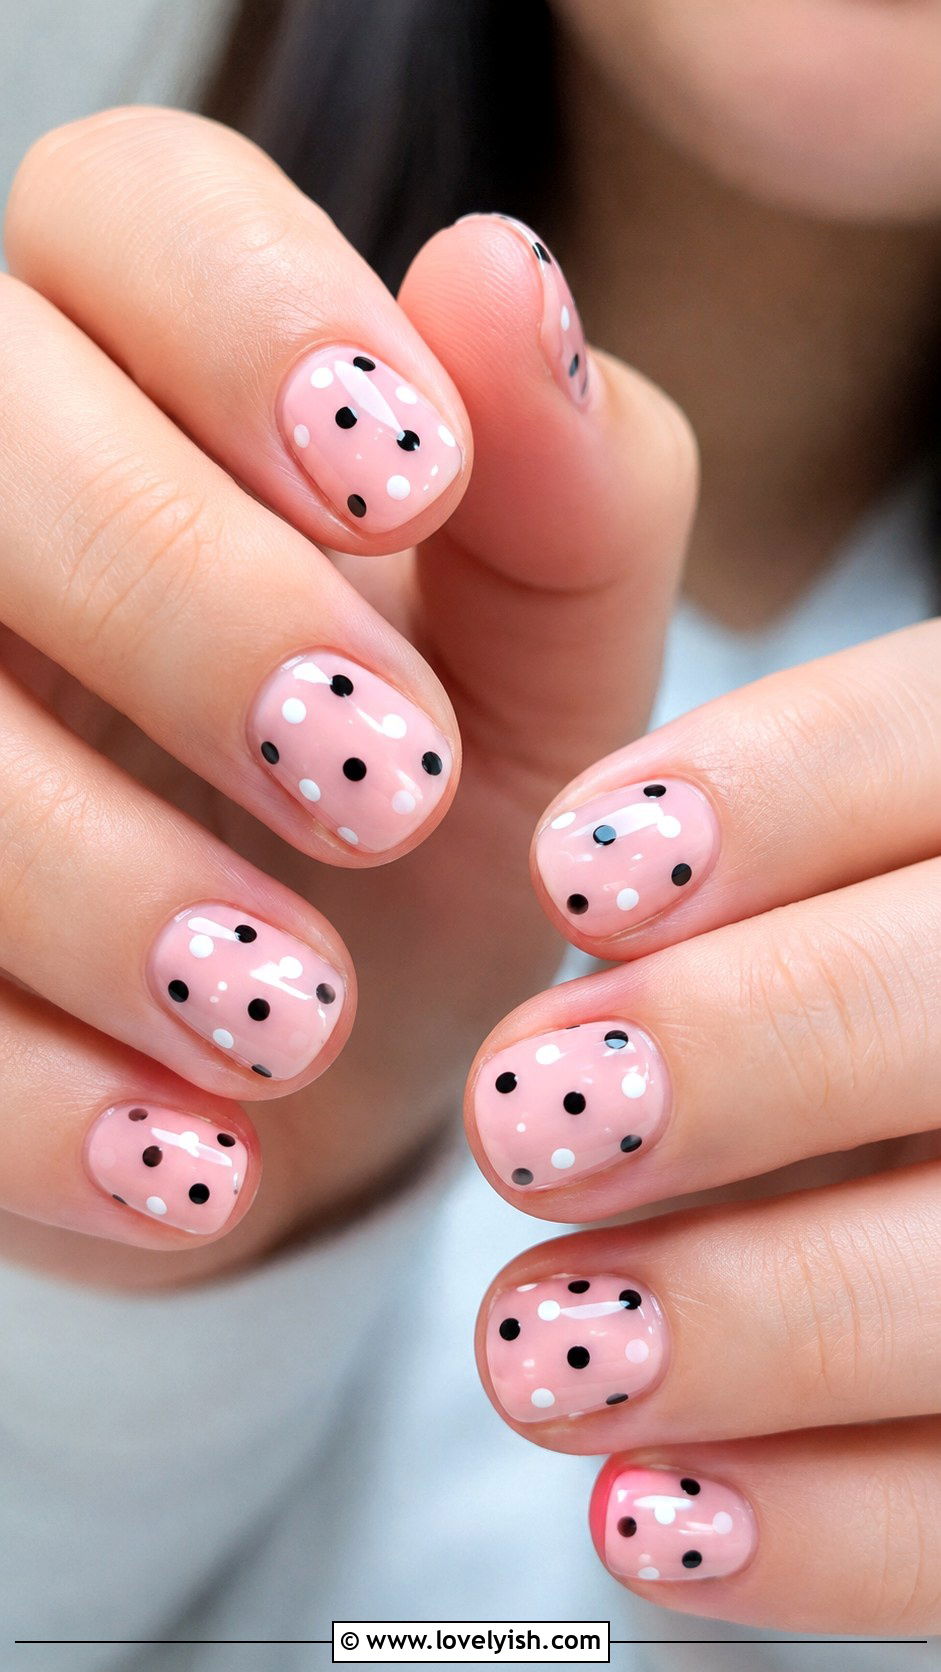
1. Polka Dot Nail Art
Polka dots are the gateway design for anyone new to DIY nail art. Start with two coats of a creamy base color like soft pink, pastel blue, or classic white. Once it’s fully dry, dip a toothpick or bobby pin into a contrasting polish and gently press tiny dots across each nail. You can scatter them randomly or line them up in neat rows. For extra interest, mix two or three dot colors on one accent nail. Seal everything with a glossy top coat to smooth out any texture. This design works beautifully on short, round nails and looks just as cute on long almond shapes. It’s quick, forgiving, and almost impossible to mess up.
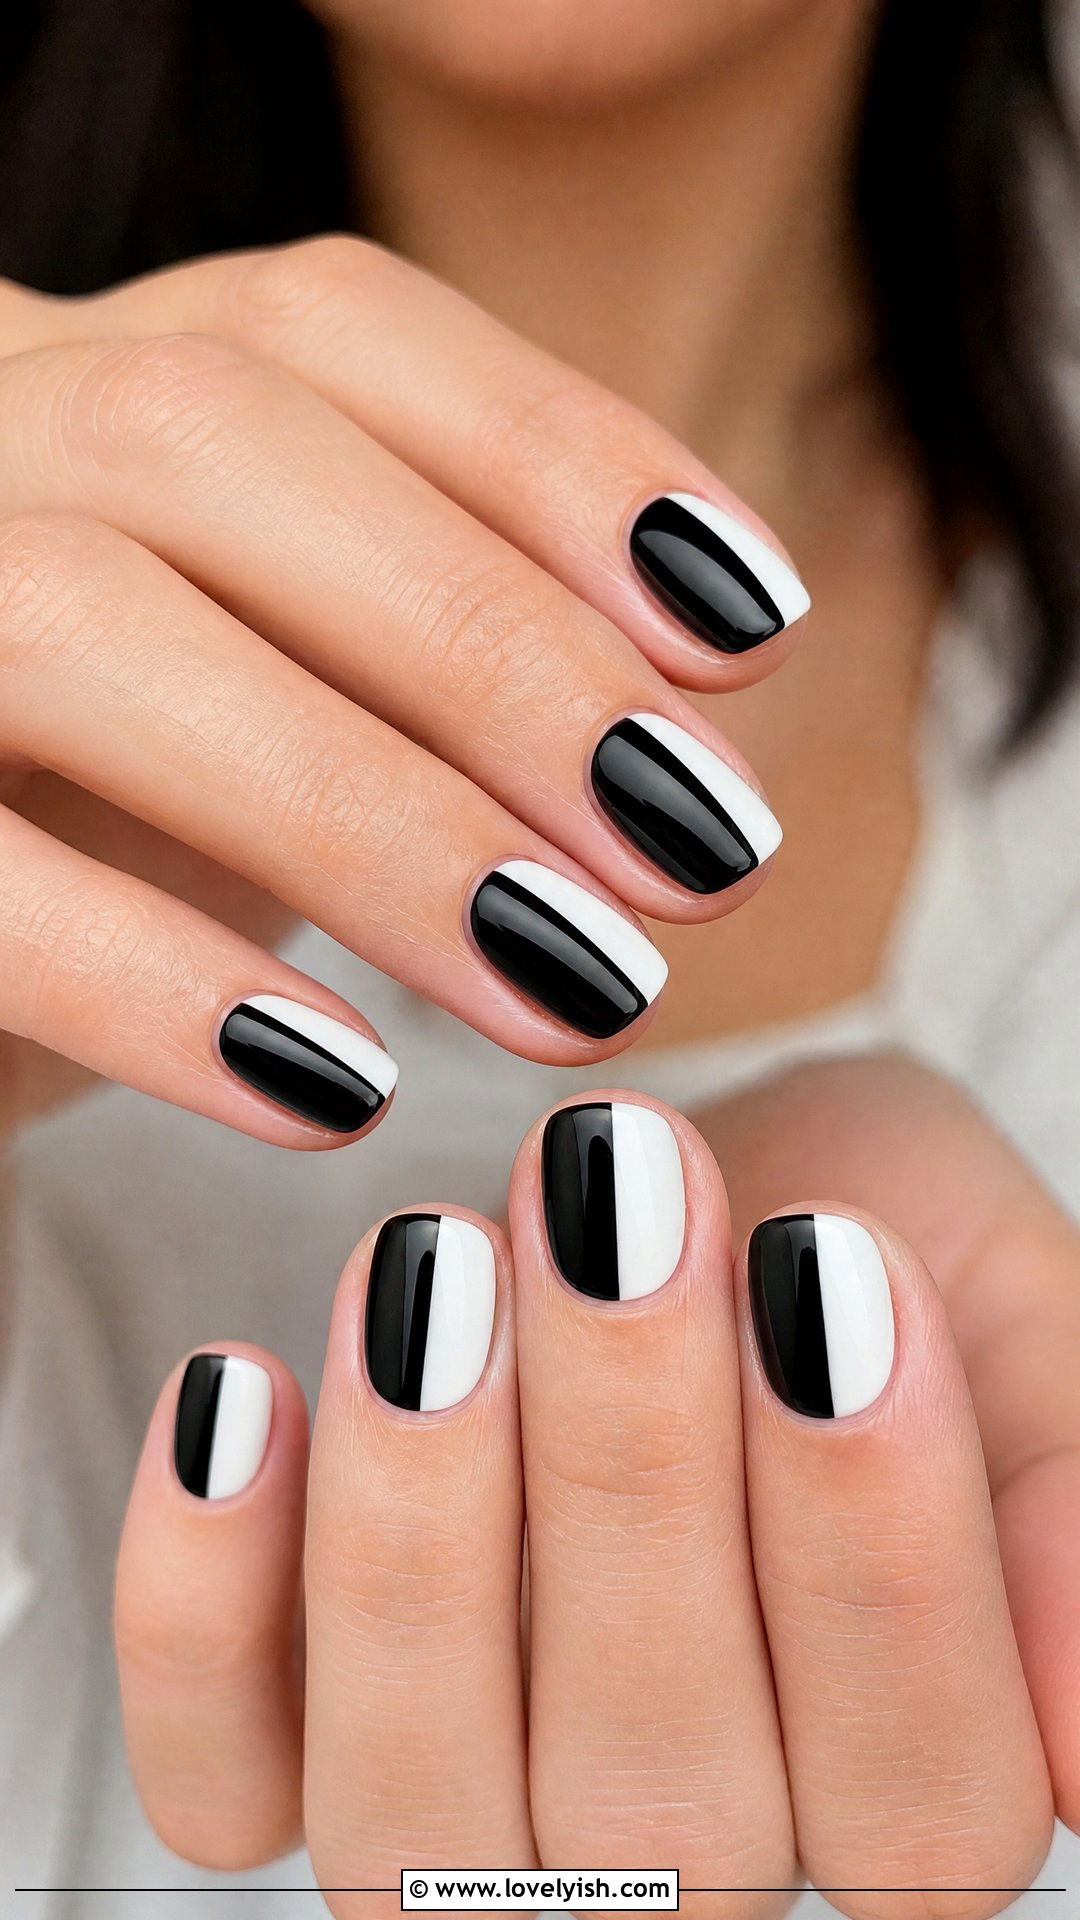
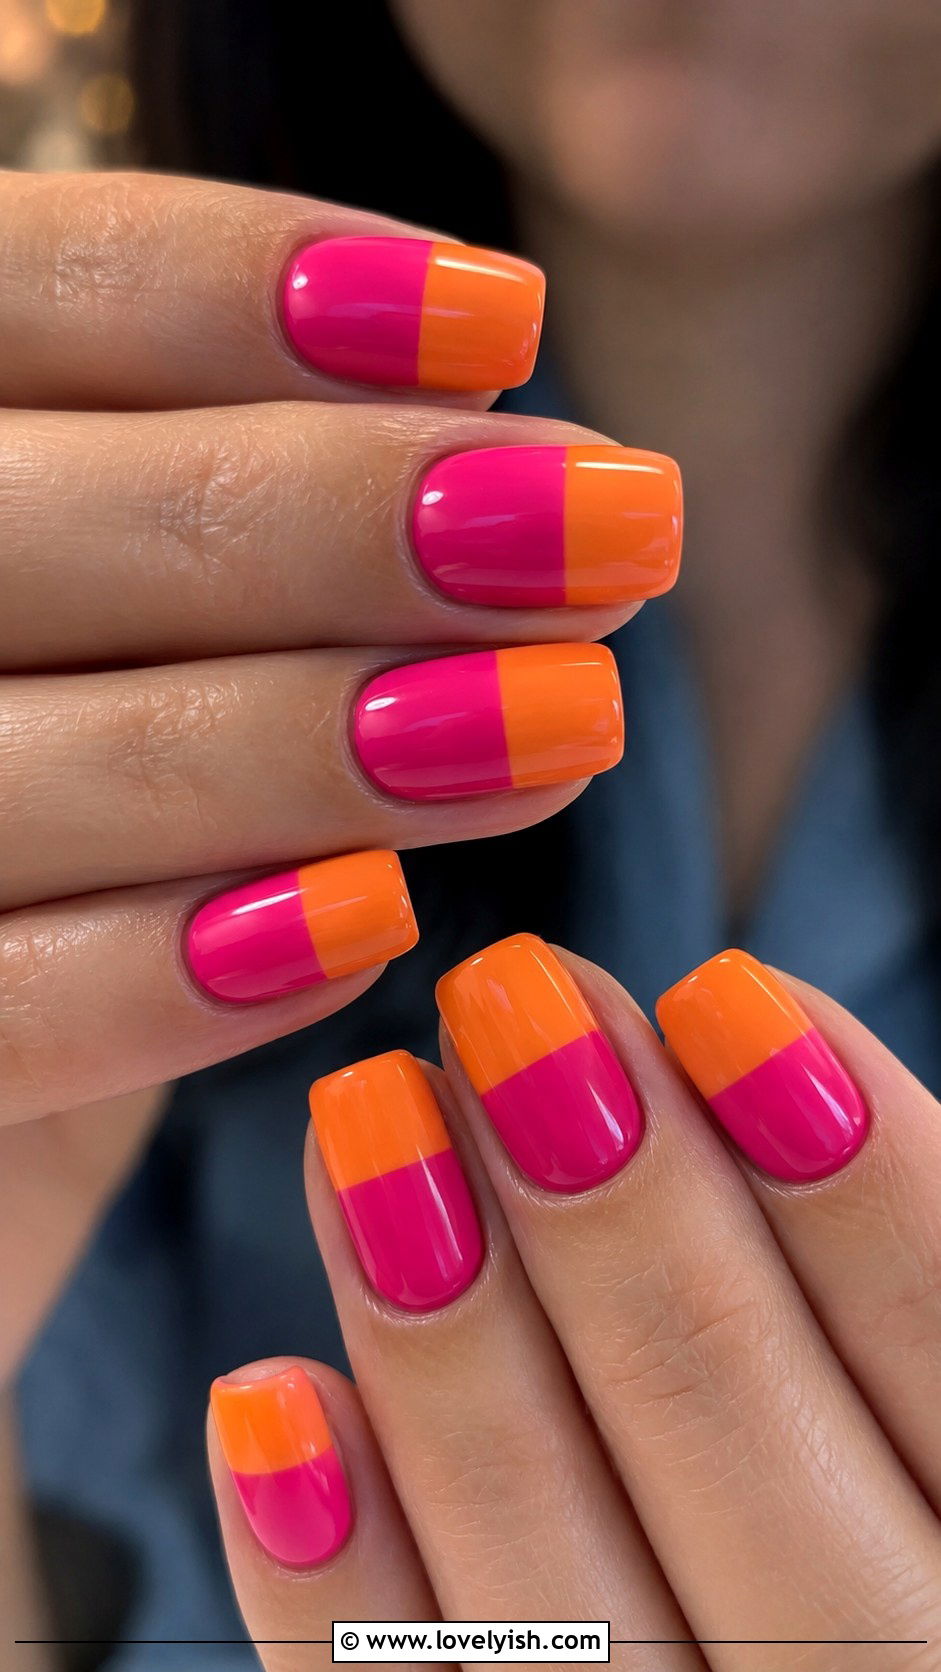
2. Half-and-Half Color Block Nails
This bold look proves two colors can completely transform a manicure. Paint the bottom half of each nail in one shade and the top half in another, using a thin nail art brush or even a piece of tape as a guide. Try unexpected combos like fuchsia and tangerine, lilac and mint, or chocolate brown and butter yellow. Keep the dividing line straight across or angle it diagonally for a modern twist. Because the design relies on clean color blocks, take your time around the seam. A high-shine top coat helps blend any small imperfections. Half-and-half nails feel fresh, colorful, and surprisingly chic on every nail length and shape.
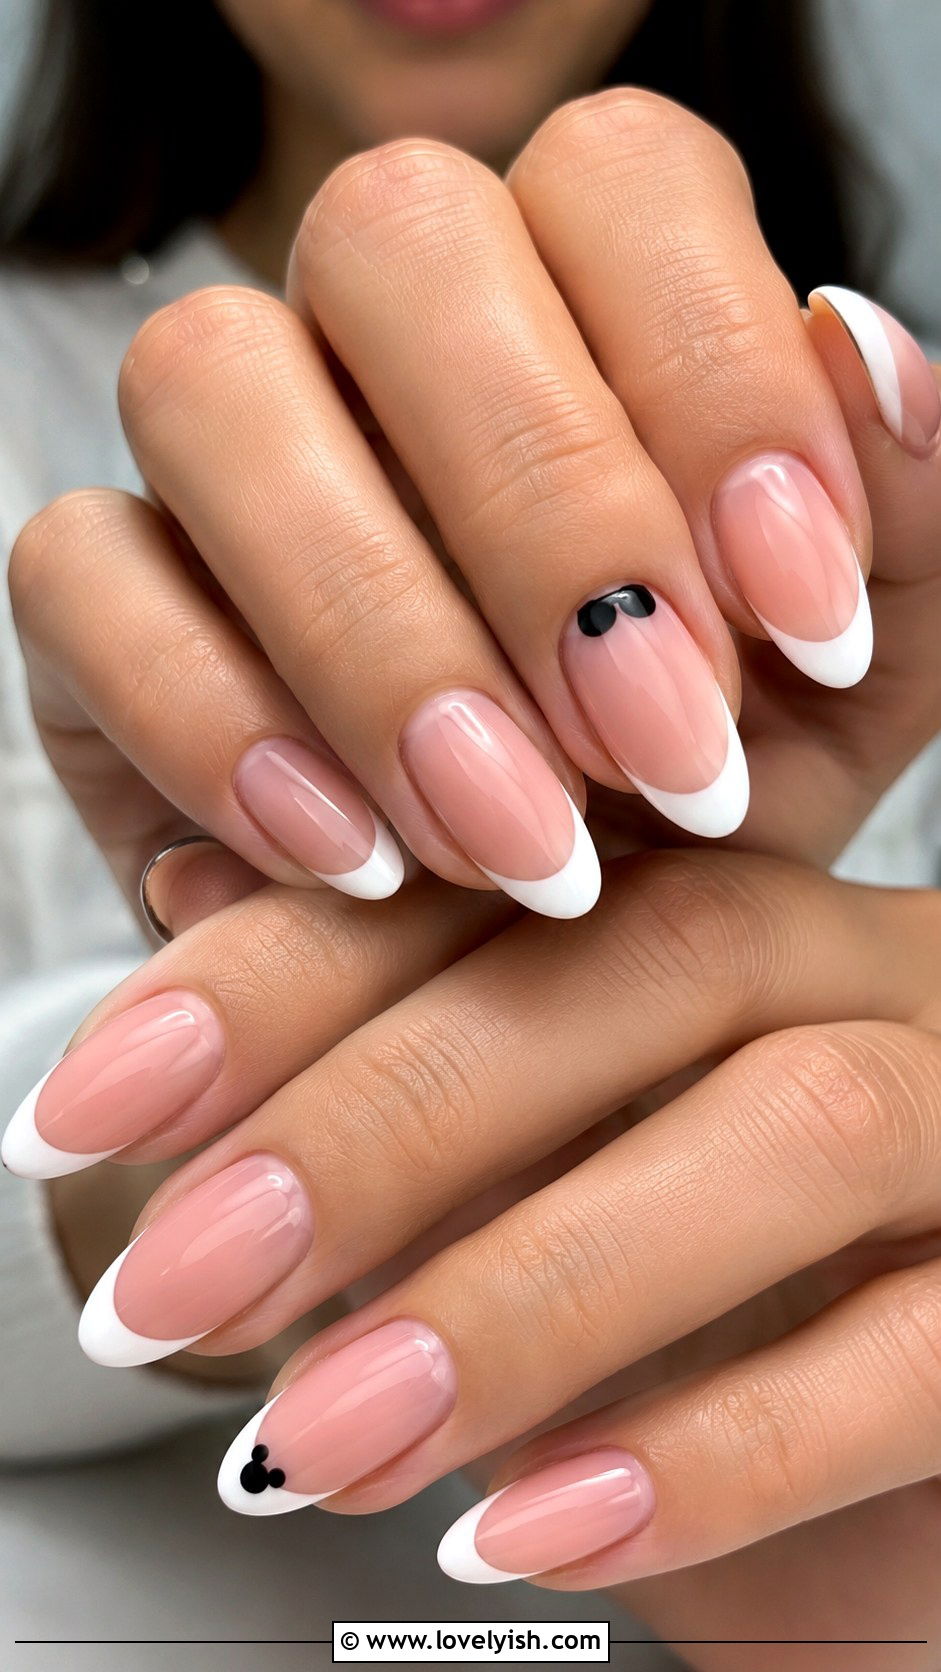
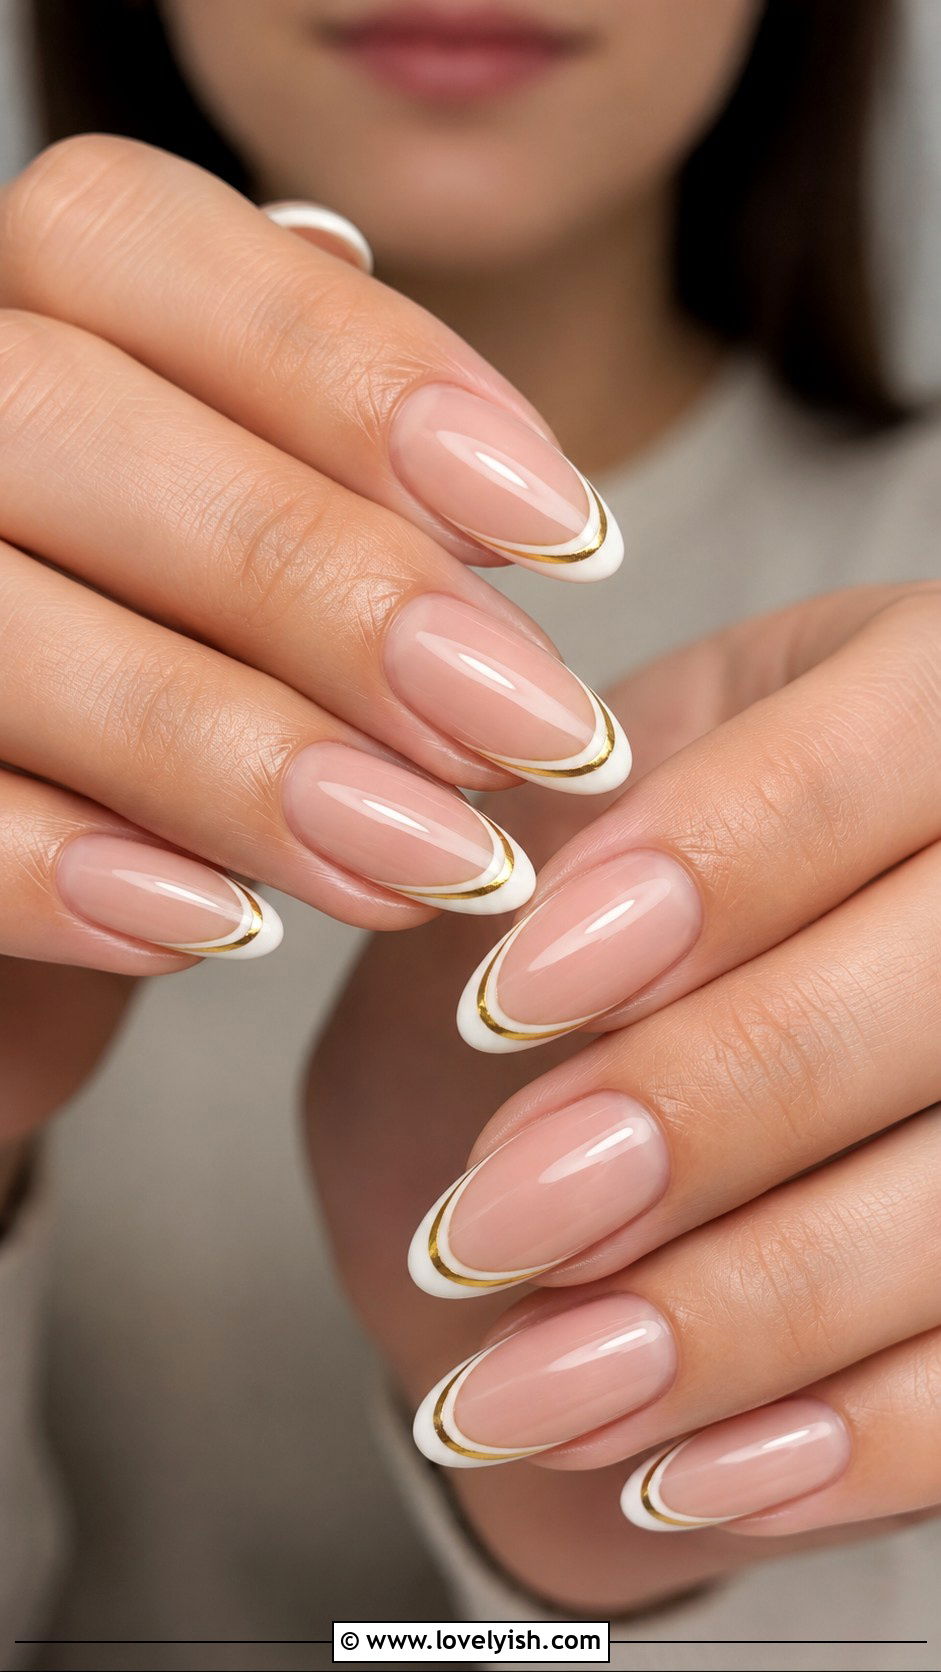
3. Classic French Tip Nail Art
The French manicure never gets old, and you can absolutely DIY it. Start with a sheer pink or nude base across the entire nail. Once dry, use a thin striping brush to paint a clean white tip along the natural curve of each nail. If freehand feels tricky, place a curved sticker or piece of tape just below where you want the tip to begin and paint above it. Two thin coats of white give the crispest finish. Add a glossy top coat to lock everything in. This timeless design suits work, weddings, and everyday wear, and it flatters short squoval nails just as much as long coffin shapes.
4. Glitter Tip Nail Art
If a traditional French tip feels too plain, swap the white for sparkle. Apply a sheer nude or milky white base coat first. Then dip a small flat brush into chunky or fine glitter polish and dab it onto the tip of each nail, building density toward the very edge. The glitter naturally fades down the nail for a soft gradient effect. Silver glitter feels classic, gold reads warm and luxe, and rose gold suits almost every skin tone. Use two coats of top coat to smooth the texture. Glitter tips are perfect for parties, birthdays, and weekends out, and they hide chips and grow-out lines really well.
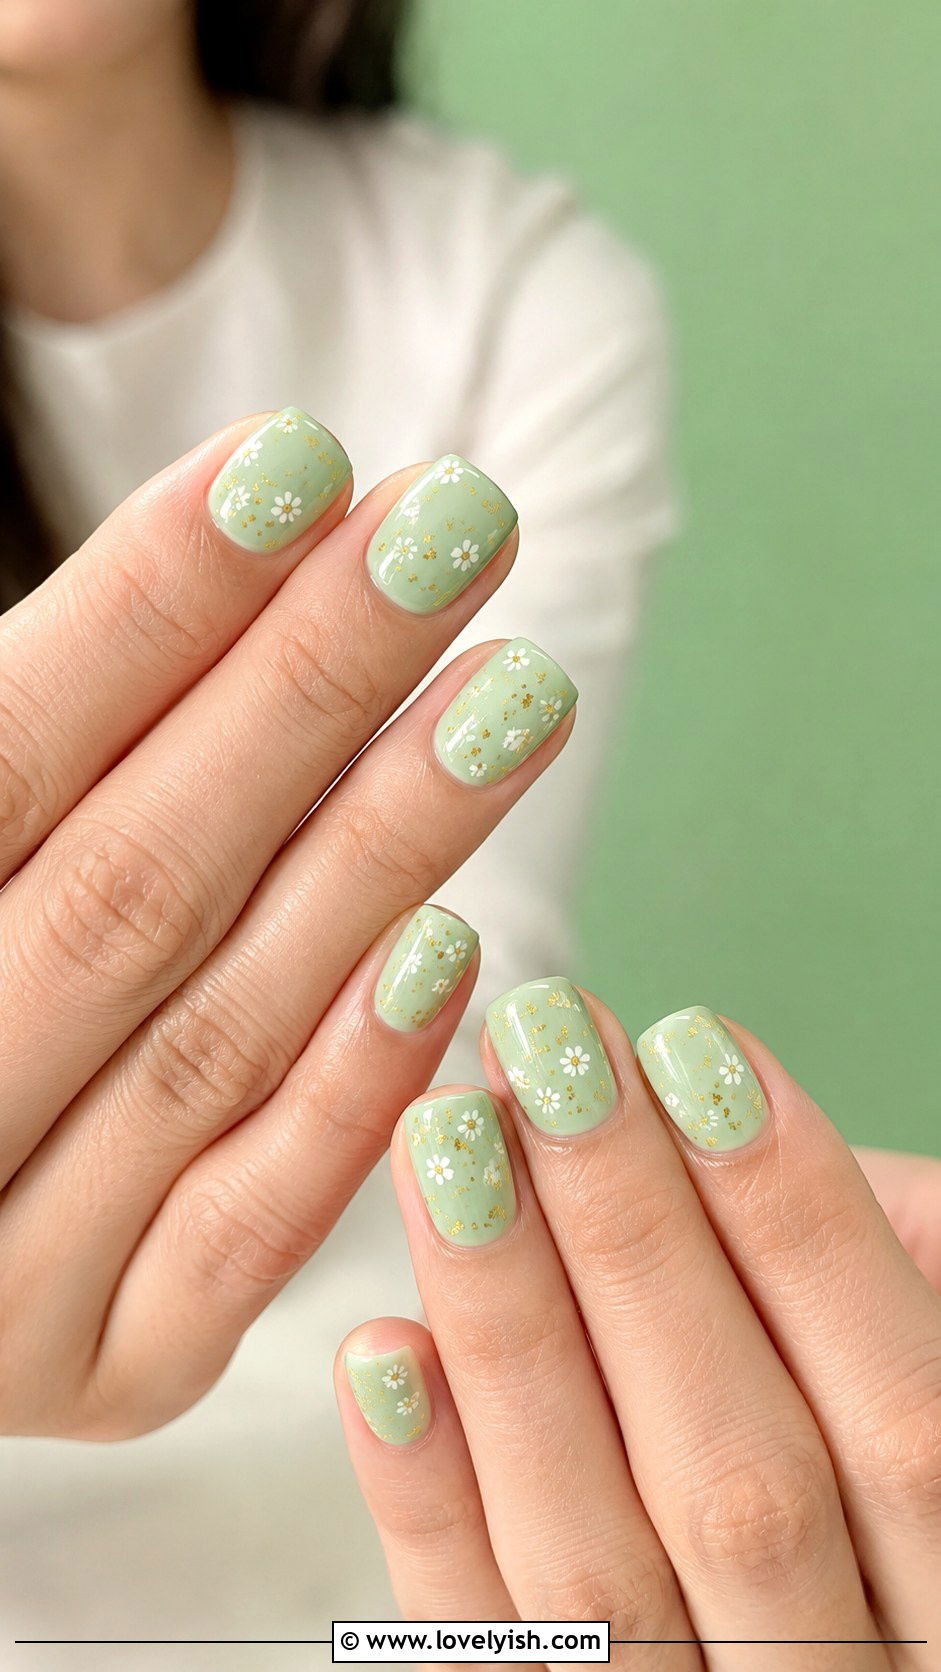
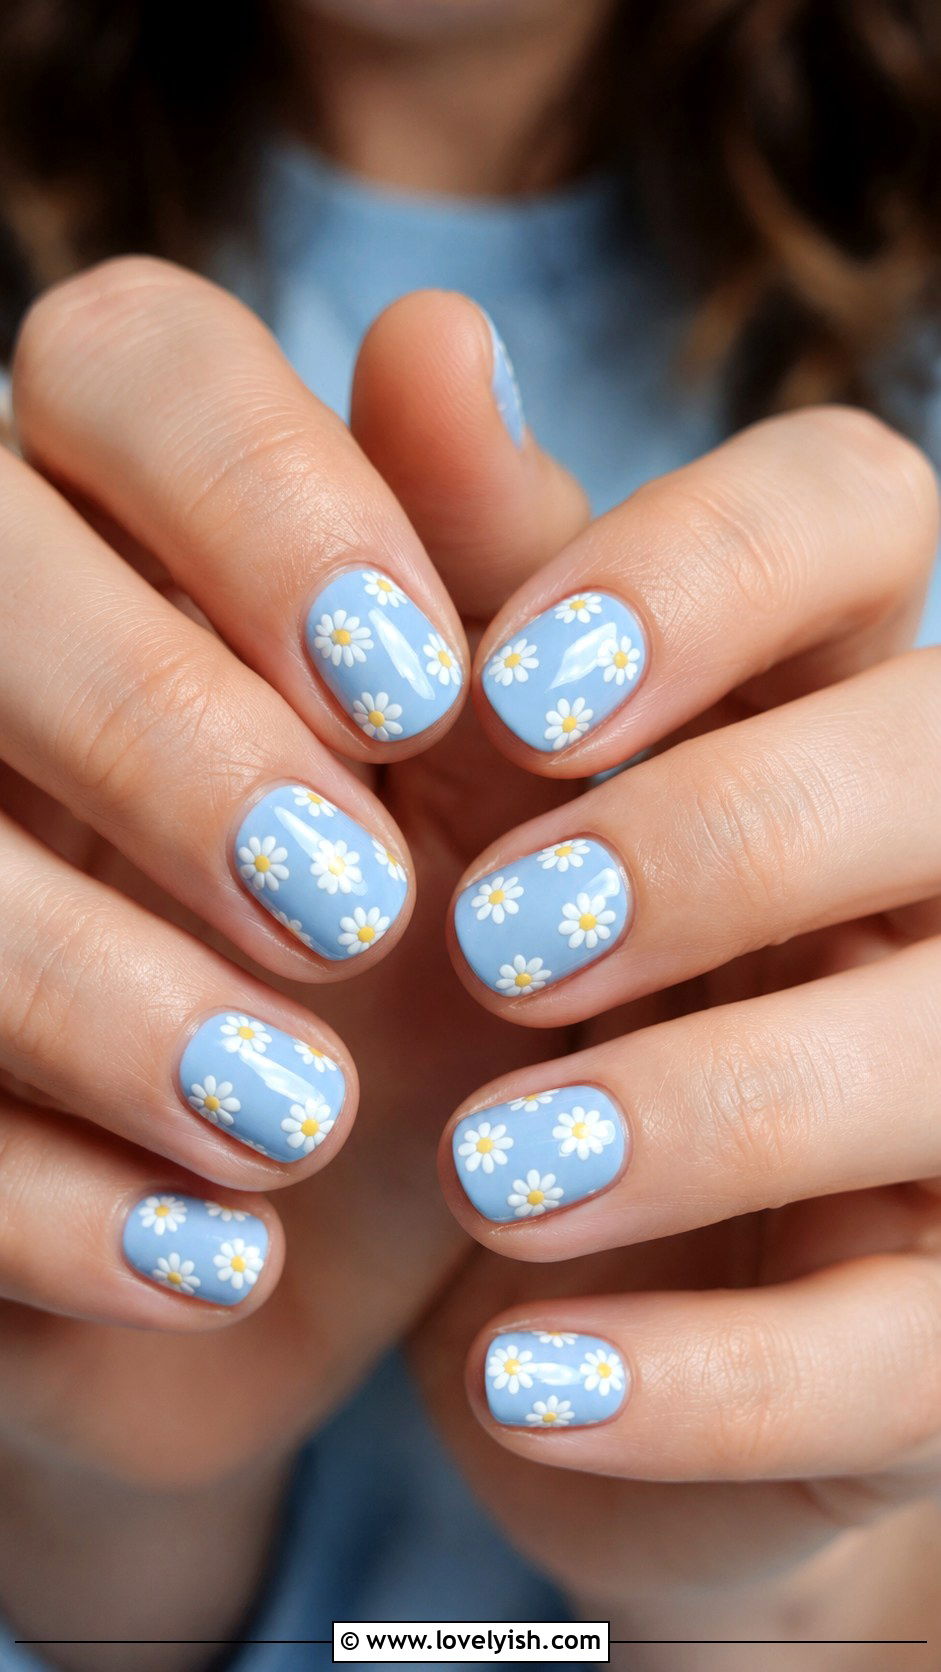
5. Daisy Flower Nail Art
Tiny daisies look complicated but only require a dotting tool. Start with a soft base like baby blue, butter yellow, or milky white. Use a small dotting tool or toothpick dipped in white polish to create five little dots in a circle for each flower’s petals. Add a yellow dot in the center and let it dry completely. Scatter two or three daisies per nail, or place a single bloom on accent nails. Tiny green leaf shapes add an extra spring touch. Seal with a clear top coat. Daisy nails work beautifully on short, rounded nails and feel especially fitting for spring, summer, garden parties, and bridal showers.
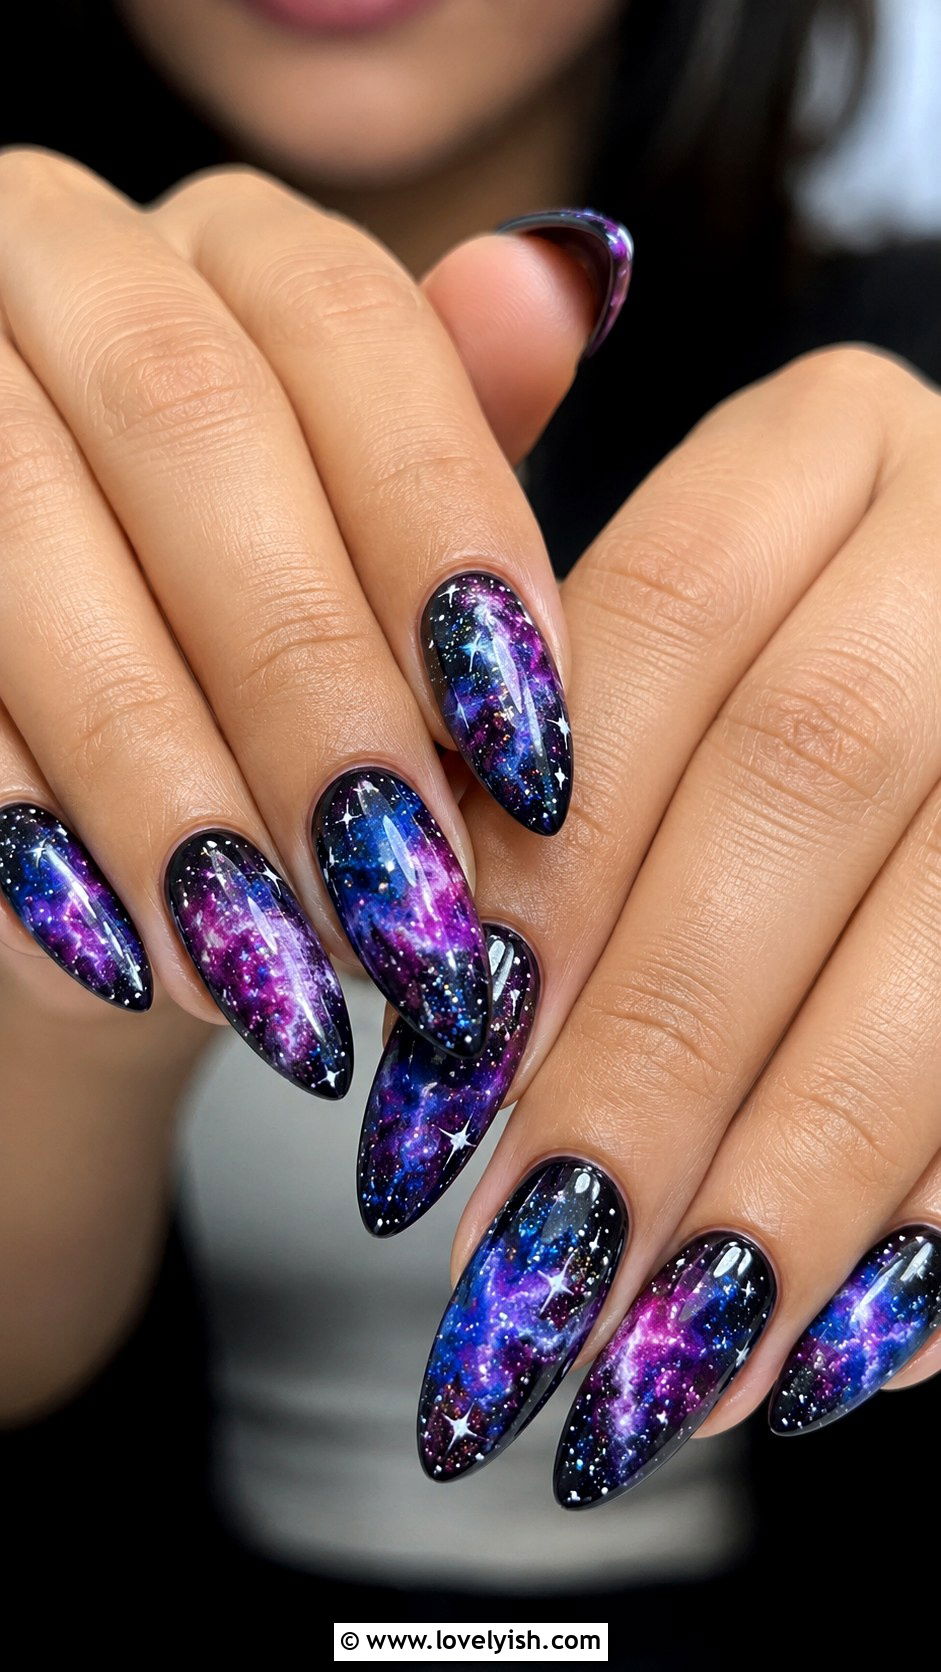
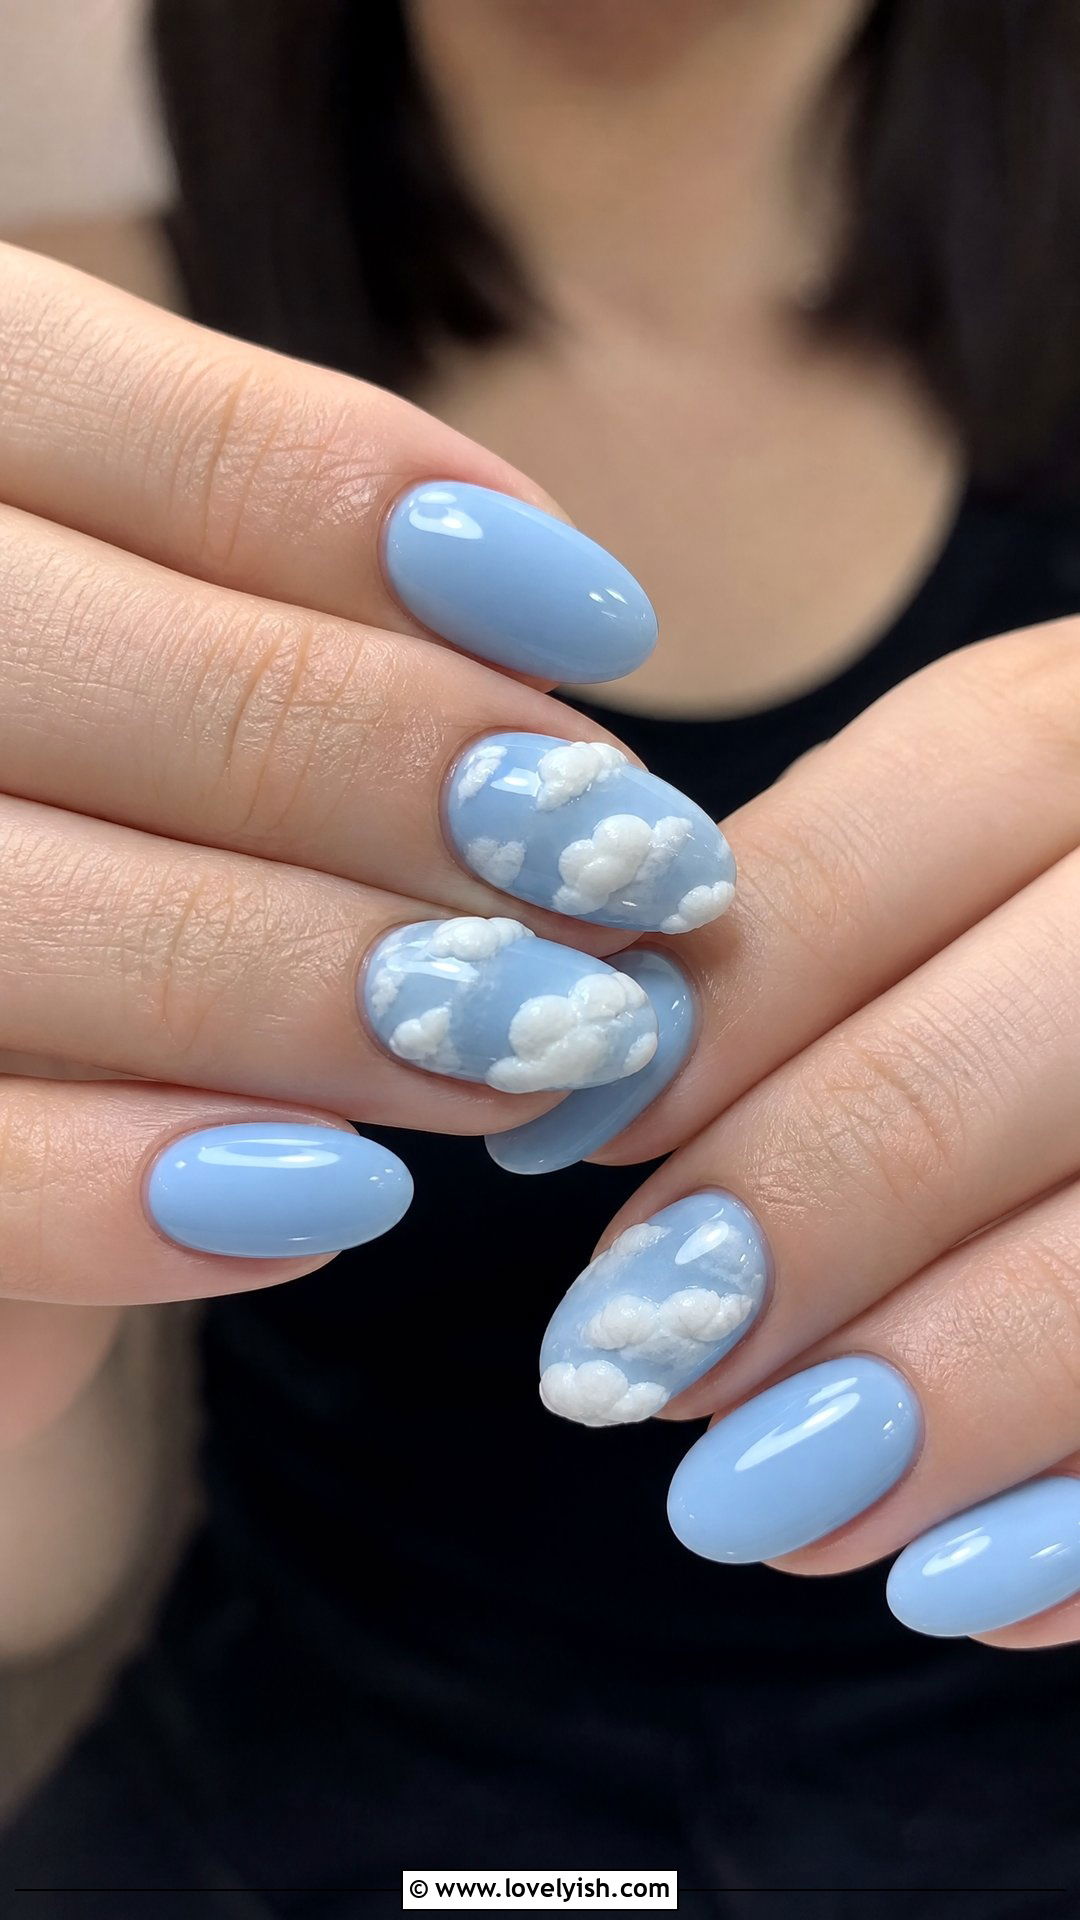
6. Galaxy Nail Art
Galaxy nails turn your fingertips into a tiny night sky. Start with a black base coat across all nails. While it’s tacky, use a small makeup sponge to dab patches of deep blue, purple, and magenta polish in soft cloud shapes. Add a touch of white to brighten the centers. Once dry, dip a thin toothpick in white polish and dot tiny stars across each nail. Finish with a fine silver glitter top coat for that scattered stardust effect. The trick is layering colors gradually so they blend instead of streak. This dreamy design looks especially striking on longer almond or stiletto shapes and never fails to draw compliments.
7. Water Marble Nail Art

Water marbling looks like magic, but it just takes patience. Fill a small cup with room-temperature water and drop two or three nail polishes onto the surface, one drop at a time, until concentric rings form. Use a toothpick to swirl the colors into a marbled pattern. Tape around your fingers to protect skin, then dip your nail into the design. Lift your finger out and peel away the tape. Each nail will have a unique swirl. Pair colors like teal and gold or pink and white for striking results. Top with clear gloss. This eye-catching look works on every nail shape and feels especially fun for summer.
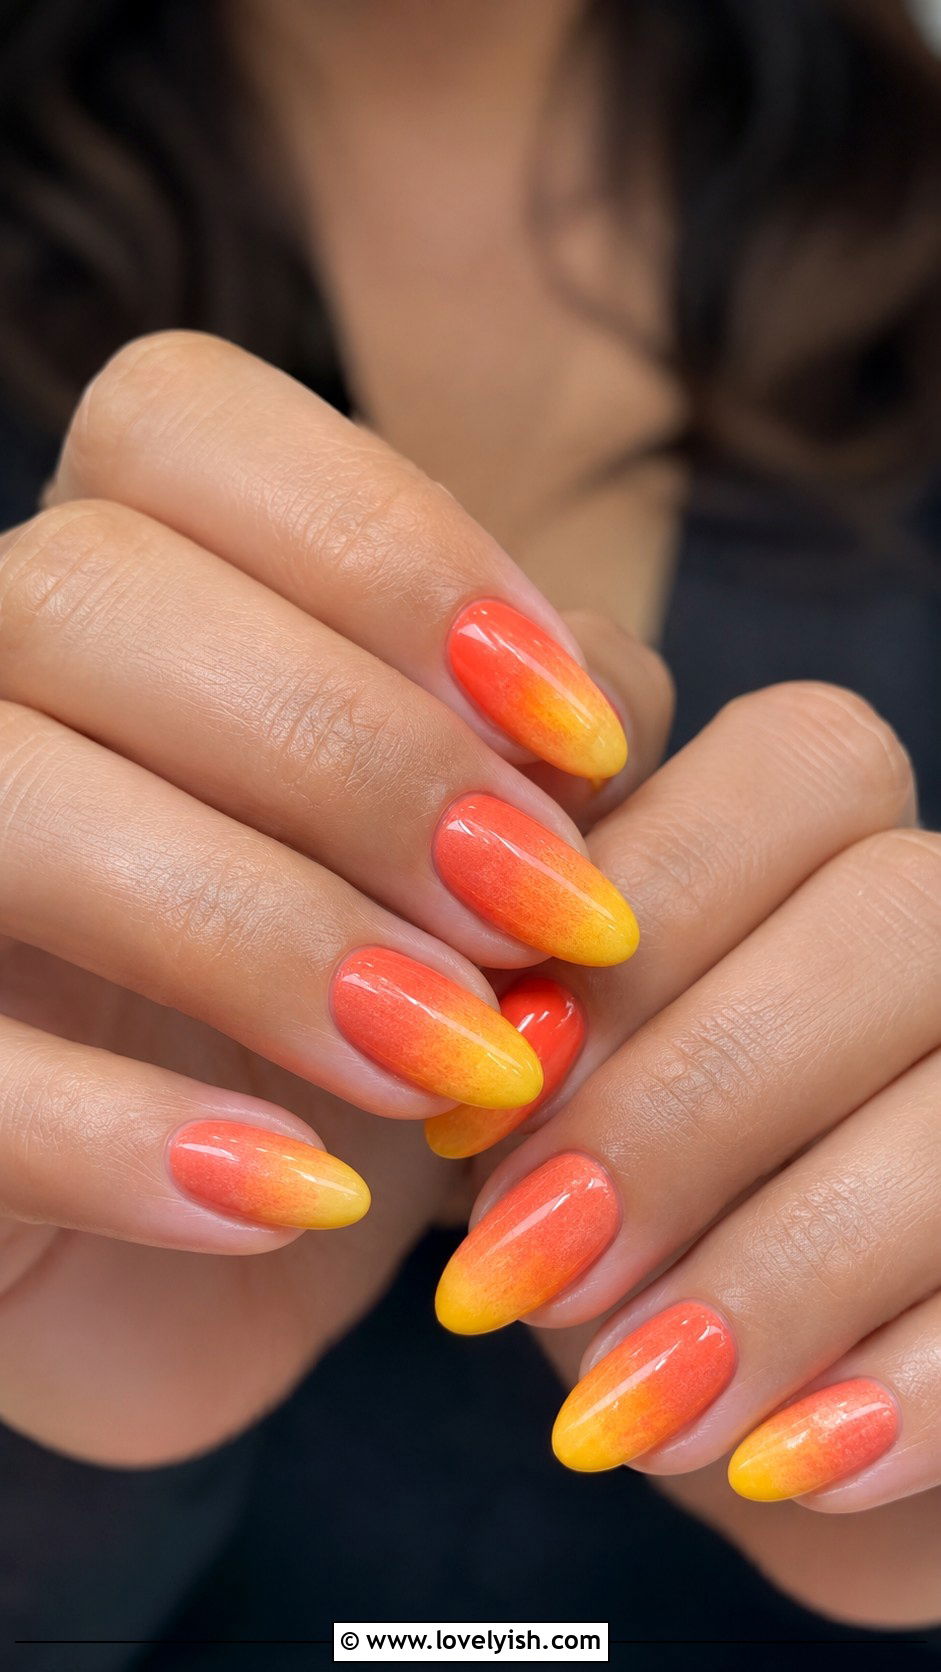
8. Sponge Ombre Nail Art
Ombre nails are softer than they sound and easier than they look. Apply a light base color, like white or pale pink, across all nails. On a small makeup sponge, paint two stripes of polish side by side, blending slightly where they meet. Press the sponge gently onto your nail, repeating two or three times until the gradient looks smooth. Try sunset shades like coral and yellow, or cool tones like lavender and blue. Clean up the edges with a brush dipped in remover. Two coats of glossy top coat blend any sponge texture and add shine. Ombre nails flatter every nail length and feel right for vacations, brunches, and casual weekends.
9. Tape Stripe Nail Art
Striping tape, washi tape, or even regular scotch tape can create crisp geometric lines. Paint your base color and let it fully dry, then place strips of tape across each nail in any pattern you like, diagonal lines, crosshatches, or a single stripe down the center. Paint a second color over the tape and peel it away while the polish is still slightly wet. The result is sharp, clean lines without any freehand stress. Try black stripes over white for a graphic look, or gold over navy for something elevated. A glossy top coat smooths the edges. This design works on every nail shape and feels modern and minimal.
10. Heart Accent Nail Art
Hearts add instant cuteness to any manicure. Apply a soft base coat in pink, white, or red. To create a heart, use a dotting tool to place two small dots side by side, then drag the polish down to a point with a toothpick. Repeat for as many hearts as you’d like, scattered or grouped on one accent finger. Tiny red hearts on a milky white base feel sweet, while black hearts on hot pink read playful. You can also outline the hearts instead of filling them in. Top with glossy clear coat. Heart nails suit Valentine’s-inspired looks, anniversaries, and any time you want something flirty and fun.
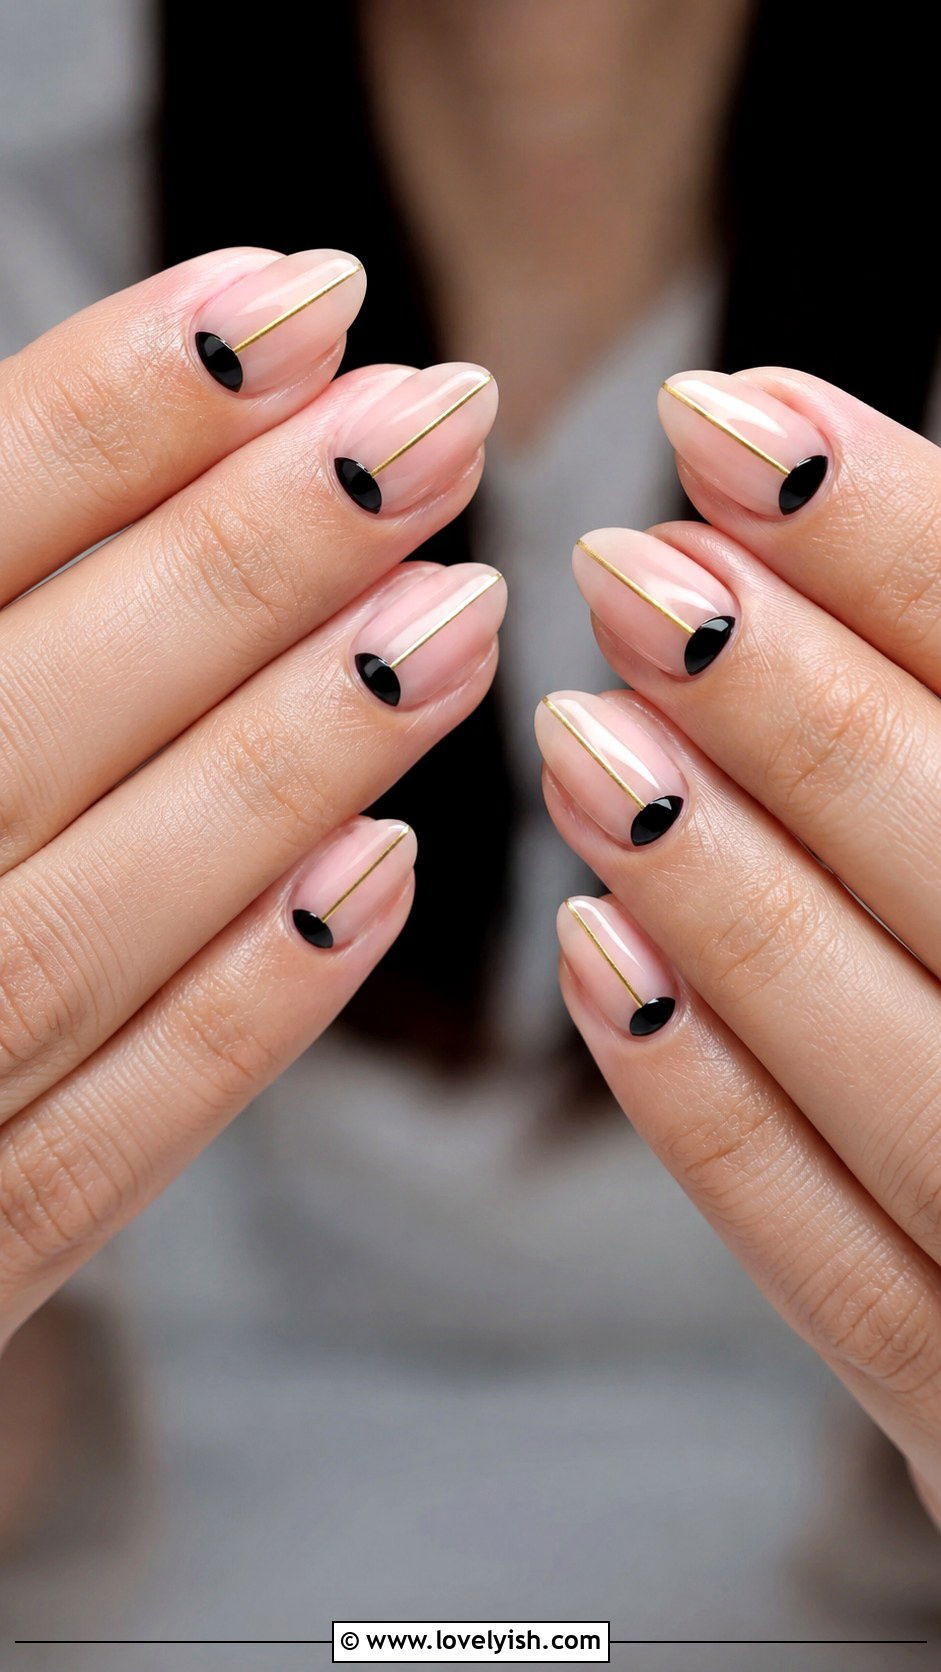
11. Negative Space Nail Art
Negative space designs use your bare nail as part of the artwork. Start by buffing your natural nail until smooth and applying a clear strengthening base. Then use polish only on certain areas, a half moon at the cuticle, a triangle at the tip, or a thin line down the center. Black, white, and metallic shades show up best. Because you’re leaving so much nail exposed, this look feels minimalist and modern. It also grows out gracefully without an obvious gap. Negative space nails work especially well on short to medium nails and feel office-appropriate while still being creative. A clear top coat ties everything together.

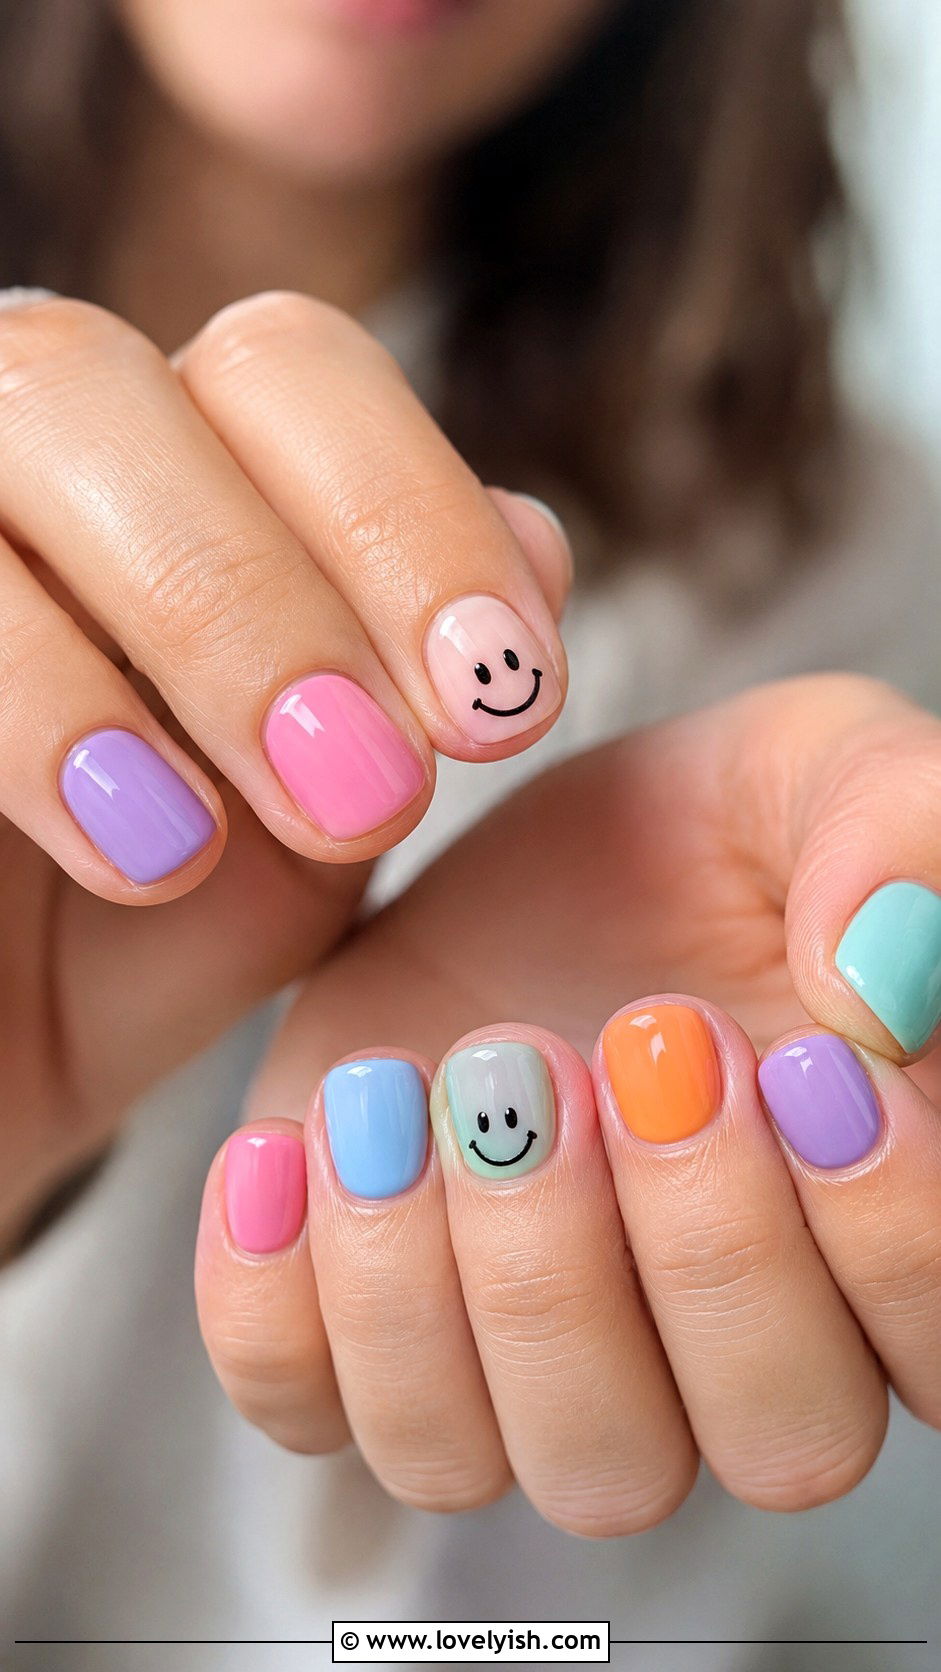
12. Smiley Face Nail Art
Retro smiley faces bring instant joy to a manicure. Paint each nail in a different bright pastel shade, think mint, lavender, peach, baby blue, and butter yellow, for that color-pop effect. On one or two accent nails, use a toothpick dipped in black polish to make two small dots for eyes and a tiny curved line for the smile. If you want filled-in faces, paint a small yellow circle first, then add the features once it’s dry. The mismatched colors plus playful faces feel very Y2K. Seal with a glossy top coat. This cheerful design suits short squoval or round nails and is perfect for casual everyday wear.
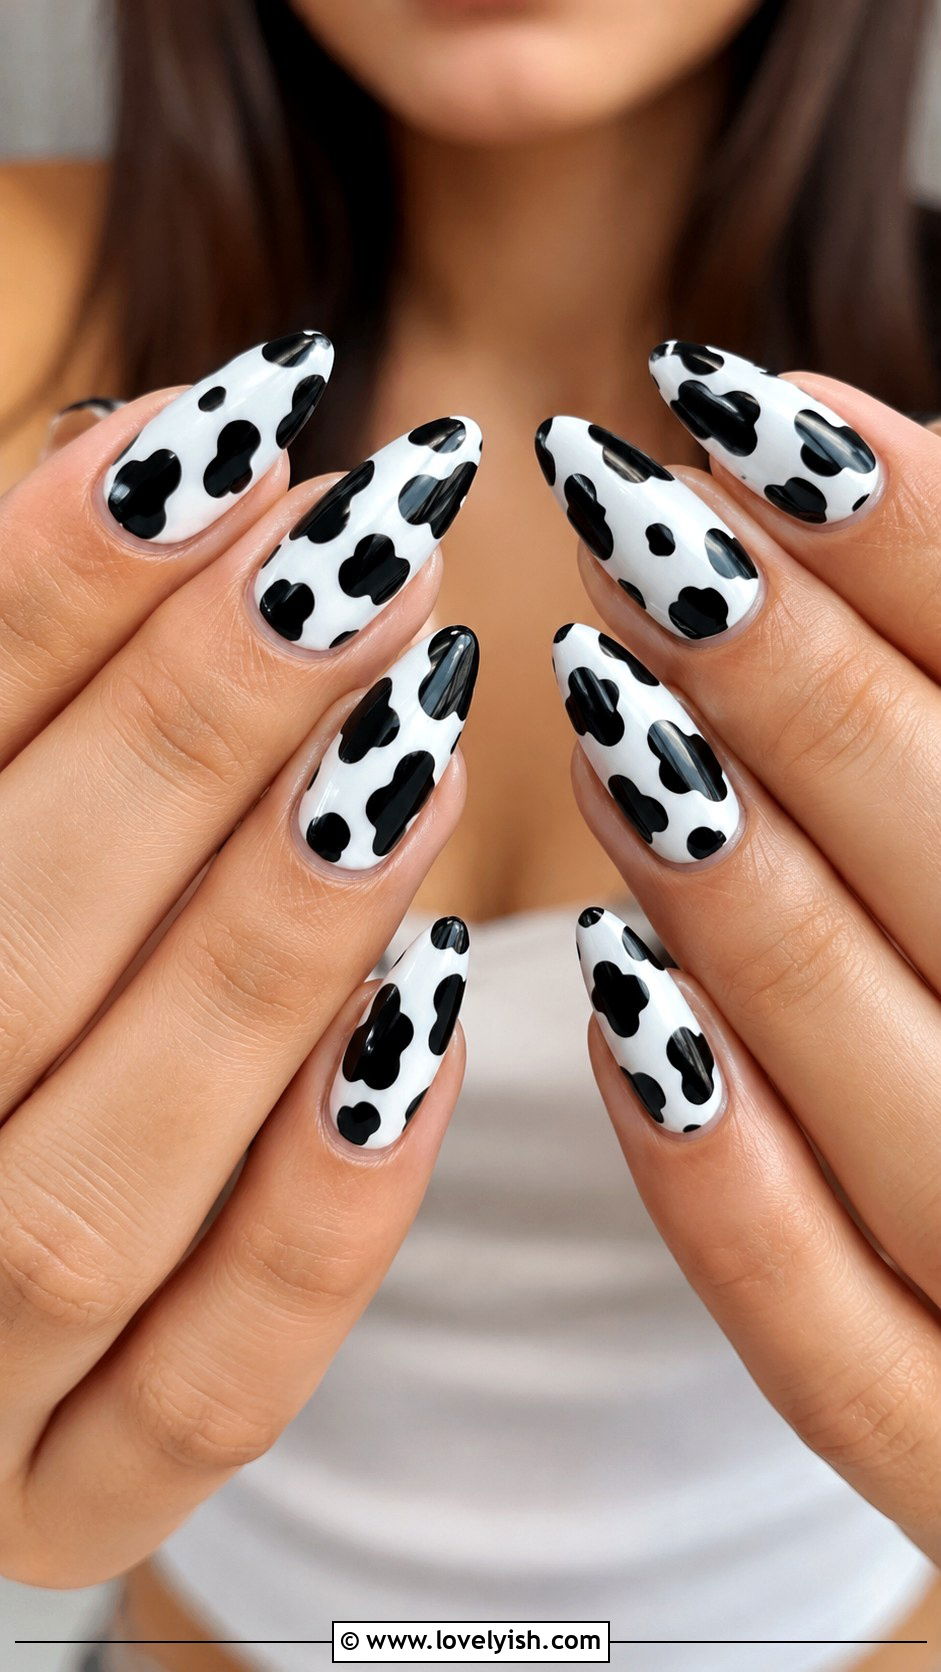
13. Cow Print Nail Art
Cow print is one of the easiest animal patterns to recreate at home. Apply two coats of white polish as your base. Once dry, use a thin nail art brush or toothpick dipped in black polish to paint irregular blob shapes across each nail. Don’t worry about symmetry, the more random the better. Vary the sizes so some patches are large and others are tiny. For a colorful twist, swap black for pink, brown, or pastel blue. Finish with a glossy top coat. Cow print works on any nail length but looks especially striking on longer almond or coffin shapes. It’s a fun trend that photographs beautifully.
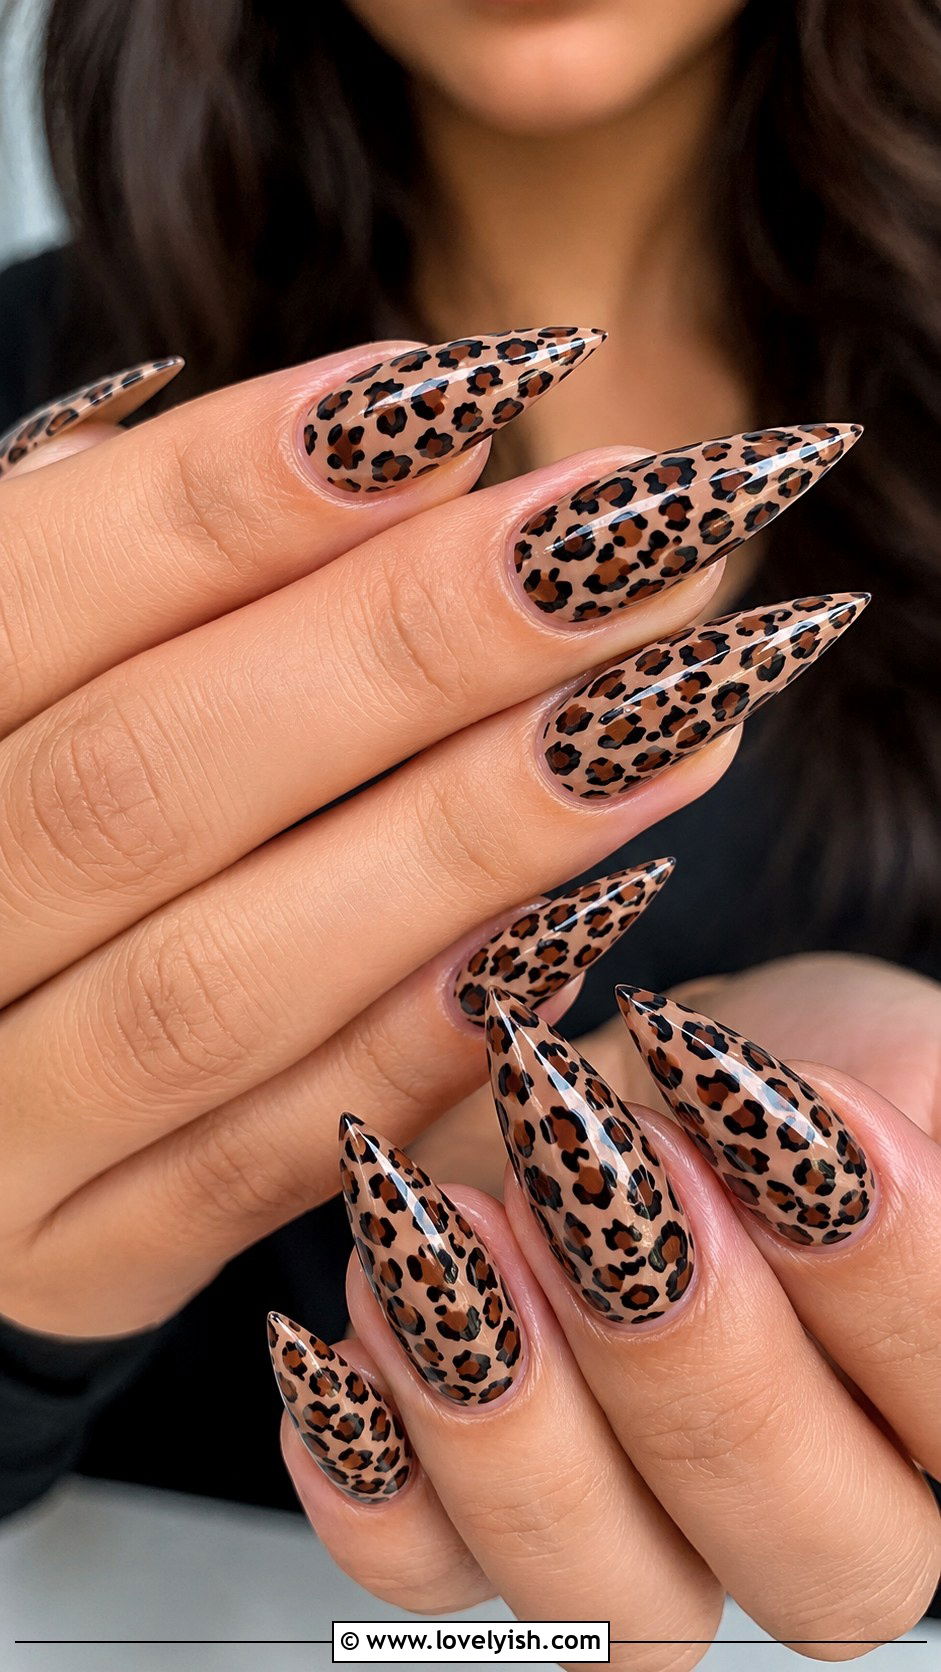
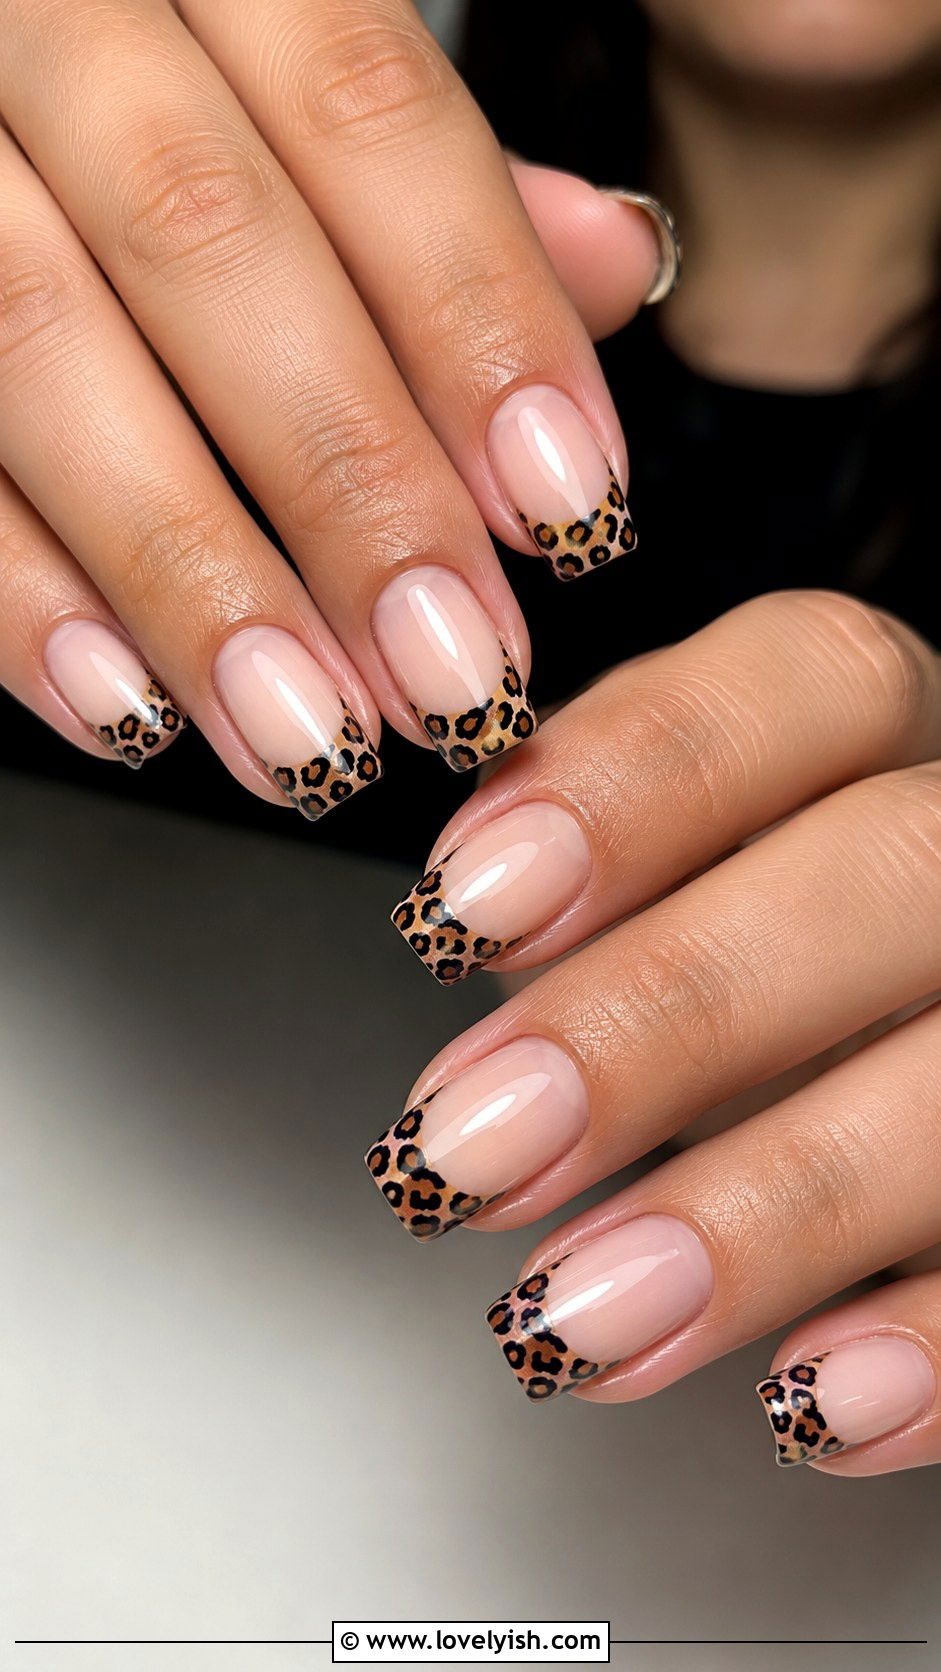
14. Leopard Print Nail Art
Leopard print looks bold but takes only a few simple steps. Start with a warm base like nude, tan, or soft gold. Use a dotting tool or toothpick to create irregular brown or black blobs across each nail. Then, with a thinner brush, outline parts of each blob with a darker shade like espresso or deep navy. Leave gaps in the outlines so each spot looks more realistic. Two or three accent nails in full leopard print, paired with solid nude on the rest, looks especially polished. Add a glossy top coat. This print suits every season and looks fierce on stiletto, almond, and coffin shapes alike.
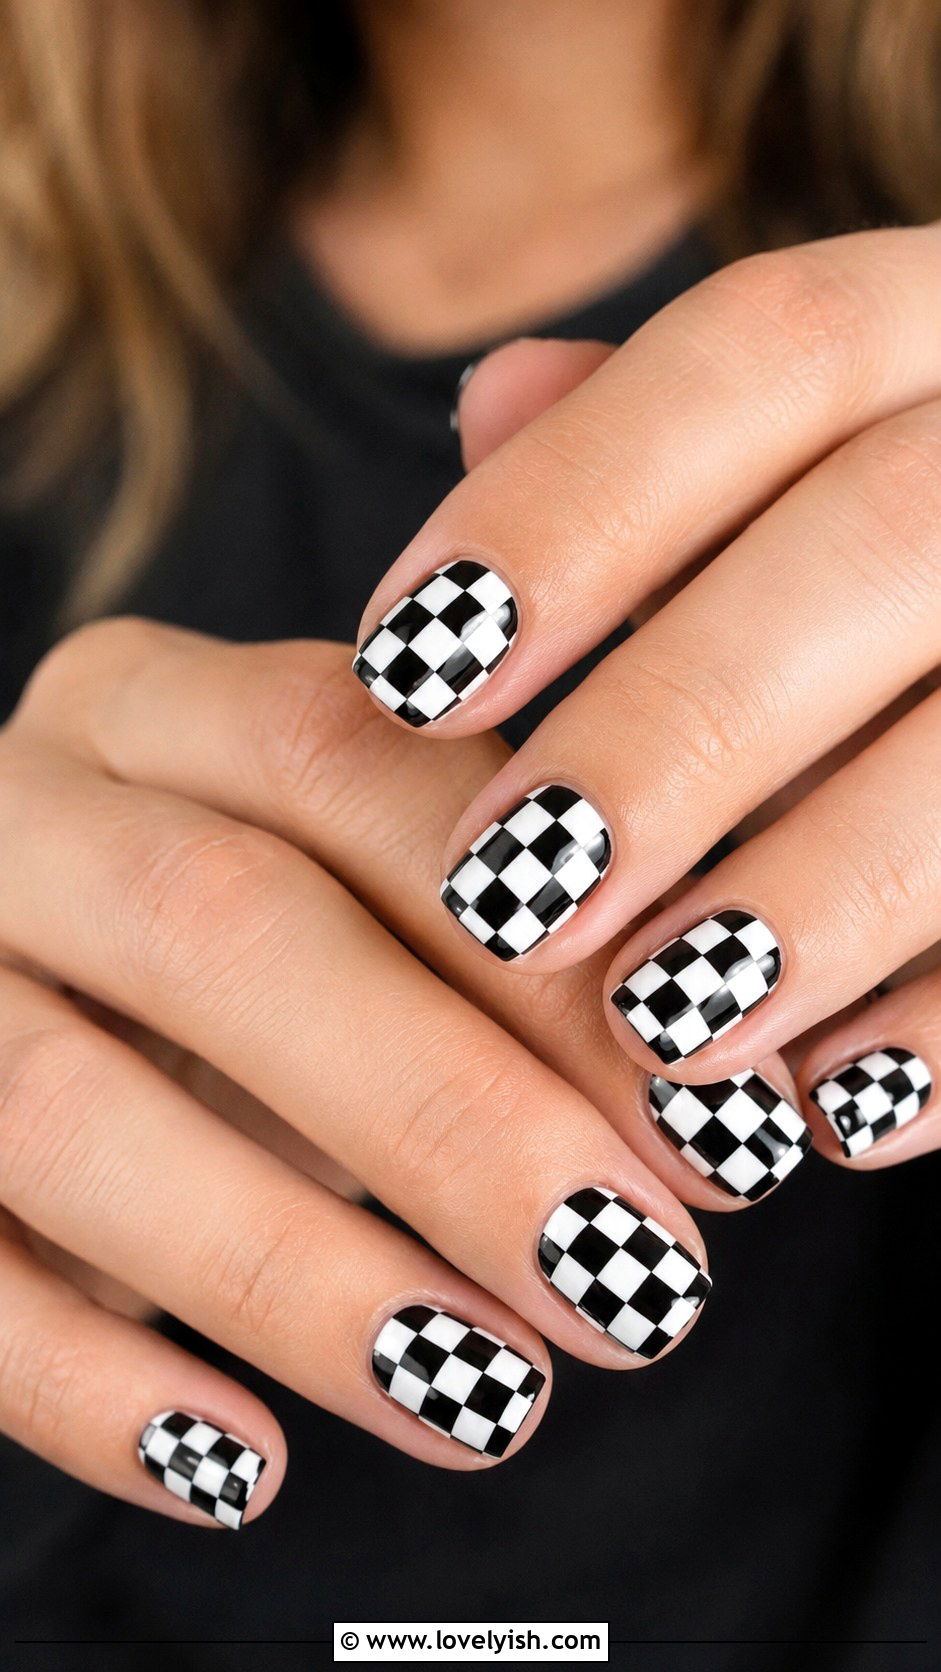
15. Checkerboard Nail Art
Checkerboard nails bring a fun, retro vibe. Paint two coats of white polish on each nail. Once fully dry, use a small square nail art brush or thin striping tool dipped in black polish to create a grid of small squares. Alternate filling them in to form the classic checker pattern. If freehand feels tough, use tape to mark off straight lines first. Try pastel combos like baby blue and white, or sage green and cream, for a softer take. Finish with glossy top coat. Checkerboard works best on shorter square or squoval nails where the pattern fits naturally, and it pairs beautifully with denim and casual outfits.
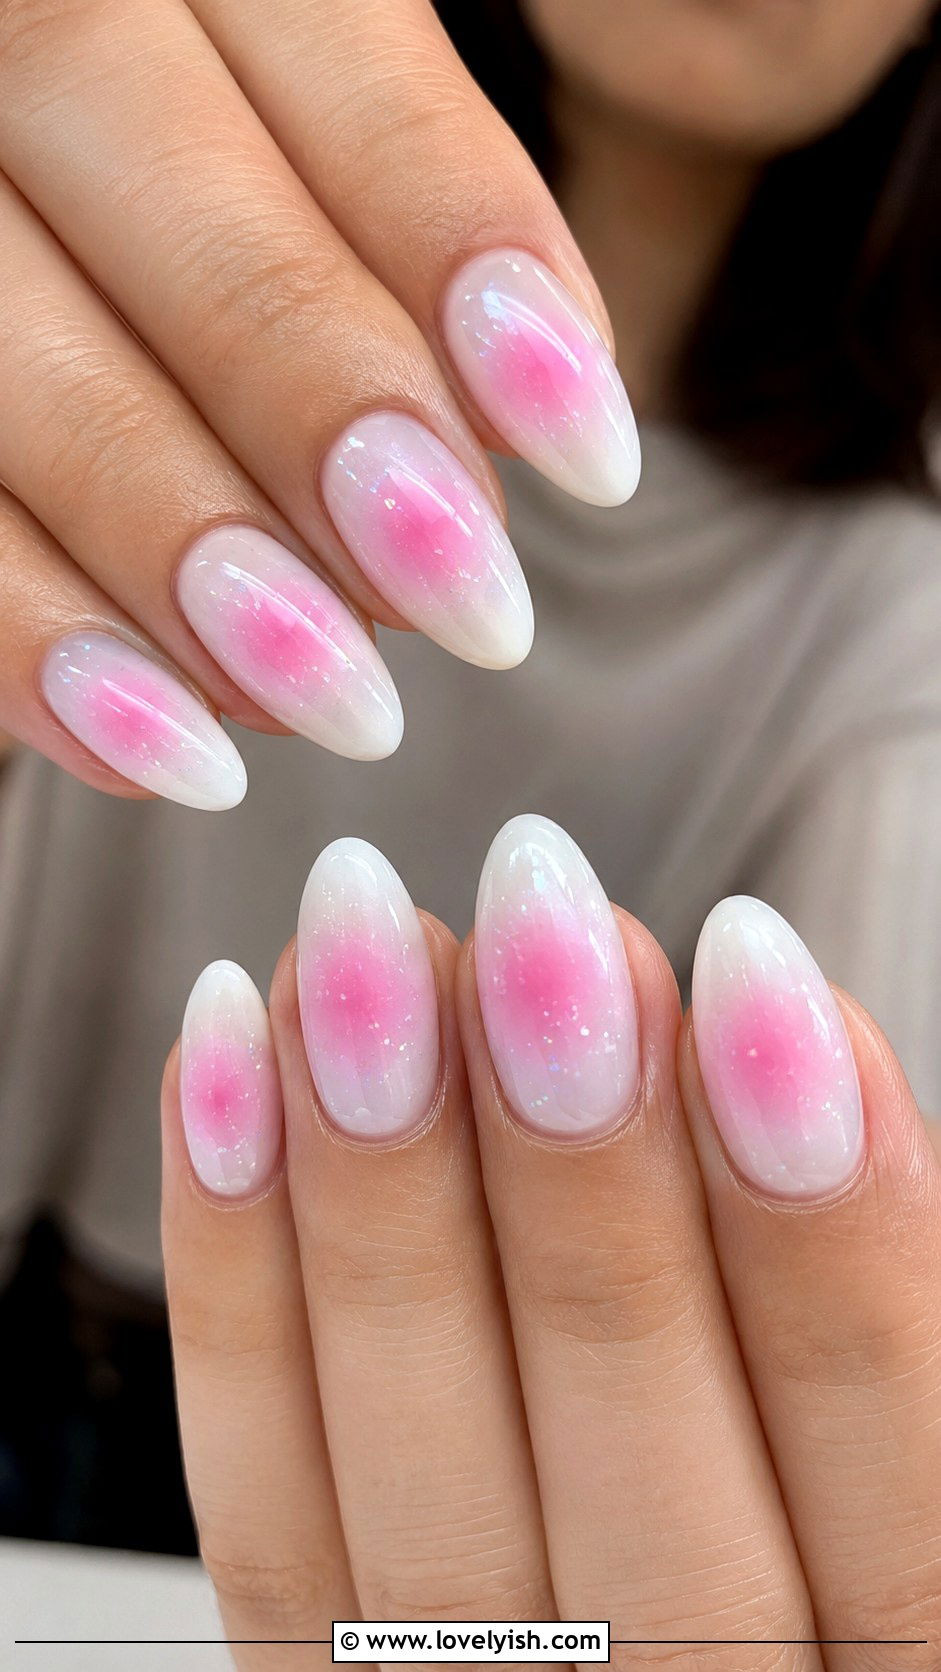
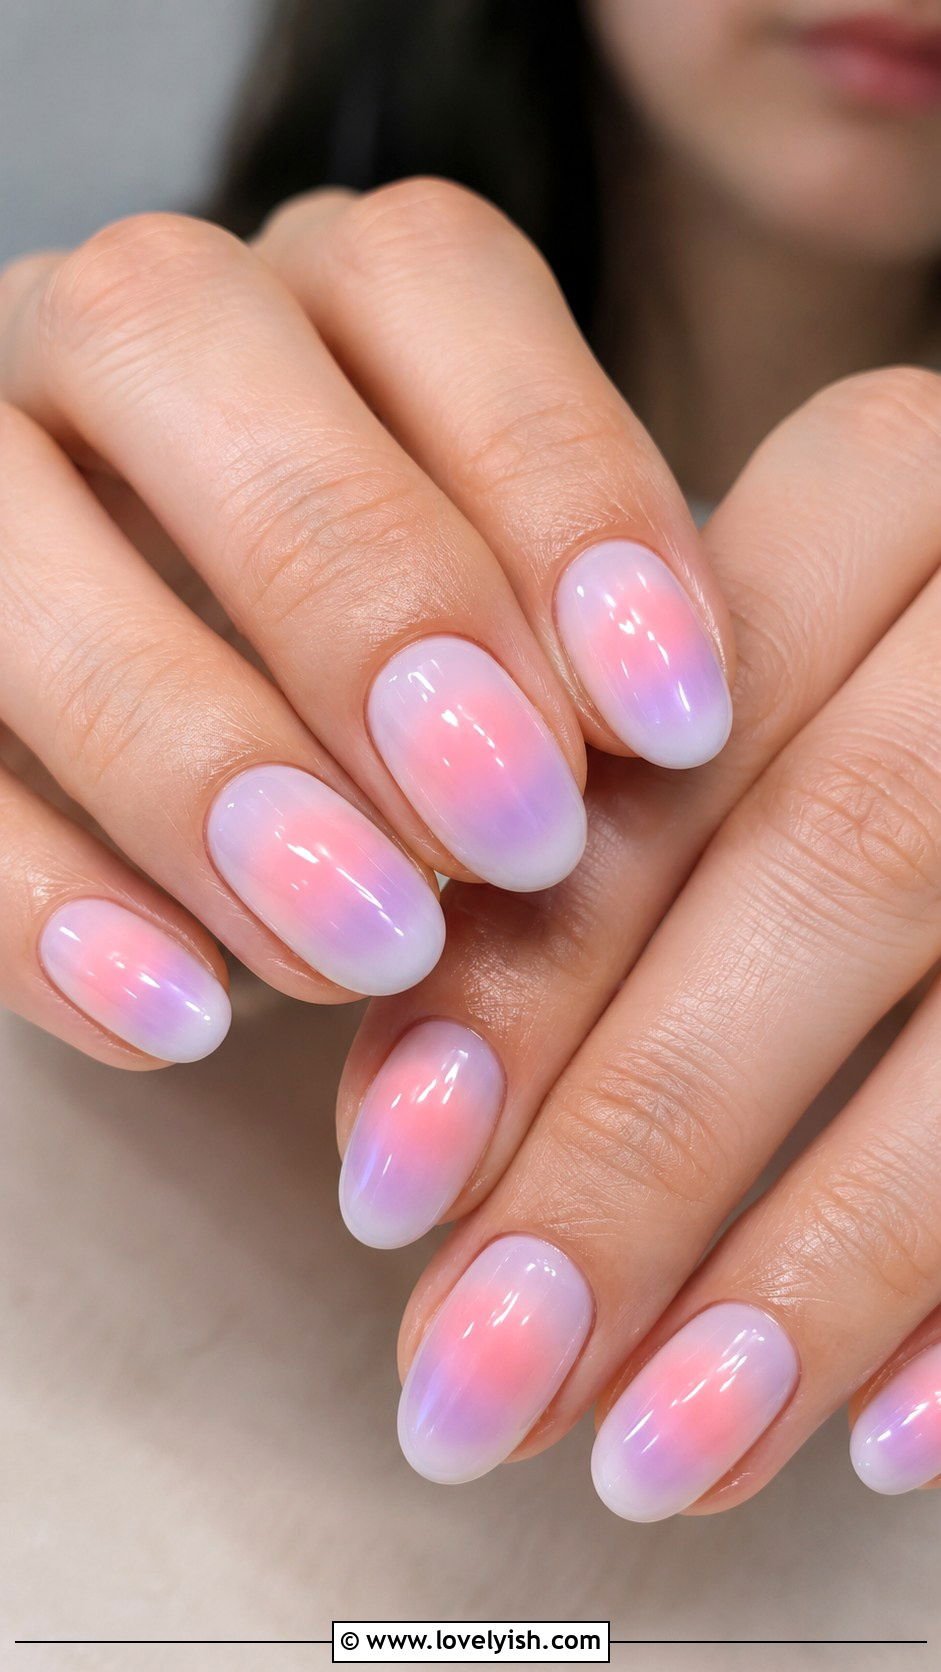
16. Aura Nail Art
Aura nails create a glowing halo effect right in the center of each nail. Apply a sheer pink or milky white base. Once dry, use a small makeup sponge to dab a soft circle of color, like pink, lavender, or peach, in the middle of the nail. Build up the color gradually, fading it out toward the edges. The result looks like a soft inner glow. Add a clear glossy top coat to blend everything seamlessly. This trendy design feels celestial and dreamy without requiring detailed brushwork. Aura nails look especially flattering on almond and oval shapes and pair beautifully with neutral outfits or feminine spring looks.
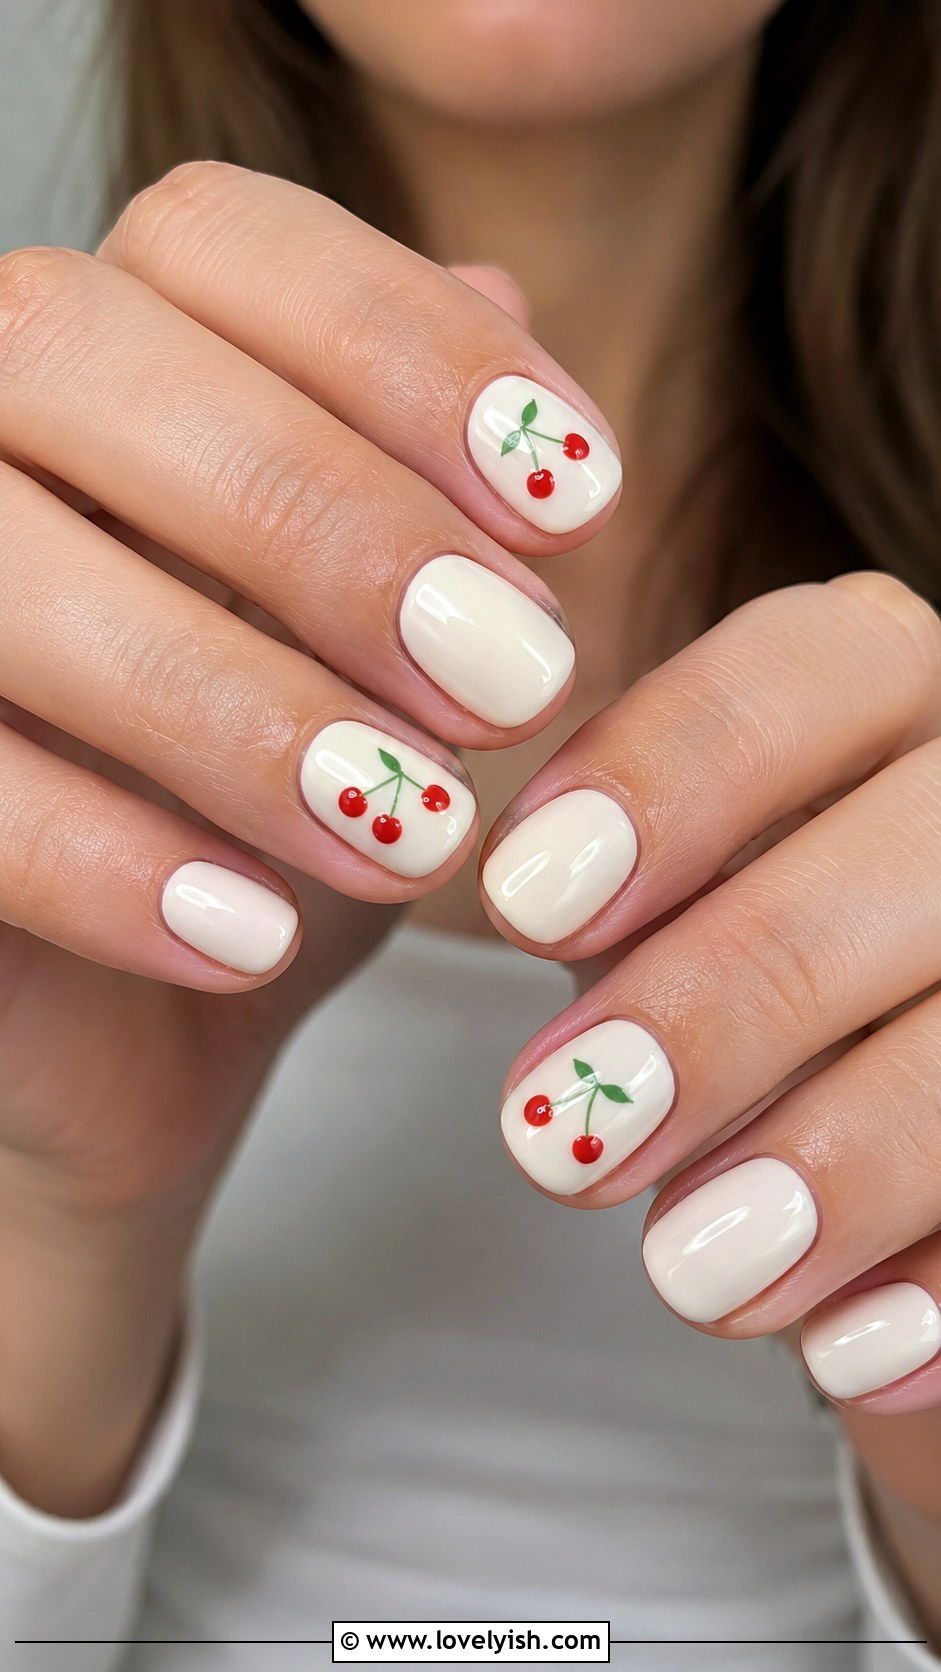
17. Cherry Fruit Nail Art
Cherries are tiny, sweet, and surprisingly easy to draw. Start with a creamy white or soft cream base coat. Use a dotting tool to place two red dots close together near the cuticle. With a thin brush dipped in dark green or brown polish, draw two curved lines connecting the cherries to form the stems. Add a tiny green leaf at the top with a small swipe of polish. One accent nail with cherries plus four solid color nails creates the most balanced look. Top with glossy clear coat. Cherry nails feel retro, summery, and playful, and they look extra cute on shorter rounded shapes.
18. Strawberry Nail Art

Strawberry nails are sweet, summery, and beginner-friendly. Apply a soft pink or white base coat. To draw a strawberry, use a small brush to paint a red triangle pointing downward in the center of an accent nail. With a toothpick, dot tiny yellow seeds across the red shape. Add a small green zigzag at the top to form the leafy crown. Repeat across one or two accent nails, leaving the rest in solid pink or white. Tiny scattered red dots on the other nails tie the look together. Glossy top coat finishes the design. Strawberry nails feel especially fun for picnics, brunches, and warm-weather outings.
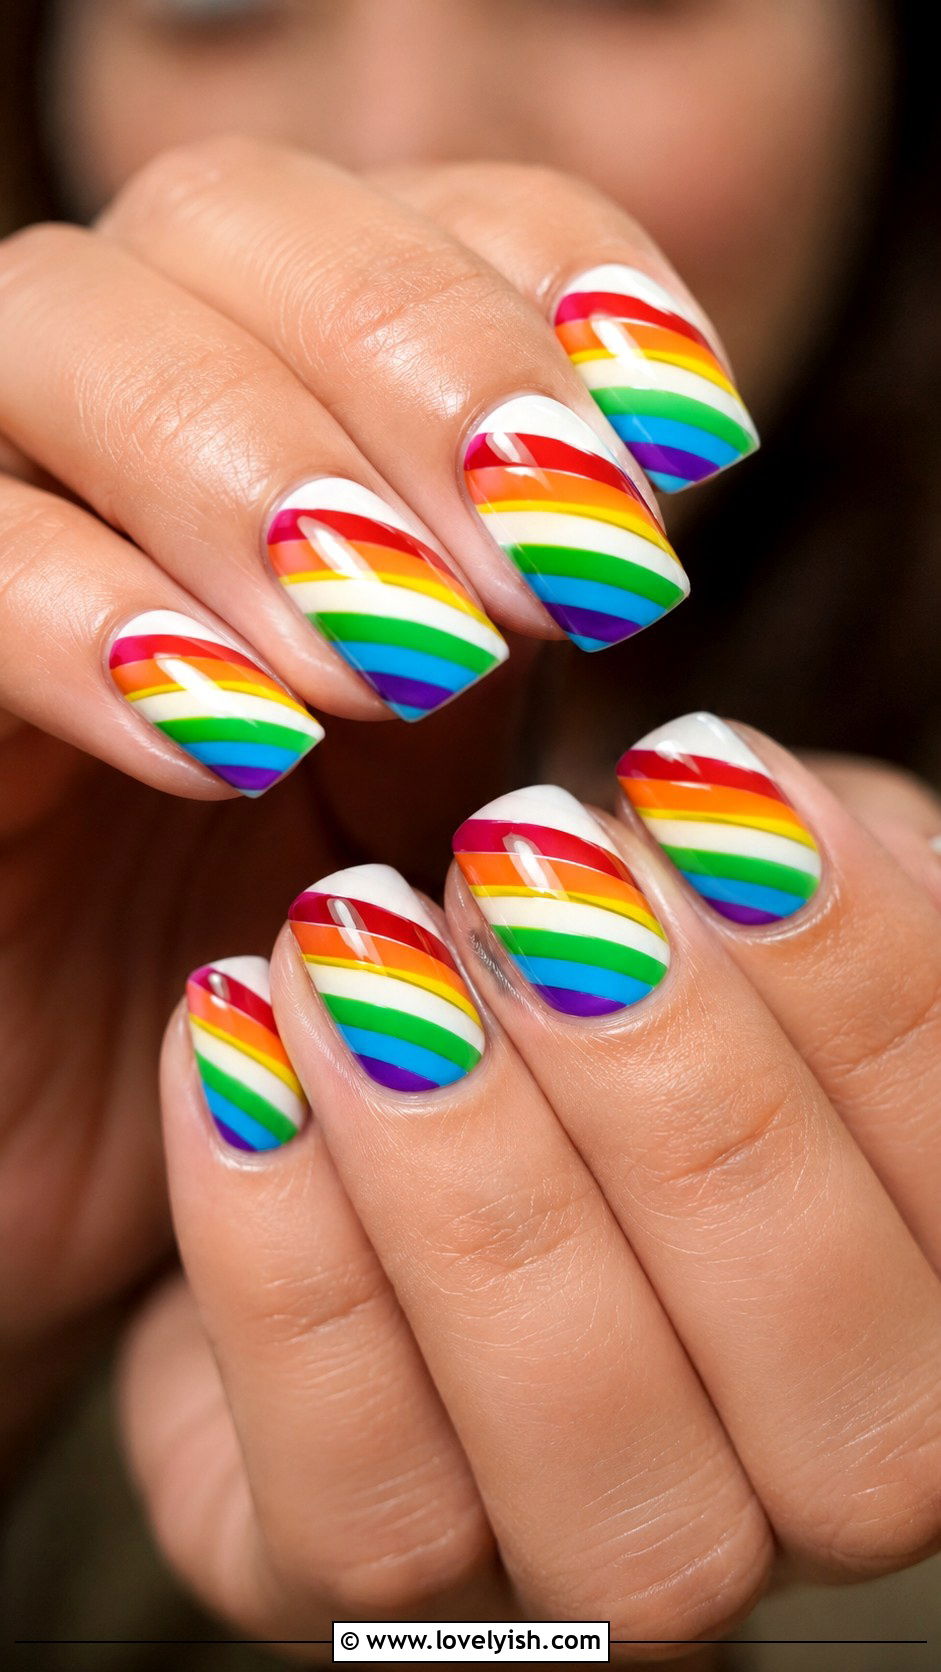
19. Rainbow Stripe Nail Art
Rainbow stripe nails are joyful and surprisingly easy with tape. Start with a clean white base across all nails. Once fully dry, use thin striping tape to mark off horizontal or diagonal sections on each nail. Paint each section in a different rainbow shade, red, orange, yellow, green, blue, and purple, then peel the tape away while the polish is slightly wet. The result is crisp, colorful stripes. For a softer take, use pastel rainbow colors instead of bright primaries. Finish with two coats of glossy top coat. Rainbow stripe nails work on every nail shape and feel especially happy for birthdays, festivals, and Pride celebrations.
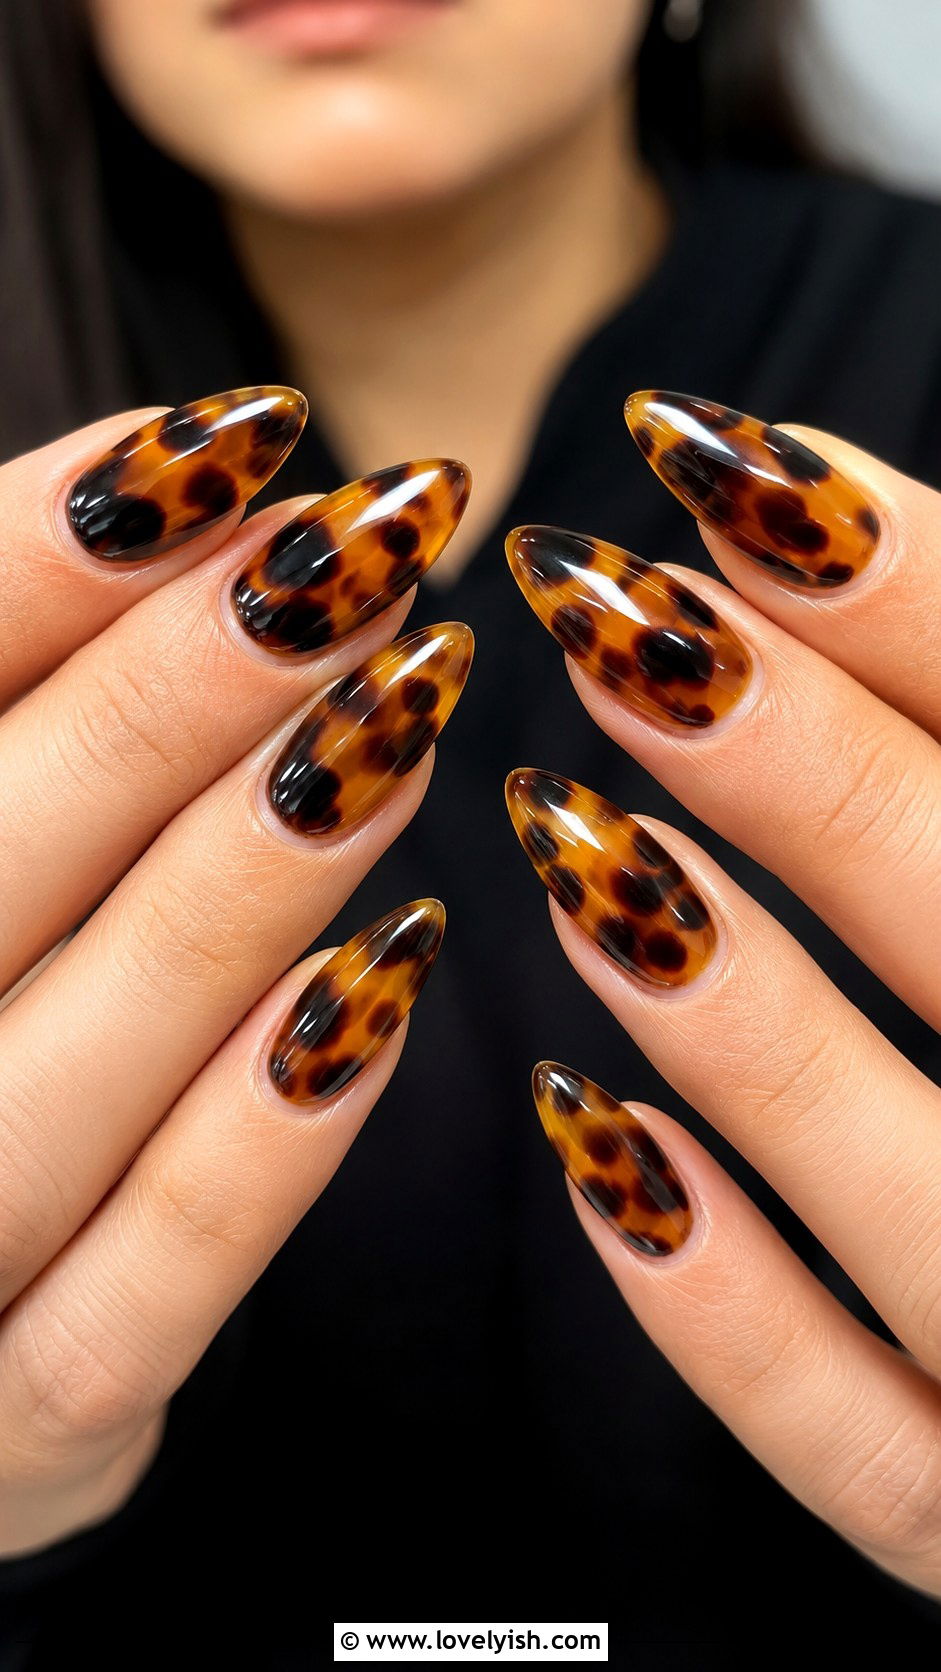
20. Tortoiseshell Nail Art
Tortoiseshell nails feel rich, warm, and unexpectedly easy. Start with a sheer amber or honey base across each nail. Once tacky, use a small brush to dab irregular dark brown blobs across the surface. Add smaller black dots in the center of some blobs for depth. Use a clean brush dipped in remover to softly blend the edges so they look organic. Two coats of glossy top coat give the design that signature glassy finish. Tortoiseshell pairs beautifully with gold jewelry and looks striking on long almond or coffin shapes. It’s a sophisticated alternative to plain neutrals and works year-round, especially in fall and winter.
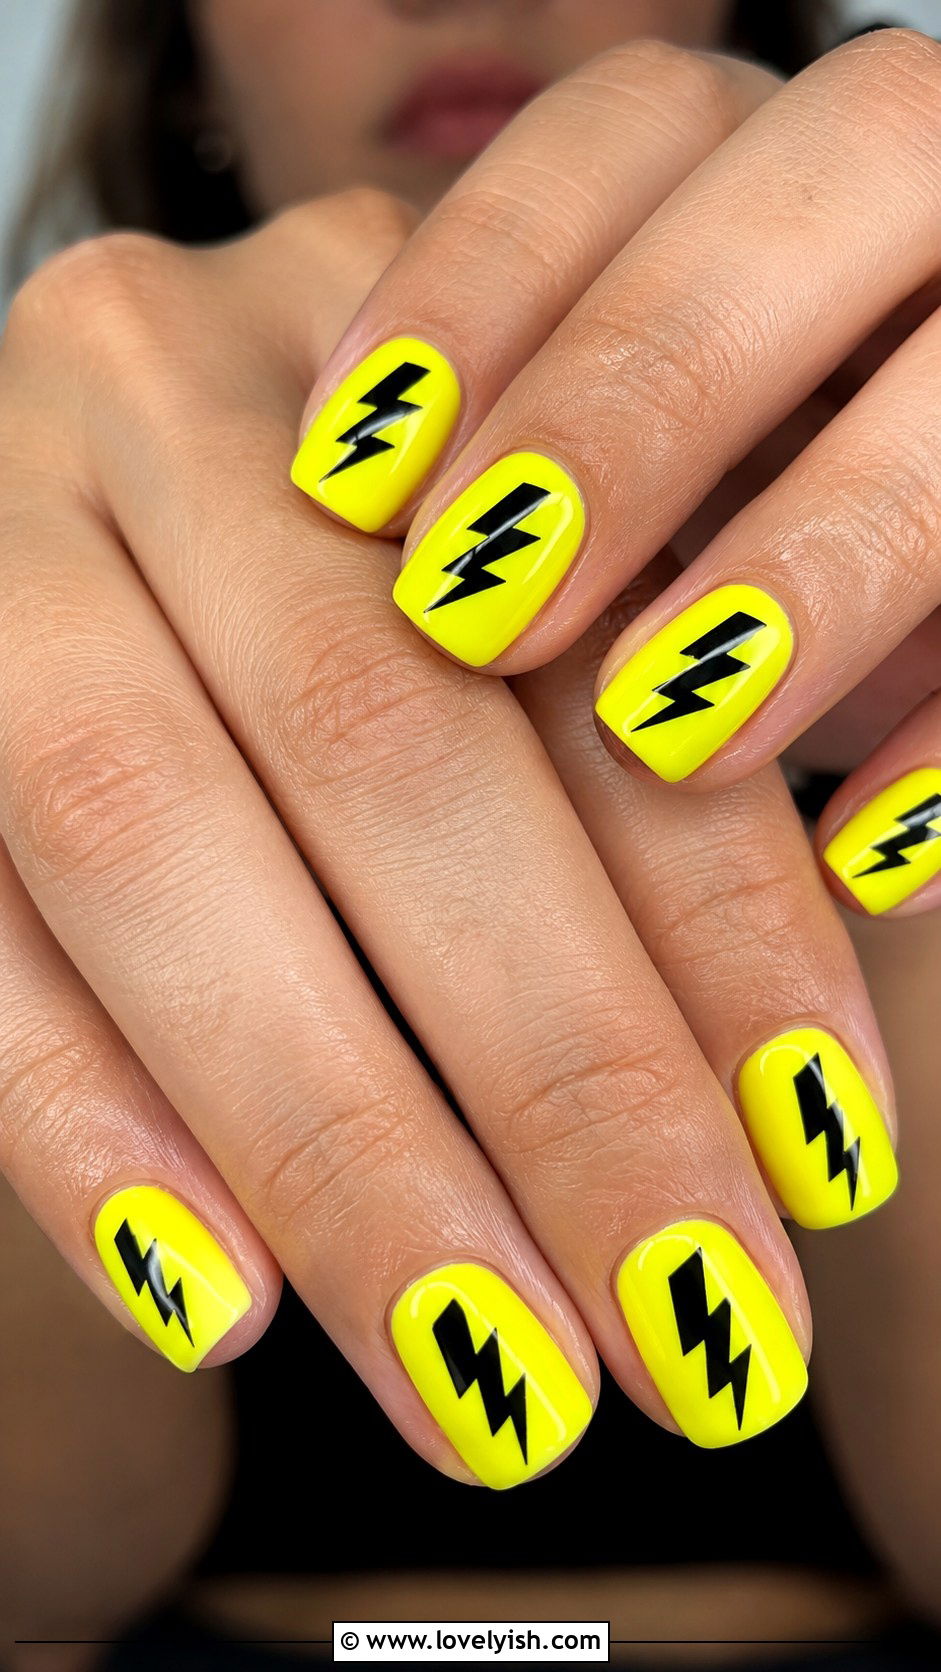
21. Lightning Bolt Nail Art
Lightning bolt nails add edgy energy to any manicure. Start with a bright base color like neon yellow, hot pink, or sky blue. Once dry, use a thin nail art brush dipped in white or black polish to draw a zigzag bolt down the center of each nail. Keep the bolt slim and angular for the best graphic effect. If freehand feels tricky, lightning bolt nail stickers work just as well. Try pairing yellow bolts on black backgrounds for maximum contrast. Top with a glossy finish. This bold design suits short to medium nails and feels especially cool for concerts, summer trips, and anyone who loves a touch of ’80s flair.
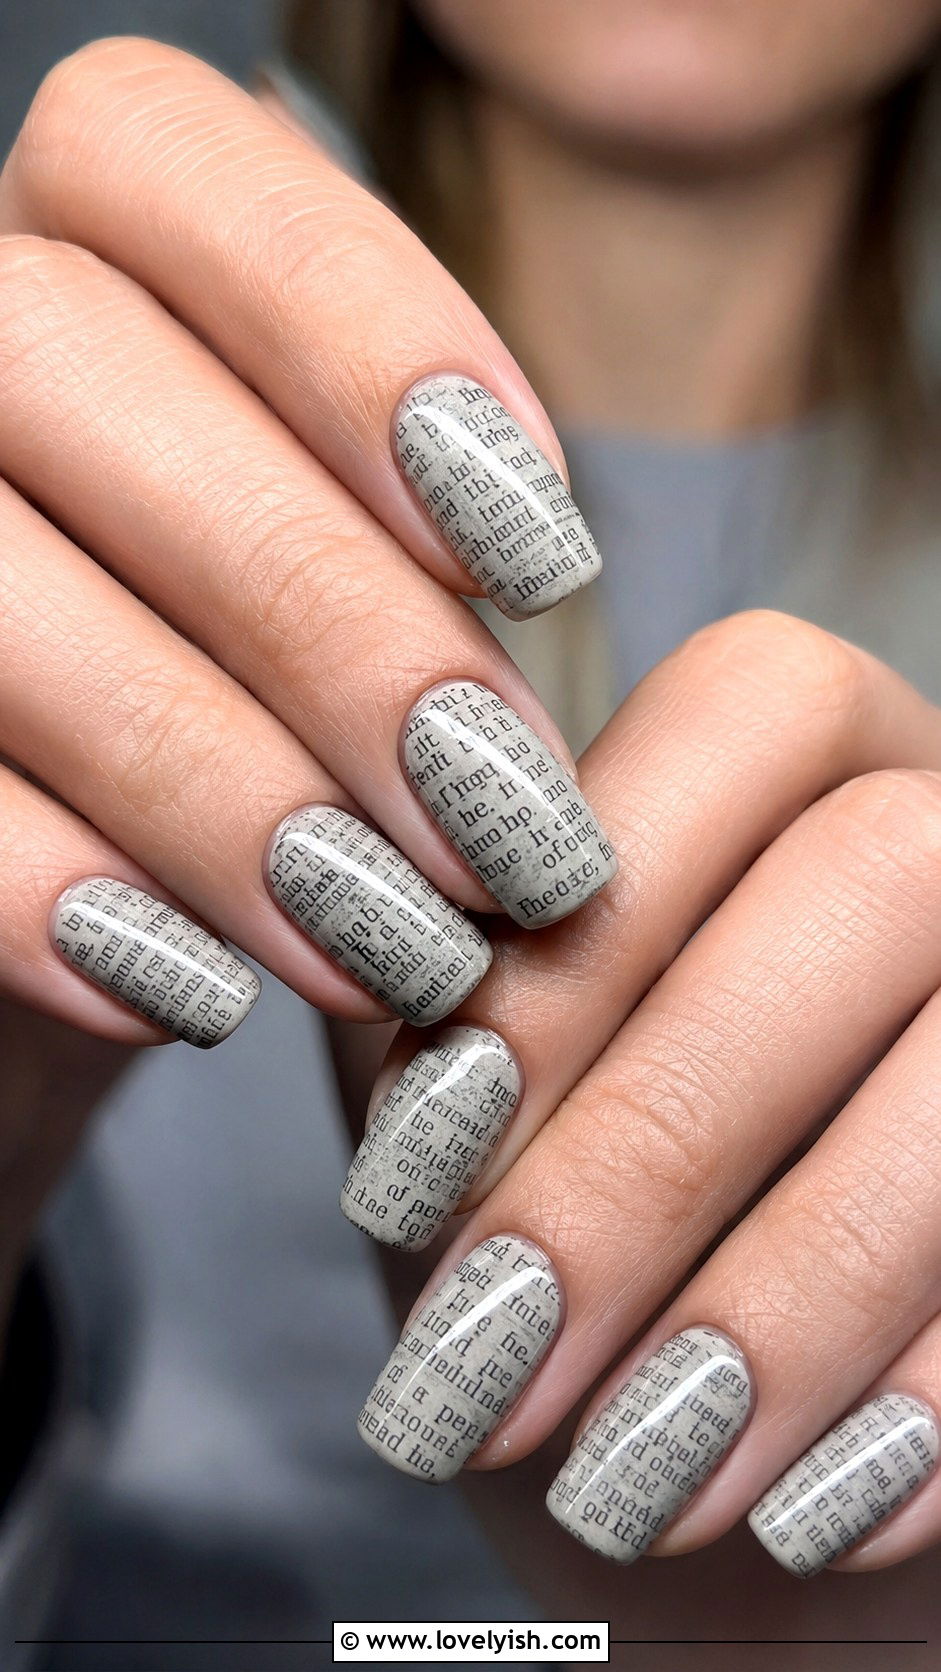
22. Newspaper Print Nail Art
Newspaper print nails create a chic, transferred ink look using just rubbing alcohol. Apply two coats of light gray, white, or pale blue polish and let it fully dry. Cut small pieces of newspaper that fit each nail. Dip the paper in rubbing alcohol for about ten seconds, press it firmly onto your nail for another ten, then peel it away slowly. The print transfers right onto the polish. Repeat for each nail. Once dry, seal with a top coat applied gently to avoid smudging. This unique design looks artsy and editorial. Newspaper nails work on any shape but stand out most on medium-length squoval or oval nails.
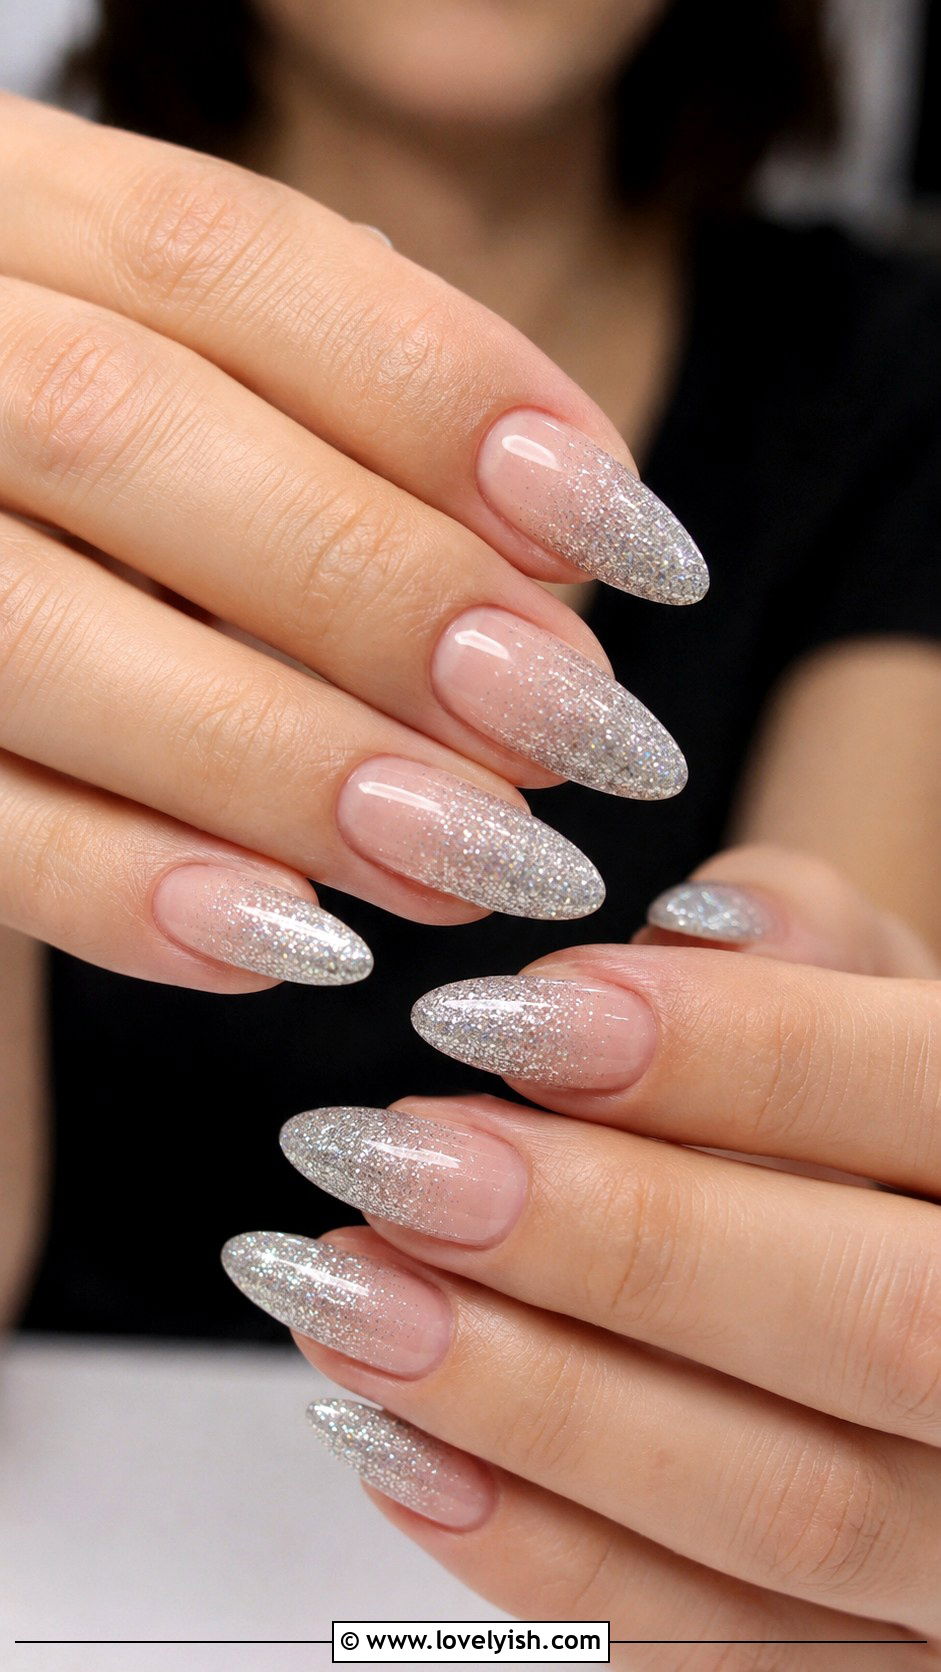
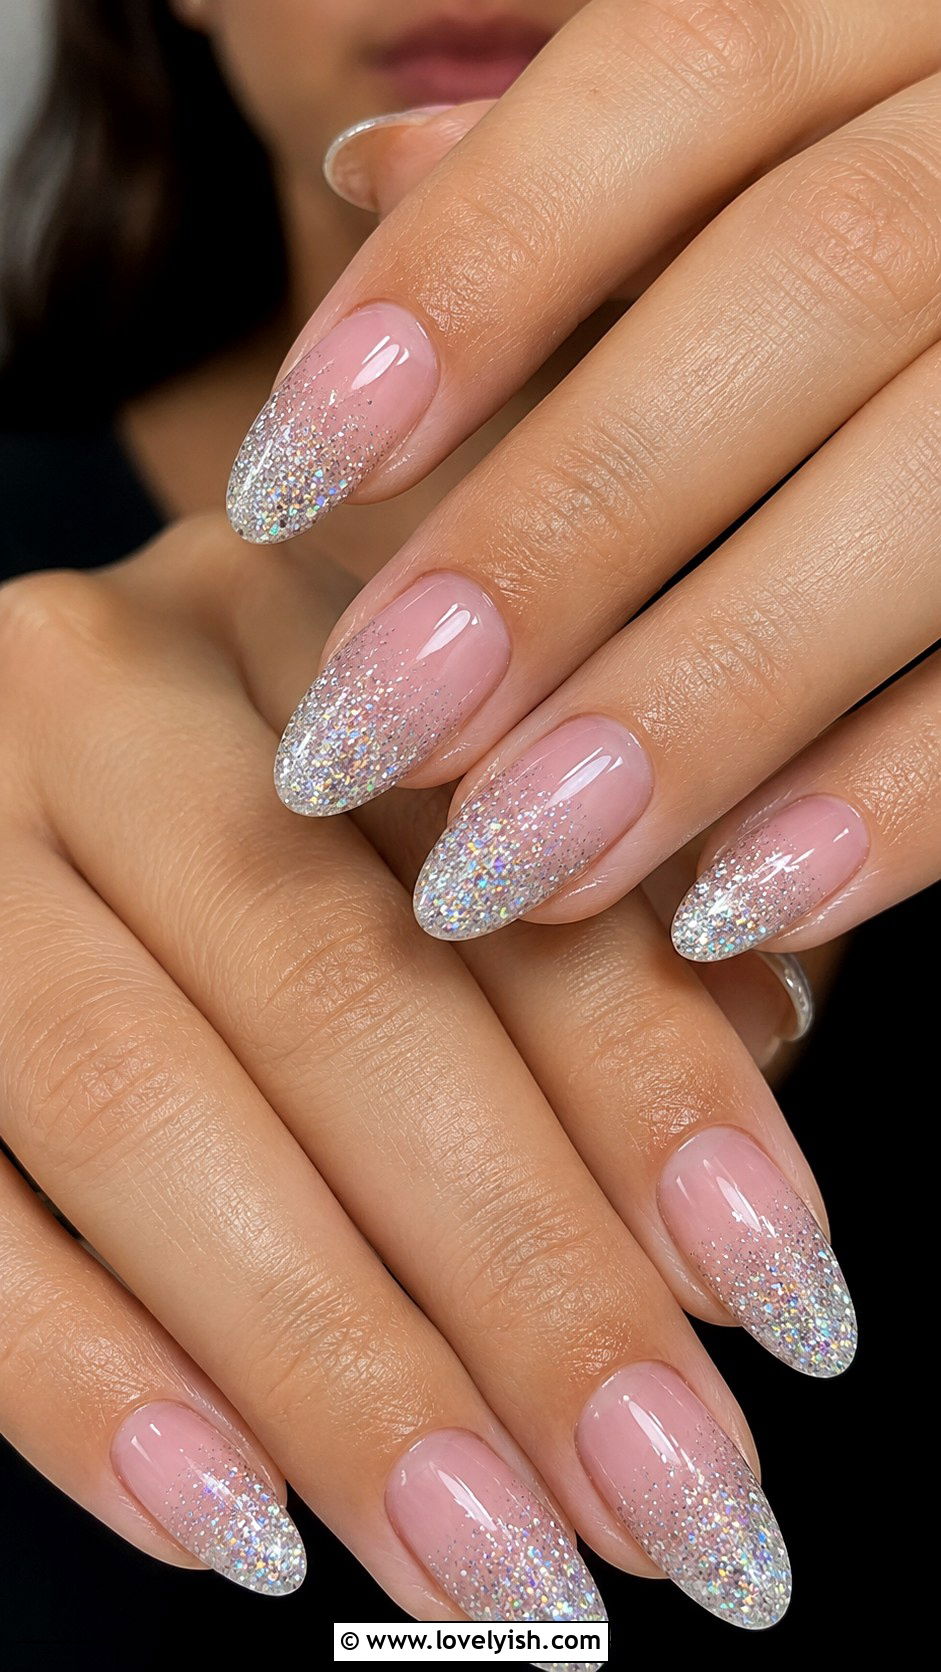
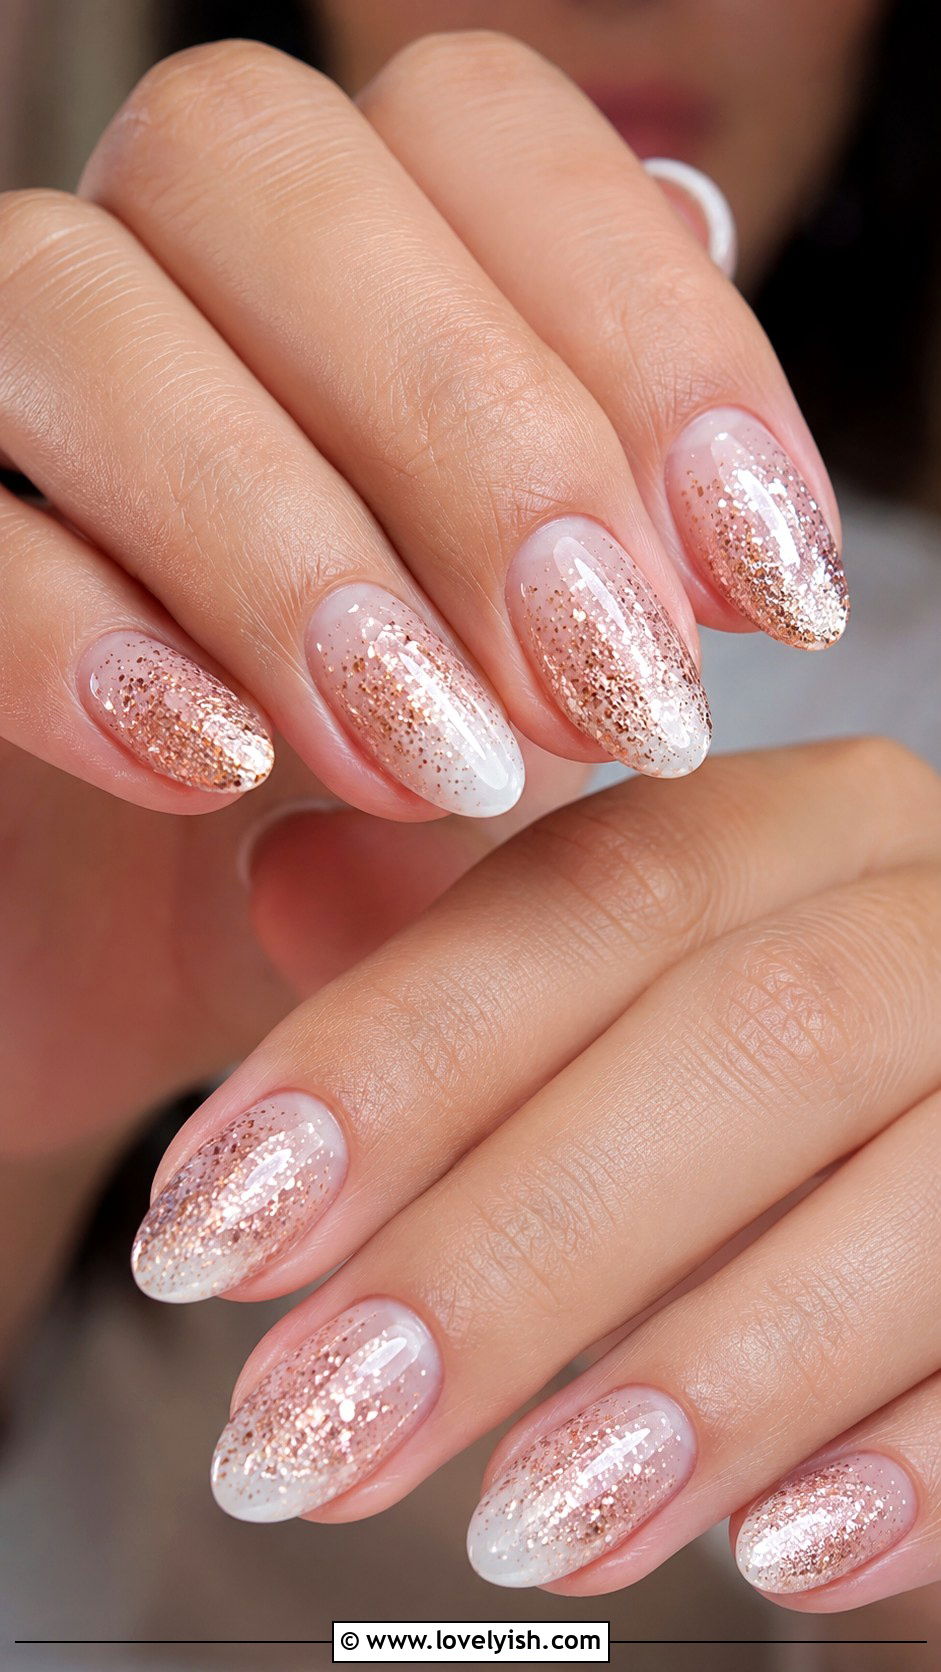
23. Glitter Ombre Nail Art
Glitter ombre takes basic glitter polish to a softer, prettier place. Apply a sheer pink or nude base coat. Once dry, use a small makeup sponge to dab fine glitter polish onto the tip of each nail, fading it down toward the middle. Build up the glitter by sponging two or three times for more intensity. Silver, rose gold, and holographic glitters all photograph beautifully. Apply two coats of clear top coat to smooth the texture and lock in shine. Glitter ombre is ideal for special occasions, birthdays, and weddings, and it grows out gracefully. The design flatters every nail shape and looks especially elegant on longer almond nails.
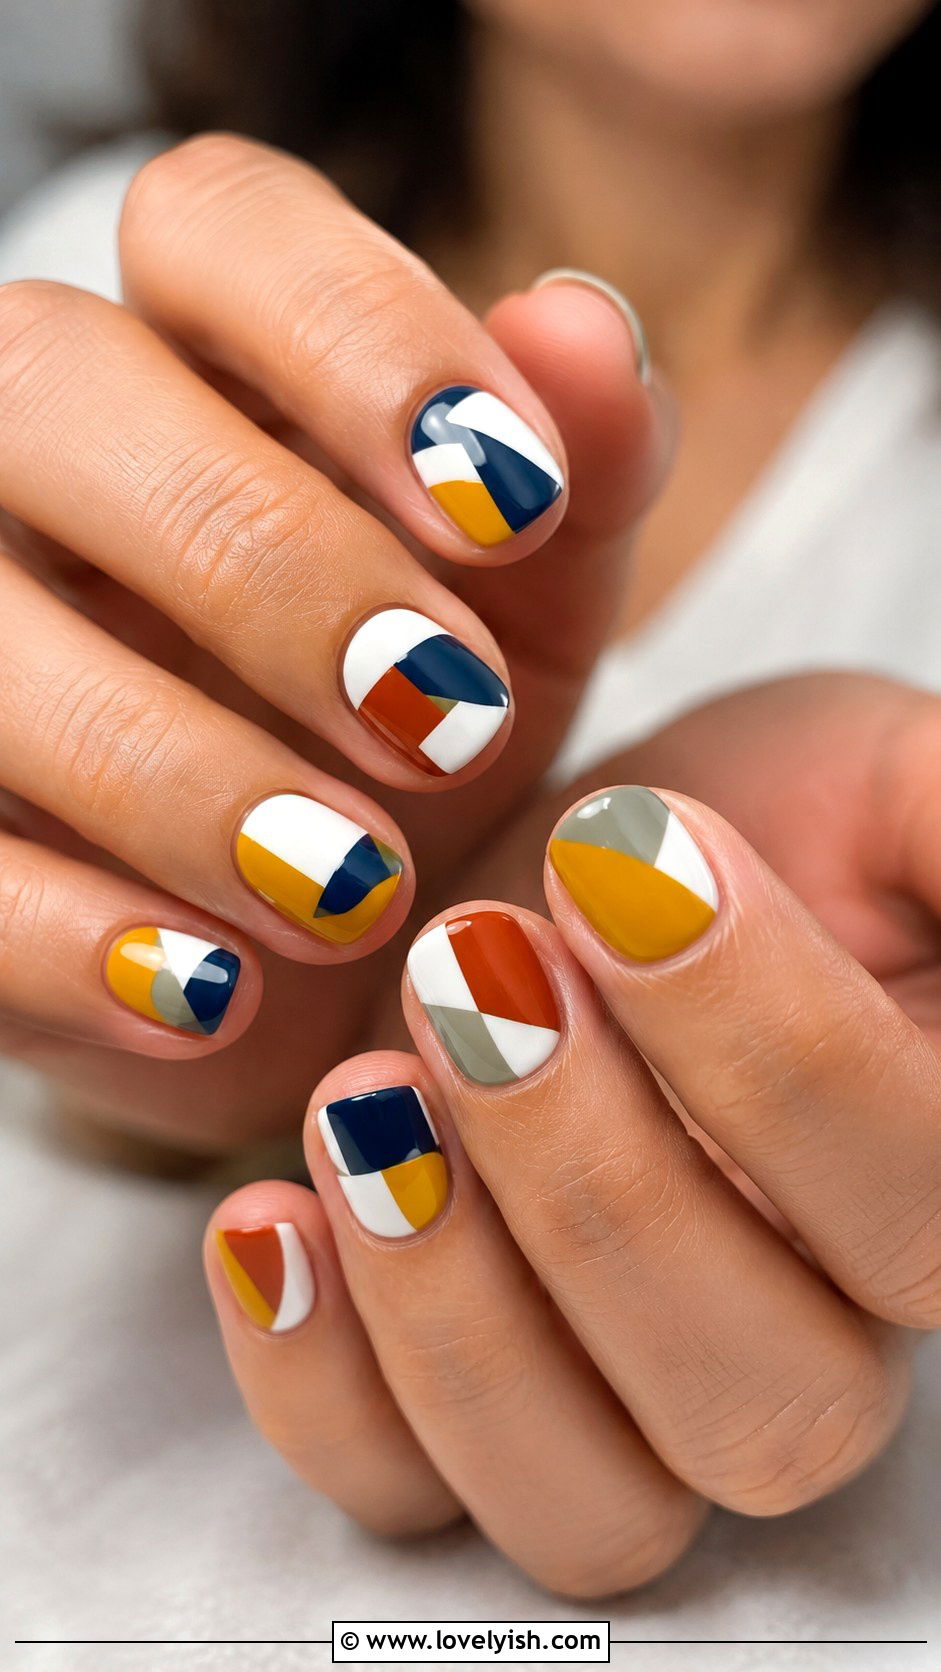
24. Color Block Nail Art
Color block nails take inspiration from modern art and feel surprisingly fresh. Start with a white or cream base. Once dry, use thin striping tape to divide each nail into geometric sections, like a triangle, rectangle, and small square. Paint each section in a different bold color, think mustard, terracotta, navy, and sage. Peel the tape away gently to reveal crisp lines. The result looks like wearable Mondrian artwork. Add a glossy top coat to finish. Color block nails work beautifully on shorter squoval shapes where the geometry feels balanced. This design suits creative outfits, art gallery visits, and anyone who loves a polished but playful manicure.
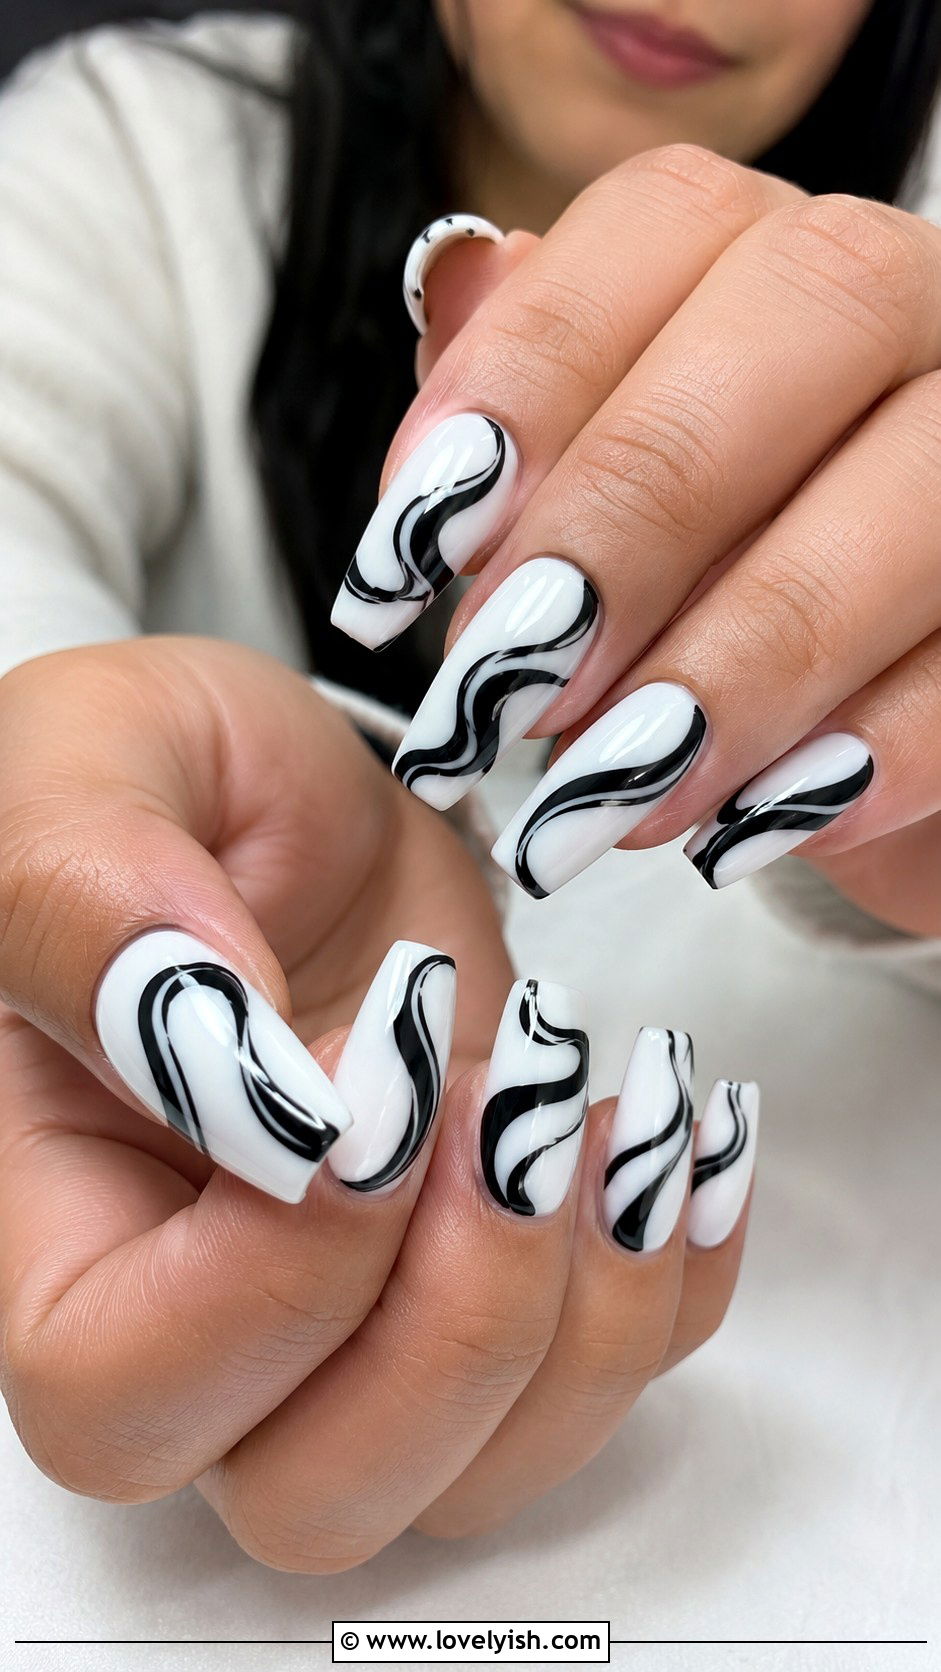
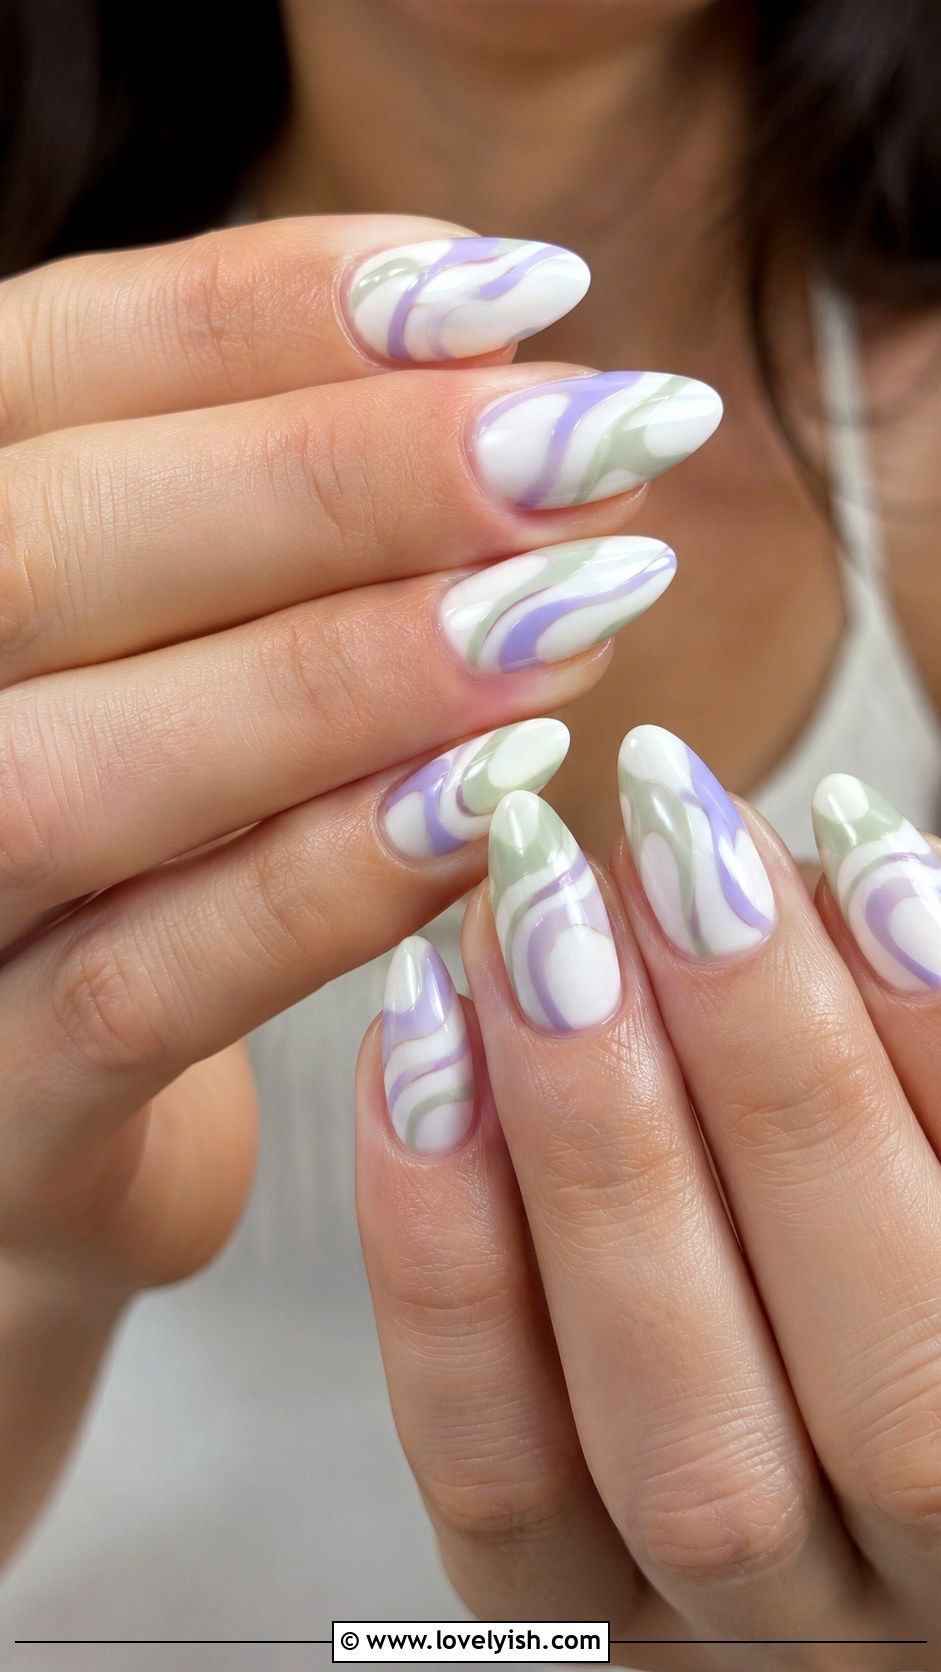
25. Swirl Nail Art
Swirl nails are one of the most popular DIY trends and require nothing more than a thin striping brush. Apply a milky white or sheer pink base. Once dry, dip a thin nail art brush in a contrasting polish, lavender, sage, baby blue, or black, and draw curving swirl lines across each nail. Vary the direction so each nail looks slightly different. Keep the lines loose and freeform for that effortless look. Top with glossy clear coat. Swirl nails feel artsy, retro, and very on-trend right now. They look amazing on any nail length but especially flattering on medium almond or coffin shapes for a long, elegant flow.
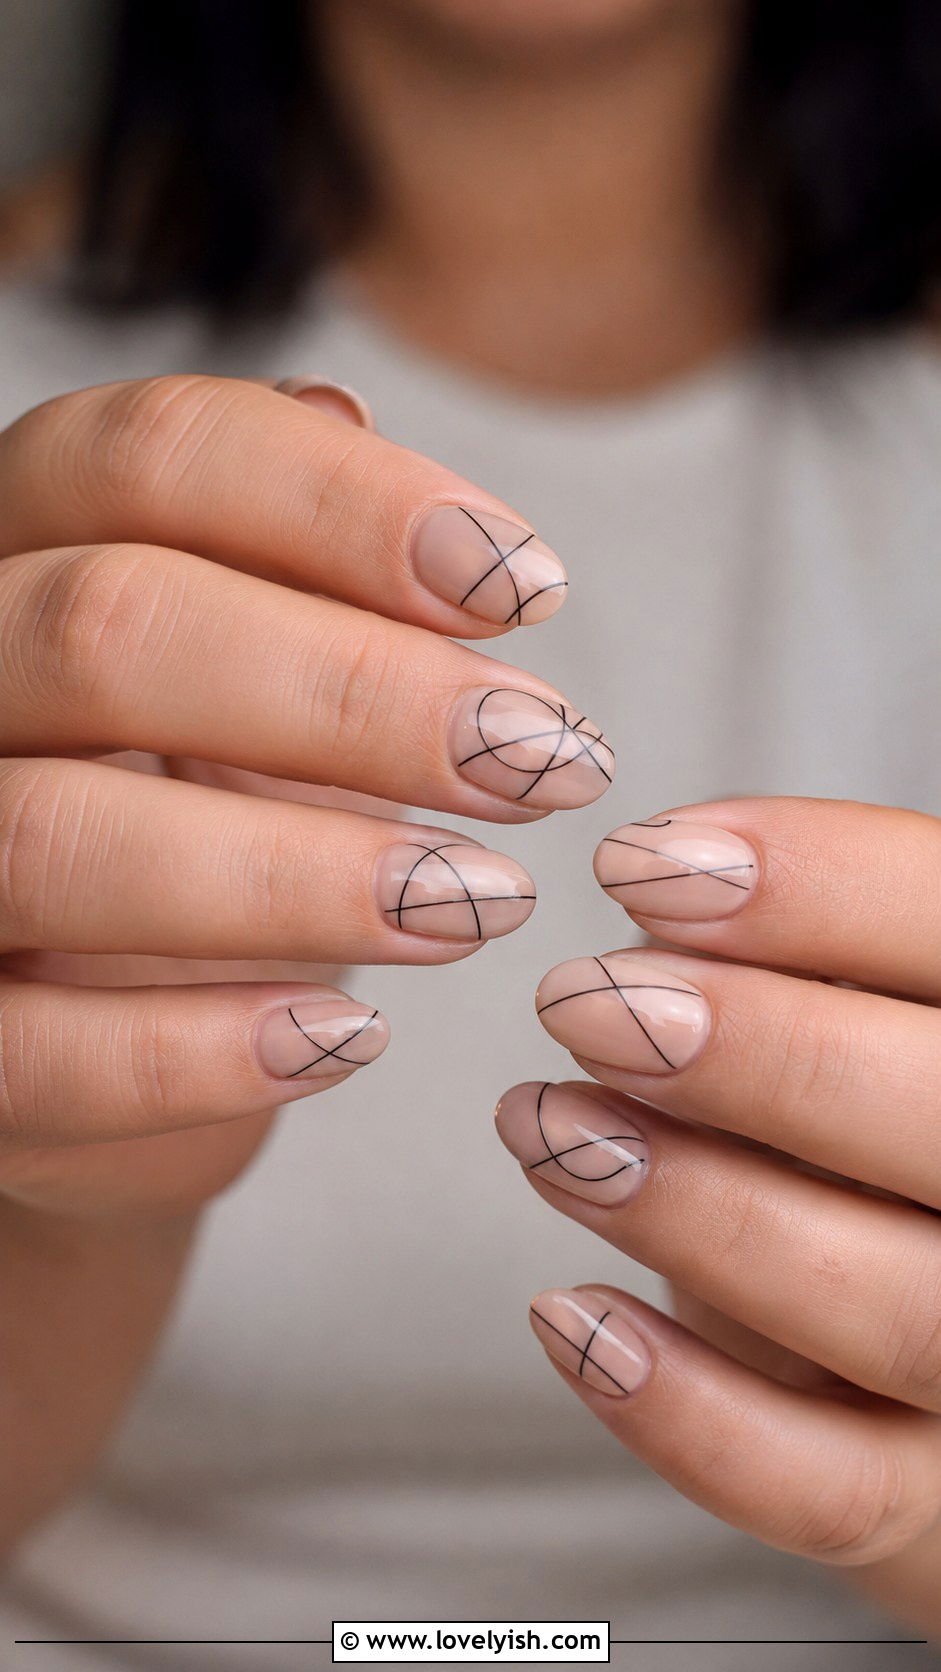
26. Abstract Line Nail Art
Abstract line nails bring an art-school feel to your fingertips. Start with a sheer beige or pale pink base across each nail. Once dry, use a thin nail art brush dipped in black polish to draw simple abstract lines, single curves, intersecting strokes, or tiny squiggles. Each nail can have a different line design for that intentional mismatched effect. Keep the lines minimal and don’t worry about perfection. The slight imperfection is what makes the look feel artistic. Add a clear glossy top coat. This minimalist design works on every nail shape and feels especially chic for offices, gallery openings, and anyone who loves a quiet but creative manicure.
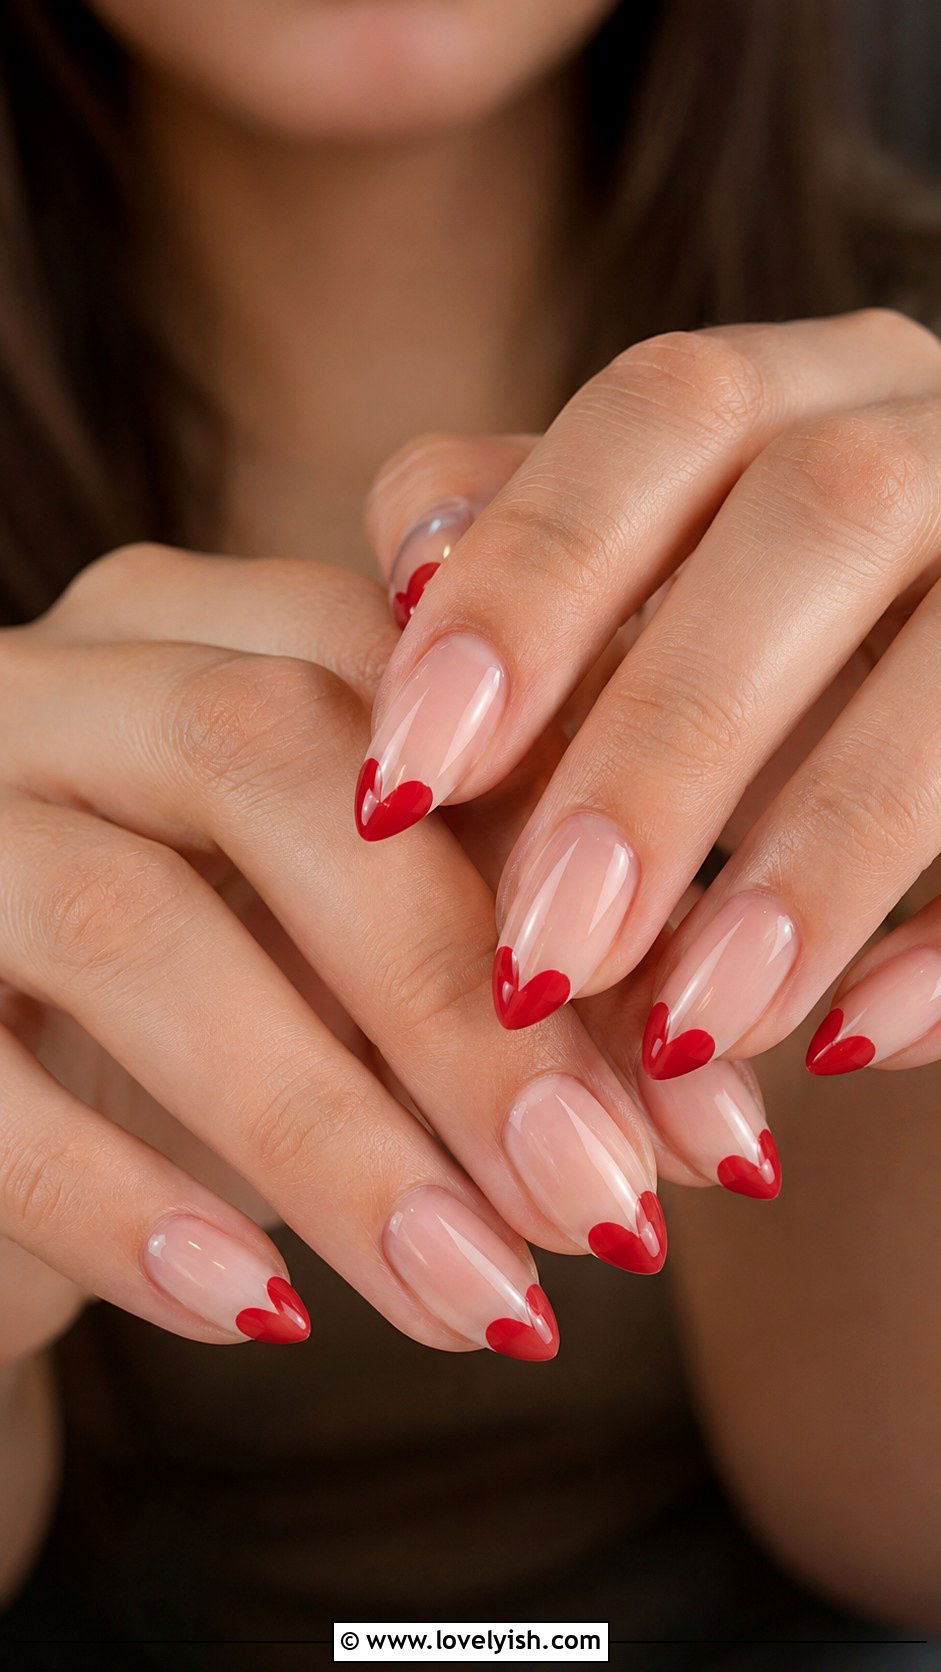
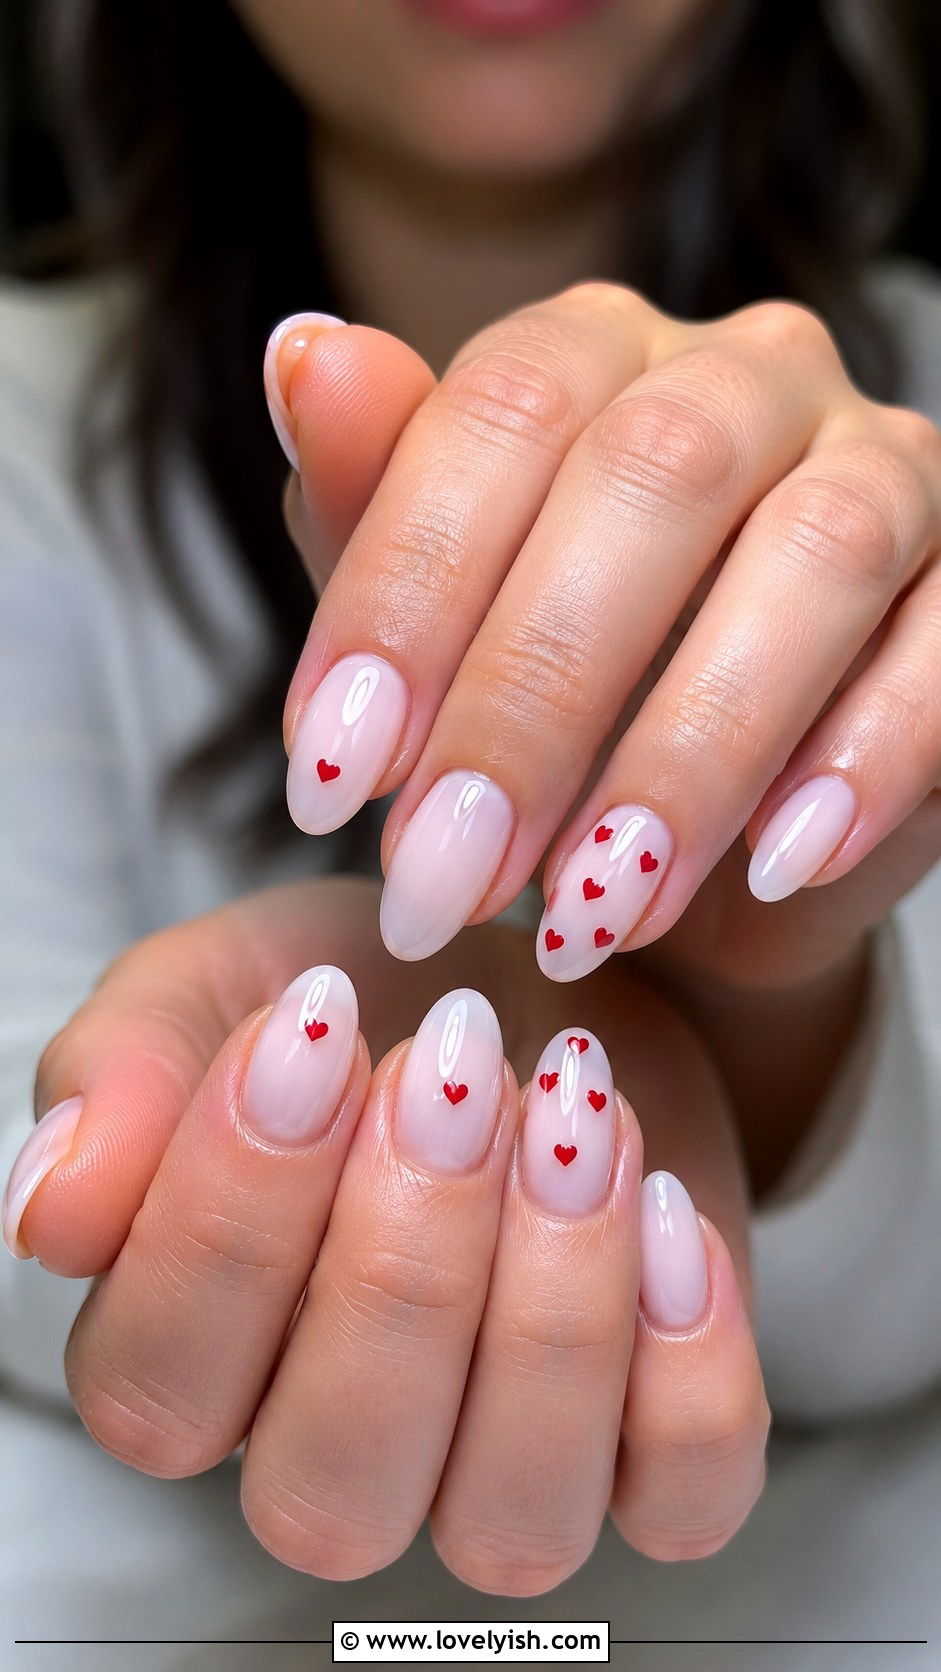
27. Heart French Tip Nail Art
This twist on the classic French manicure adds a romantic detail. Start with a sheer nude or pale pink base. Use a thin striping brush dipped in red, pink, or white polish to paint a small heart at the tip of each nail instead of a straight French line. To form the heart, draw two tiny curves meeting at a point. The hearts can sit centered on the tip or off to one side for a playful asymmetric look. Top with glossy clear coat. Heart French tips suit Valentine’s Day, bridal showers, and anniversary looks beautifully. They flatter almond, oval, and short squoval shapes especially well, adding charm without feeling overdone.
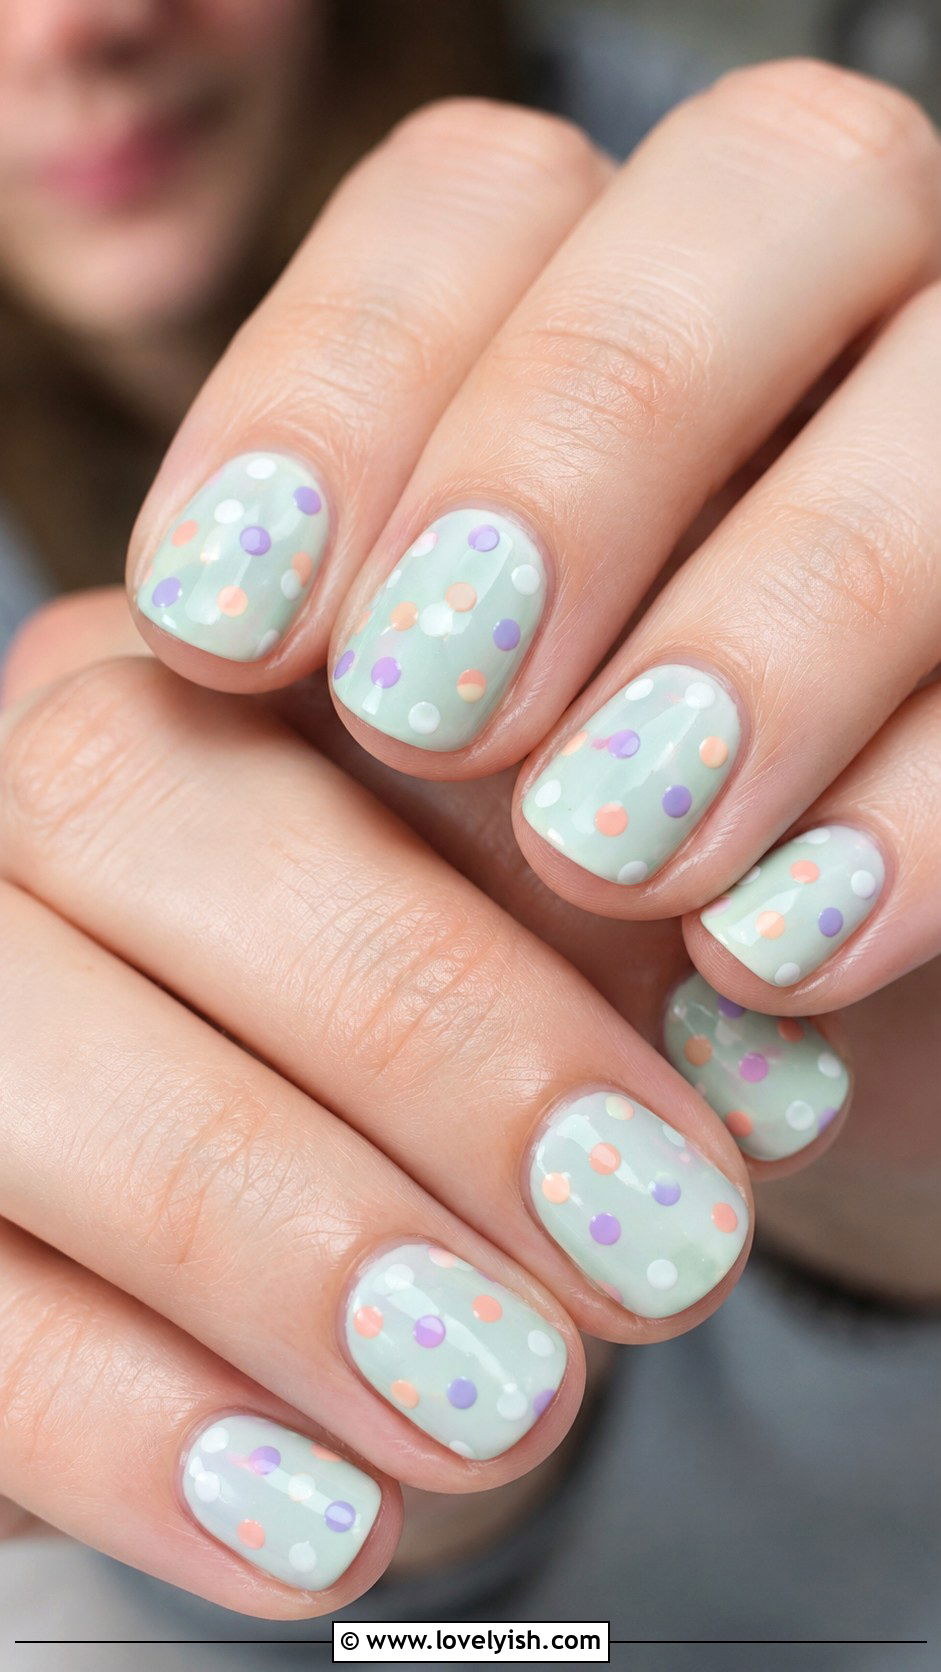
28. Pastel Polka Dot Nail Art
Pastel polka dot nails feel soft, sweet, and very springy. Apply two coats of pale pink, mint, or butter yellow base color across each nail. Once dry, use a dotting tool to create small dots in coordinating pastels, lavender on mint, peach on yellow, or baby blue on pink. Space the dots evenly or scatter them randomly for a more whimsical feel. Add a couple of dots in white for extra dimension. A glossy top coat smooths everything out. This design works on every nail length but feels especially adorable on shorter rounded nails. Pastel polka dots suit Easter brunches, baby showers, and any feminine spring or summer occasion.
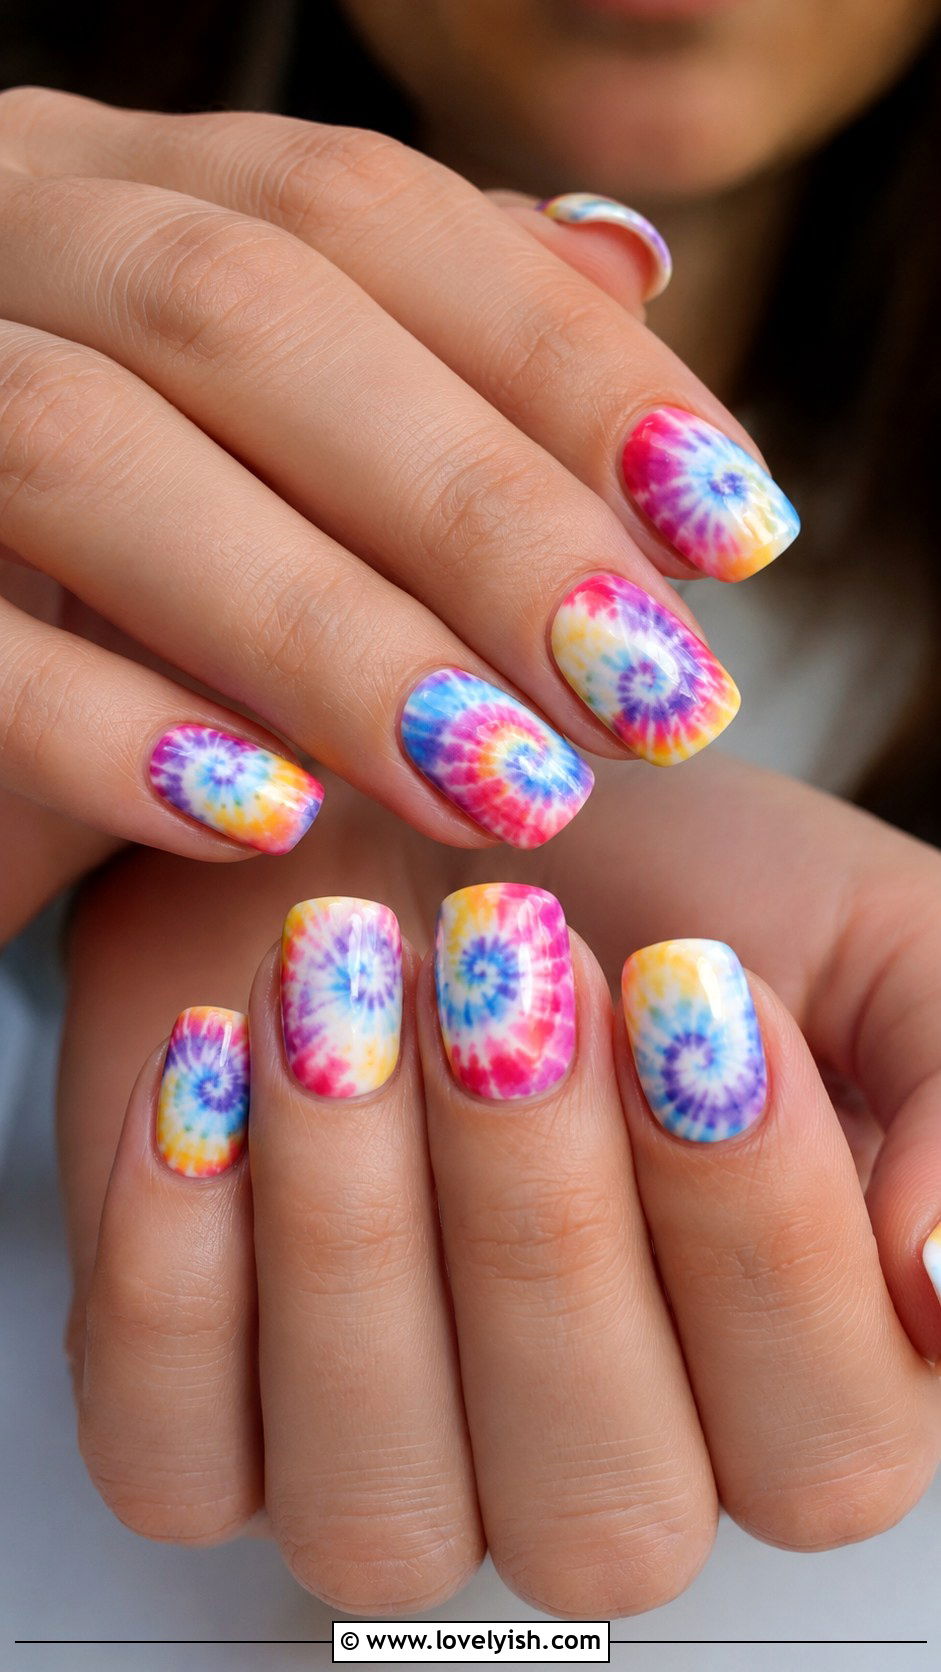
29. Tie Dye Nail Art
Tie dye nails capture that groovy summer festival vibe right at your fingertips. Start with a white base coat across all nails. While the polish is still slightly wet, drop small dots of three or four bright polishes, like pink, purple, blue, and yellow, onto the nail. Use a toothpick to swirl the colors together in spiral or wavy patterns. Each nail will look completely unique, which is part of the charm. Clean up the edges with a brush dipped in remover. Two coats of glossy top coat blend everything beautifully. Tie dye nails work on every shape and feel especially fitting for music festivals, beach days, and summer getaways.
30. Watermelon Nail Art
Watermelon nails are the ultimate summer DIY. Paint each nail in a soft pink base, leaving the very tip bare or painting it bright watermelon pink. Once dry, paint a thin green stripe along the tip with a thin white line just above it to mimic the rind. Use a toothpick to add tiny black dots scattered across the pink portion to look like watermelon seeds. Top with glossy clear coat. The result is bright, fruity, and unmistakably summer. This playful design looks especially cute on shorter rounded or squoval nails. Wear watermelon nails to pool parties, beach trips, and barbecues for an instant mood lift.
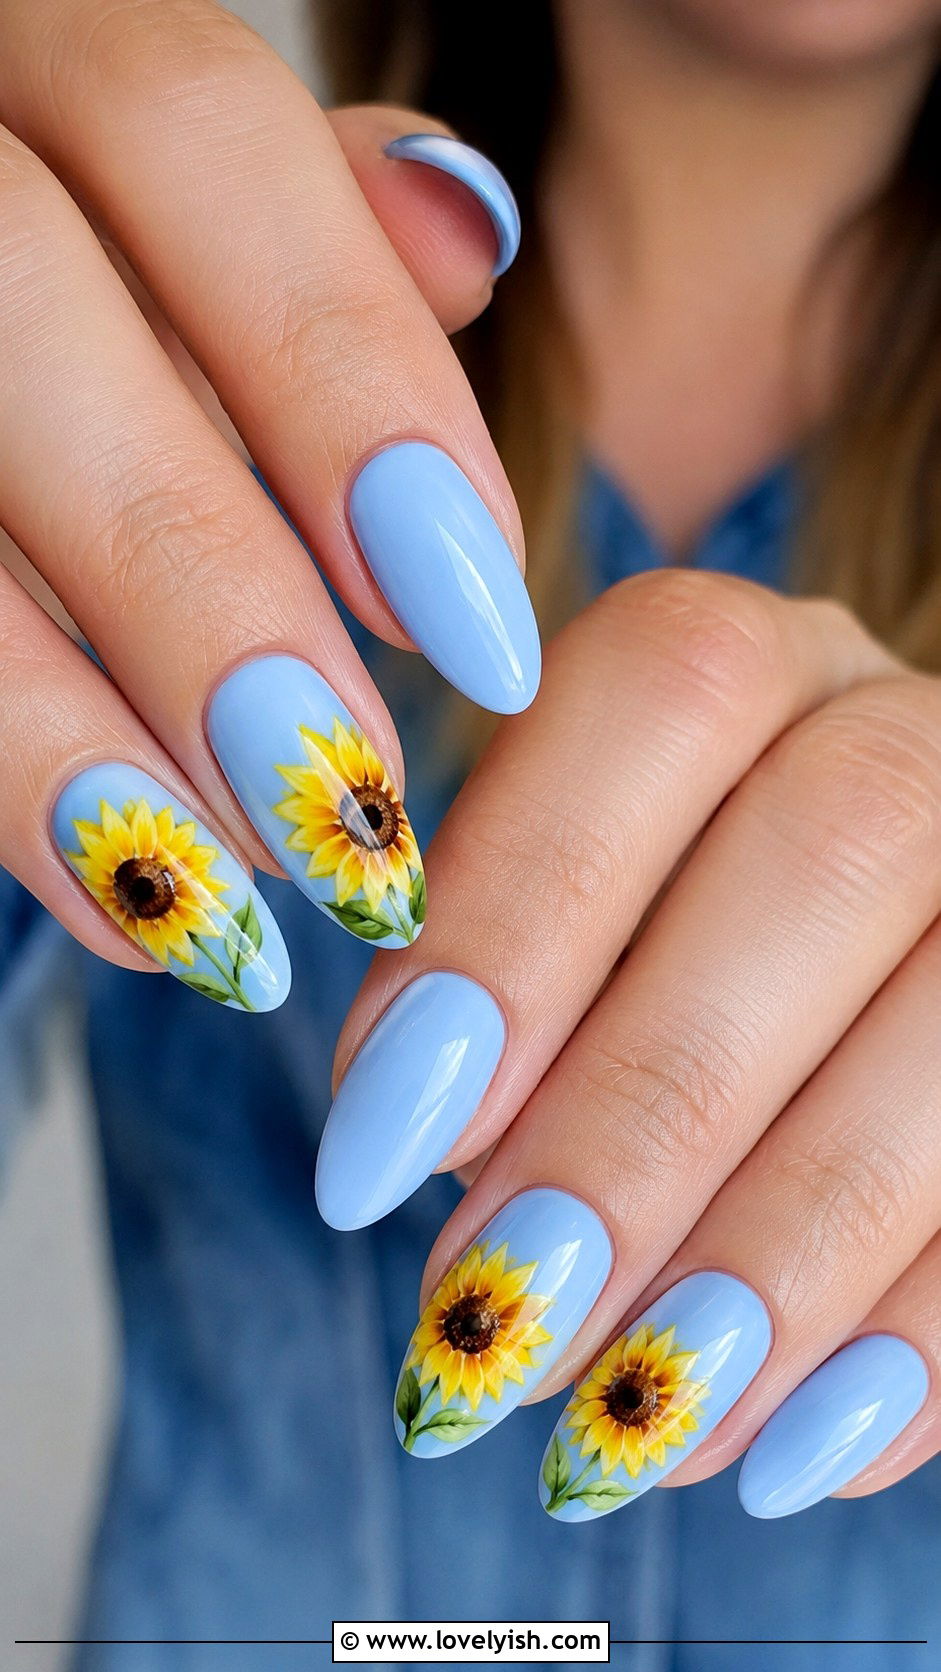
31. Sunflower Nail Art
Sunflower nails bring sunny warmth to any manicure. Start with a soft sky blue or cream base across each nail. On one or two accent nails, use a small dotting tool dipped in yellow polish to create five or six petal-shaped dots in a circle. Add a brown dot in the center and use a toothpick to add tiny darker dots for the seeds. Tiny green leaves around the bloom add extra charm. Keep the rest of the nails solid blue or cream. Top with glossy clear coat. Sunflower nails feel cheerful, rustic, and perfect for late summer through early fall. They look gorgeous on almond and squoval nail shapes.
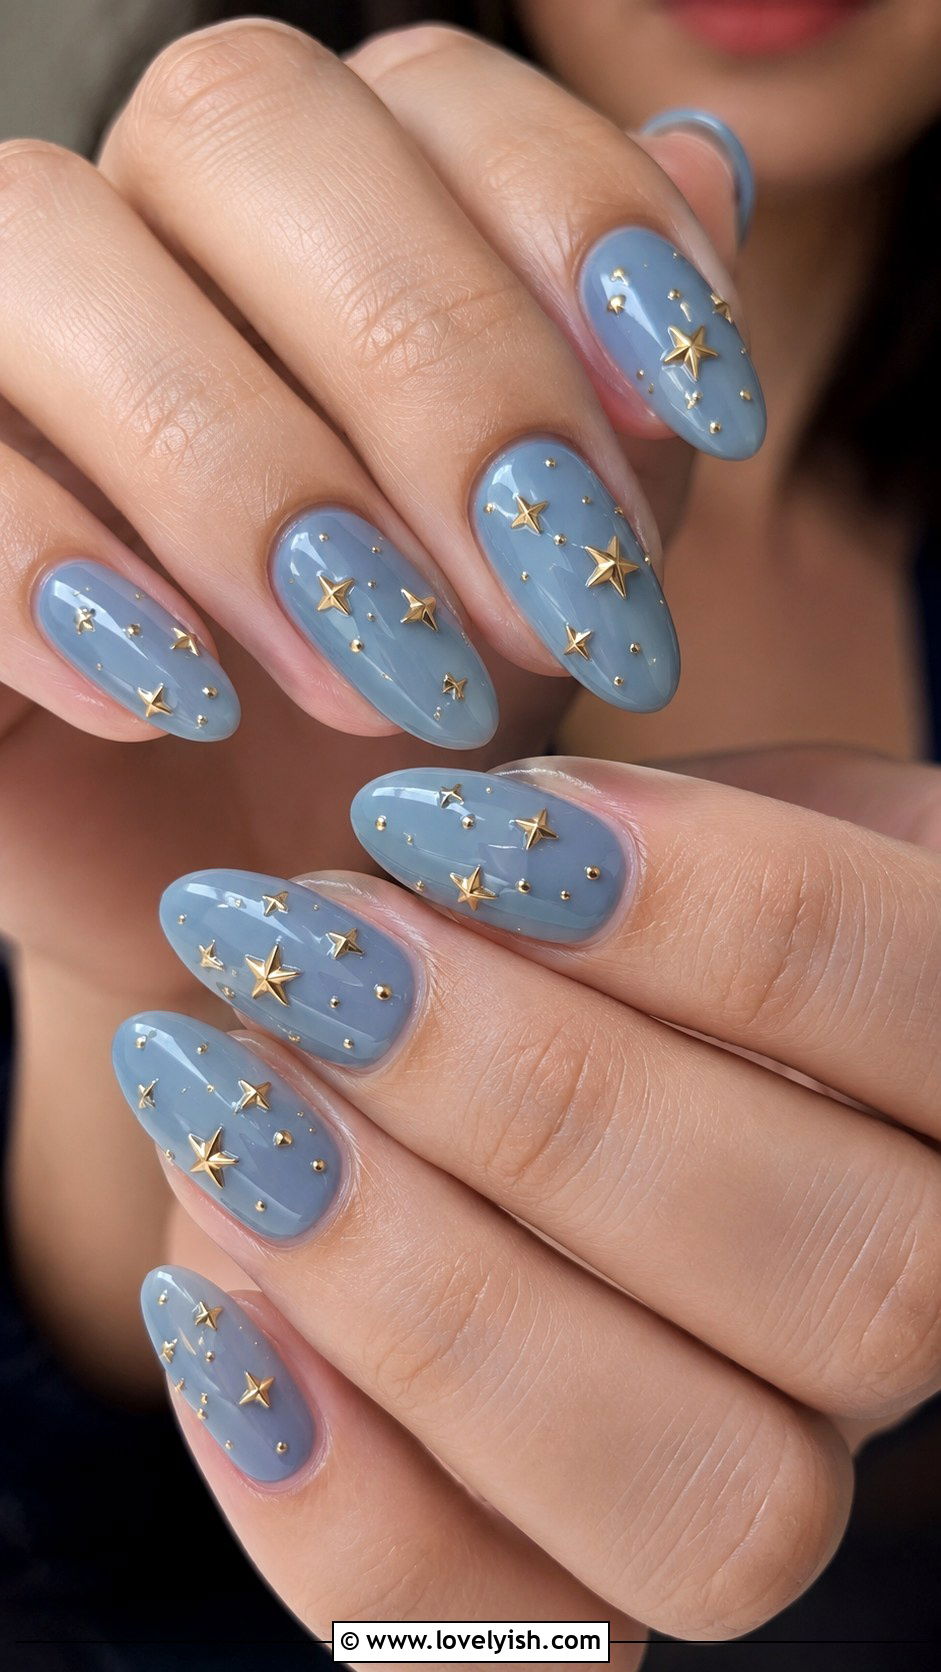
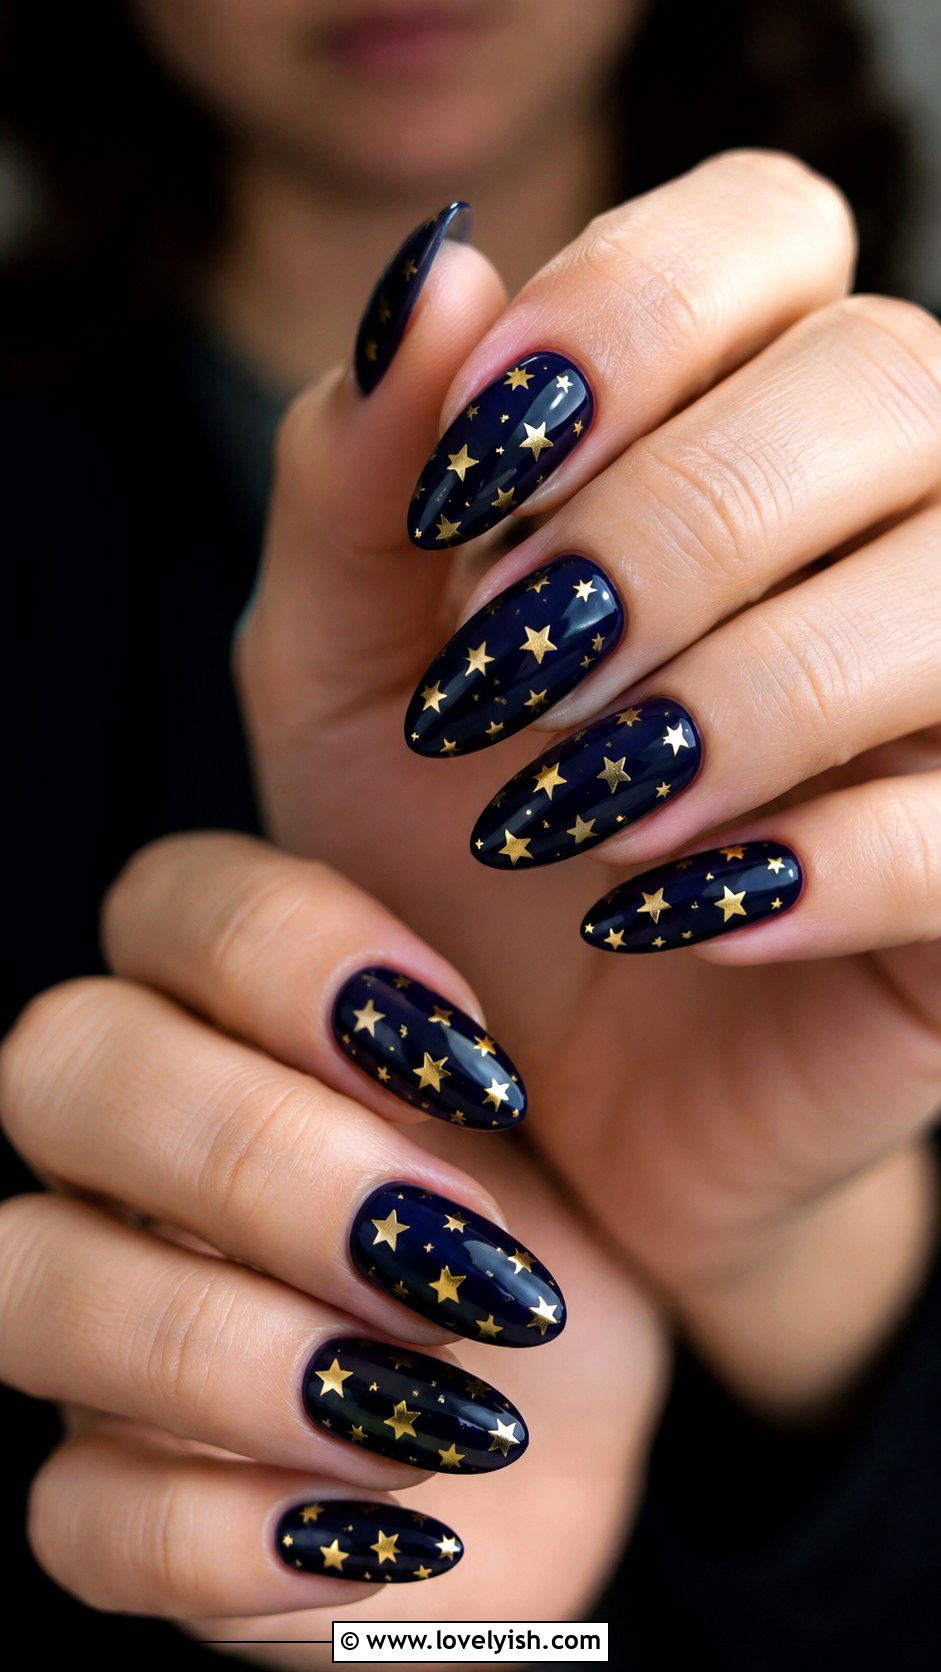
32. Star Accent Nail Art

Star nails feel celestial and easy to recreate at home. Apply a deep base color like navy, black, or even pale lilac across all nails. Once dry, use a thin nail art brush or toothpick dipped in gold or silver polish to draw small five-pointed stars on one or two accent nails. If freehand stars feel hard, draw a tiny five-dot cluster and connect them. Scatter tiny stars across an accent nail or place a single larger star at the center. Top with glossy clear coat. Star nails feel magical and work beautifully on every nail shape, especially long almond or stiletto for that dreamy night-sky effect.
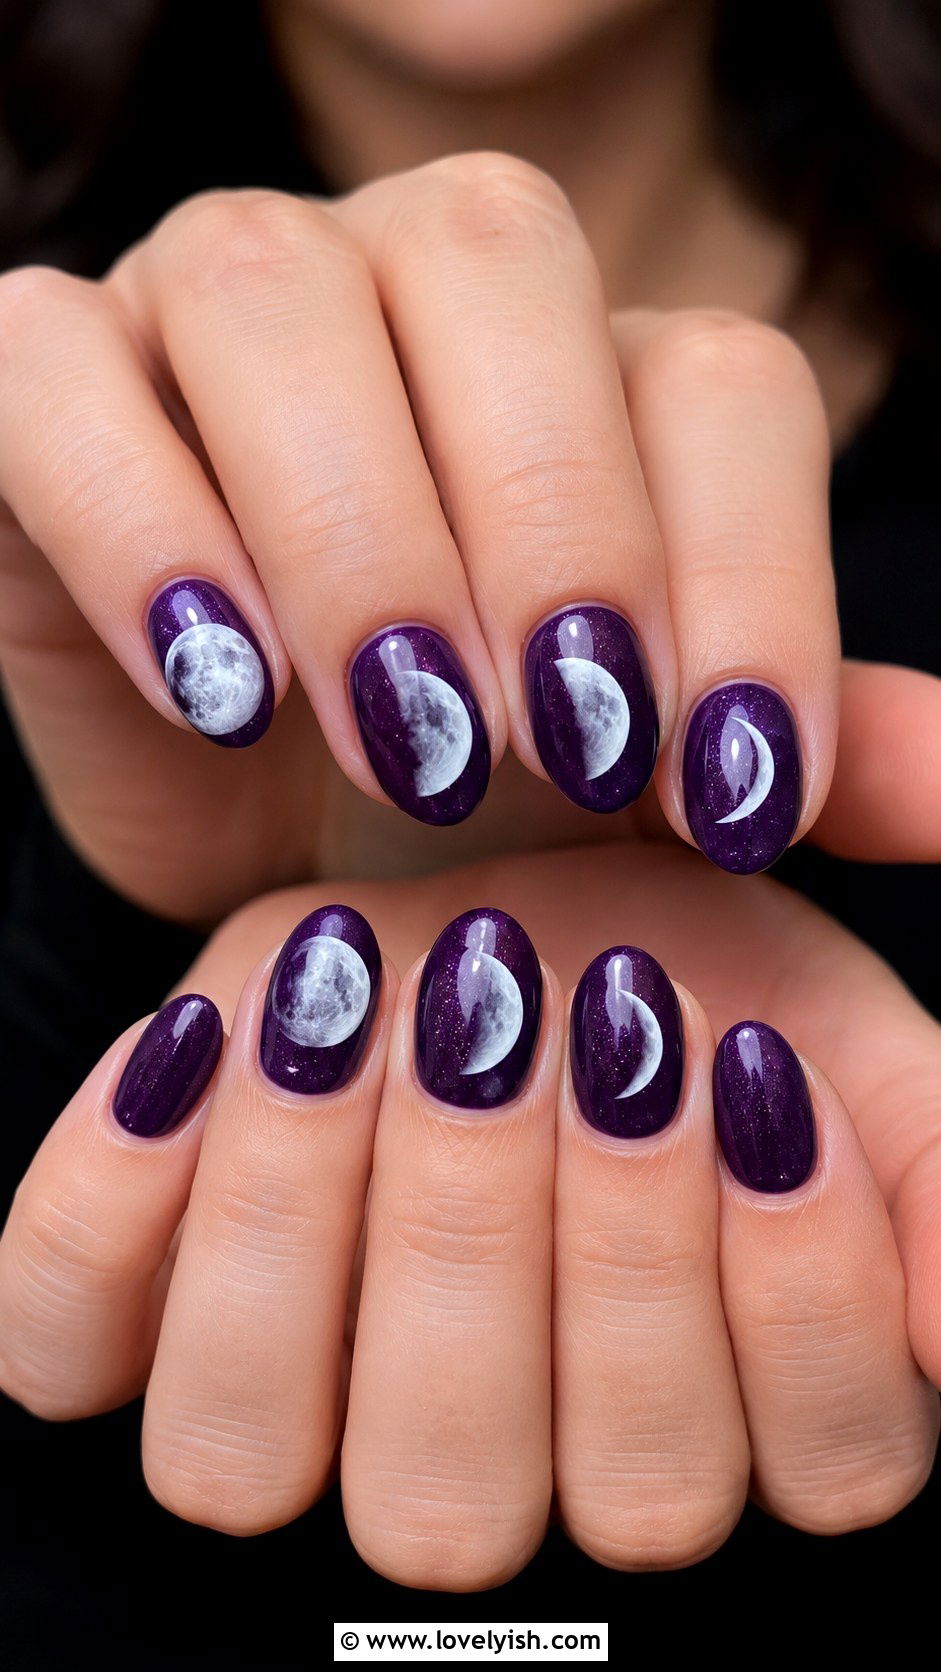
33. Moon Phase Nail Art
Moon phase nails have a mystical, celestial feel that’s surprisingly easy to create. Start with a navy or deep purple base across each nail. Use a small dotting tool dipped in white or pale silver polish to draw a different moon phase on each finger, full moon, gibbous, half, crescent, and new. Keep the moons centered on each nail. For extra detail, add tiny scattered stars in white. Finish with glossy top coat. This design works beautifully on medium to long oval or almond shapes where each moon has space to shine. Moon phase nails feel especially fitting for anyone drawn to astrology and dreamy, ethereal aesthetics.
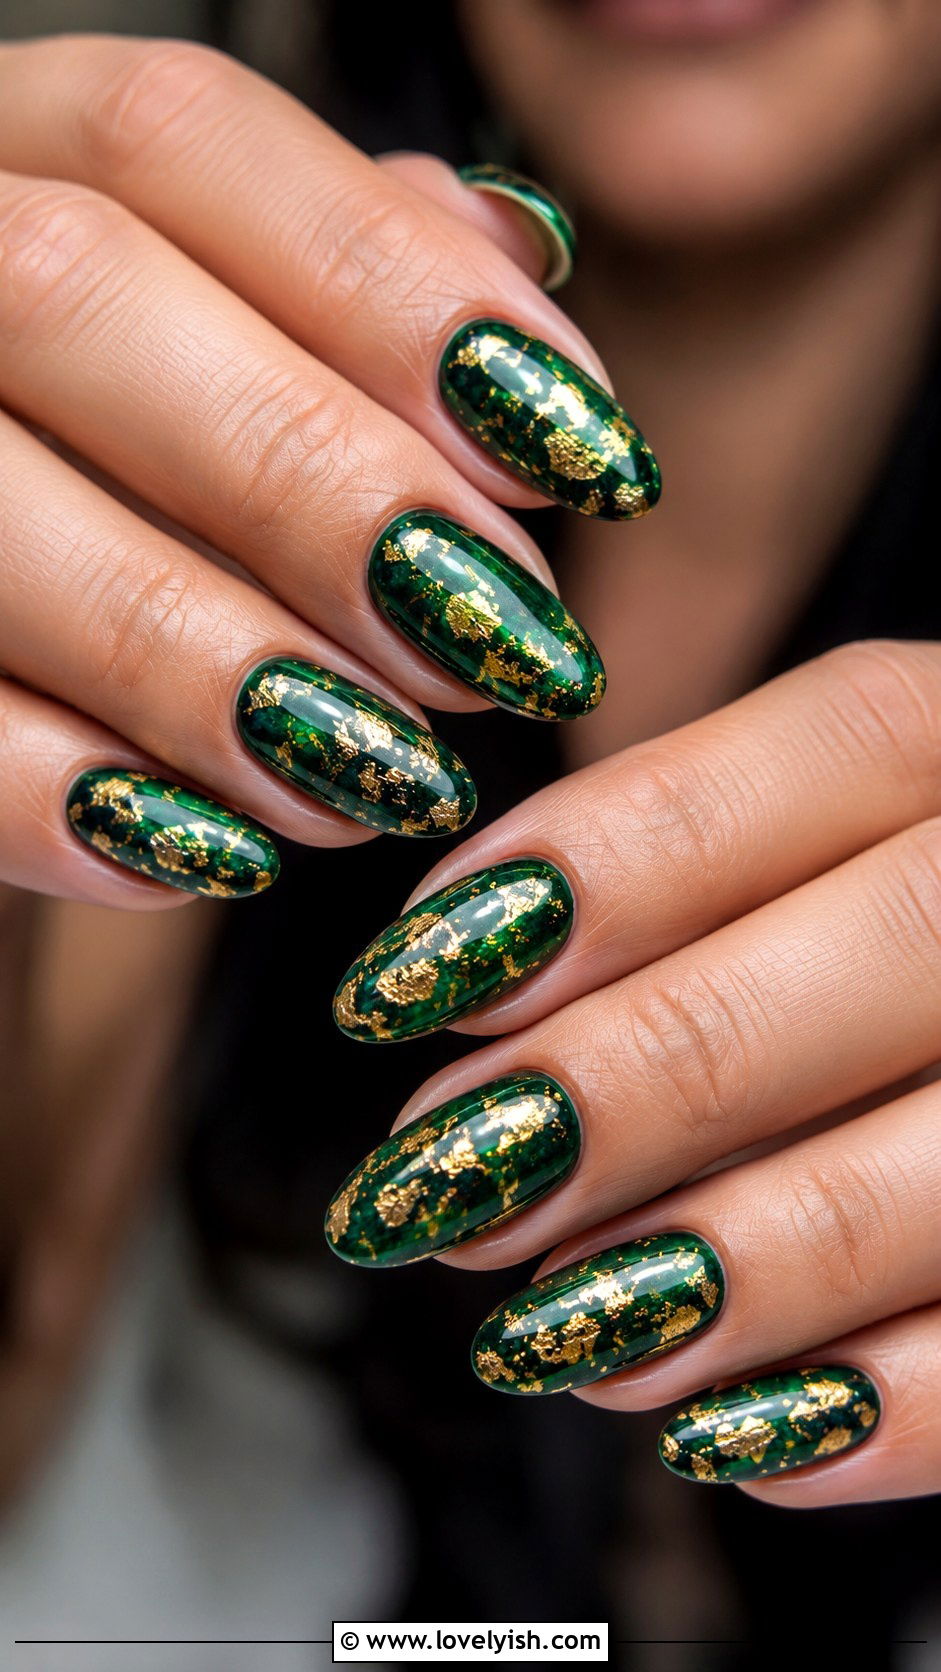
34. Foil Flake Nail Art
Foil flakes add instant texture and shine without much effort. Start with a base coat in any color, deep emerald, black, or nude all work beautifully. While the polish is still tacky, use tweezers or a dotting tool to press small pieces of nail foil onto the surface. Place flakes randomly on every nail or concentrate them on accent nails only. Gold and silver flakes are classic, but holographic foils give a modern edge. Press a generous coat of clear top coat over everything to smooth and seal. Foil flake nails look elegant and luxurious. They suit every shape and length and feel especially right for parties and special events.
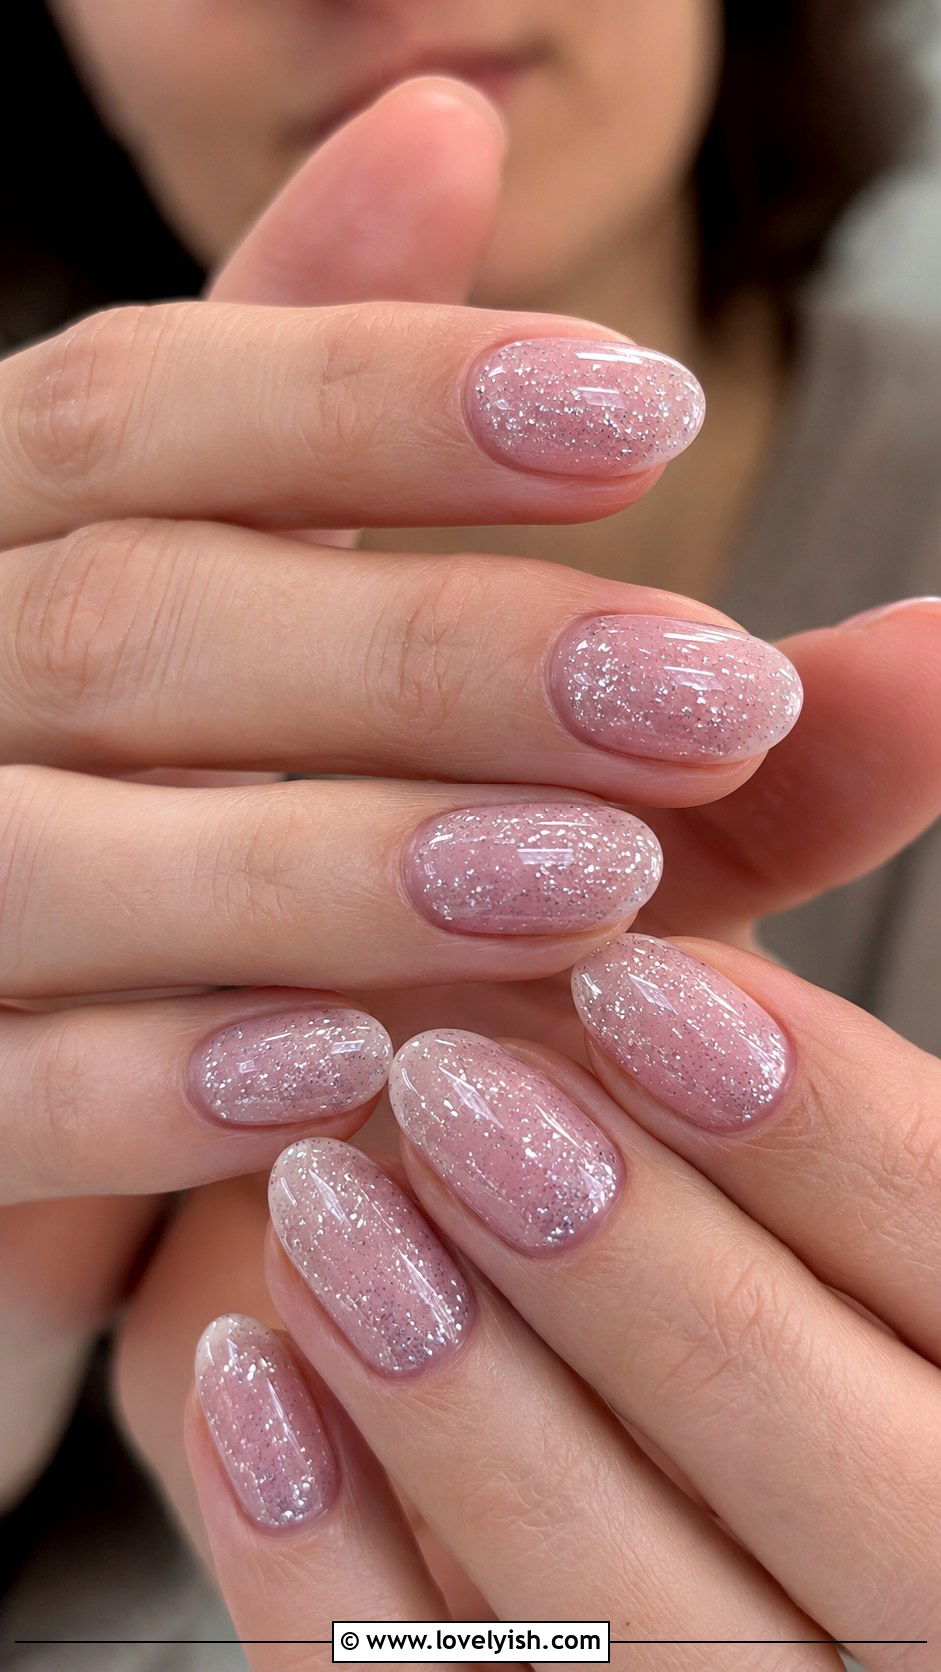
35. Glitter Sandwich Nail Art
The glitter sandwich technique gives your nails depth and dimension. Apply a creamy base color like pale pink or nude. Once dry, brush on a layer of fine glitter polish, then add another coat of the base color over it. Finish with one more layer of glitter on top. The glitter looks like it’s floating inside the polish, creating a subtle, sparkly 3D effect. Use silver glitter for a soft shimmer or holographic glitter for a magical finish. Top with a glossy clear coat. This design works on any nail length and feels especially elegant for weddings, formal events, and anyone who loves understated sparkle.
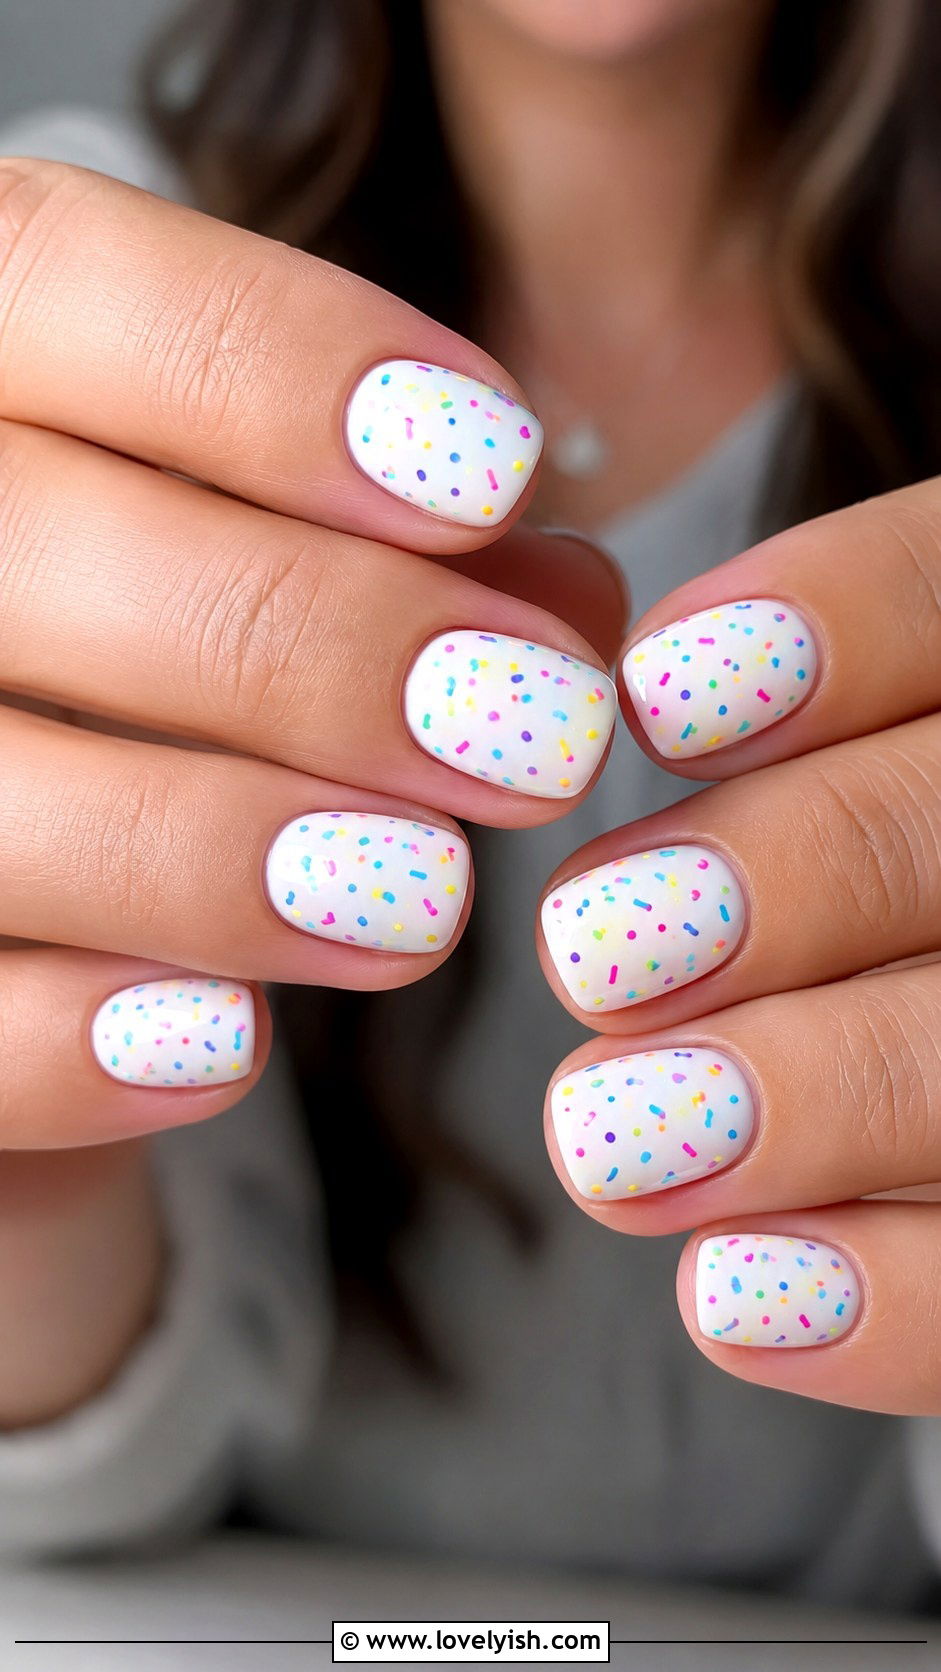
36. Confetti Nail Art
Confetti nails are perfect for birthdays and celebrations. Start with a white or pale pink base coat. Once dry, use a thin striping brush dipped in different bright polishes to paint tiny rectangular dashes scattered across each nail. Mix colors like pink, yellow, blue, green, and purple for that party-popper effect. The shapes don’t need to be perfect, the more random, the more festive. Add a few tiny dots in between for variety. Top with glossy clear coat. Confetti nails feel happy, celebratory, and wearable for any age. They flatter every nail shape and length, and they’re a great choice for birthdays, baby showers, and graduation parties.
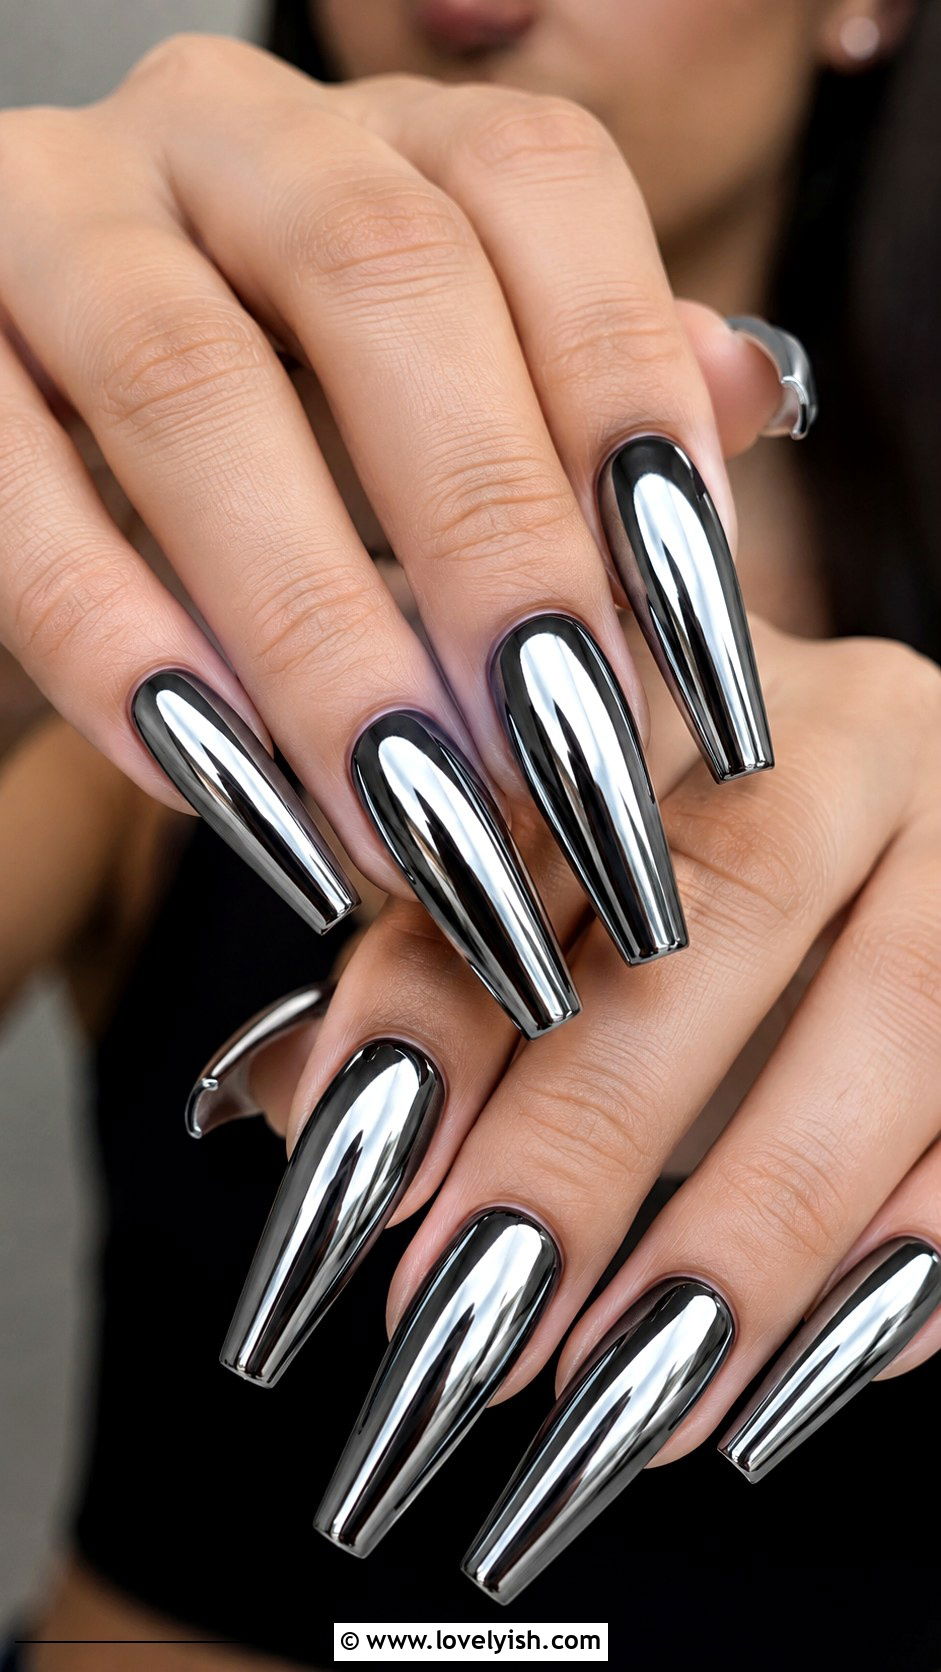
37. Chrome Powder Nail Art
Chrome nails give a stunning mirror-like finish that looks salon-perfect at home. Apply two coats of black or dark base polish, then add a layer of no-wipe gel top coat and cure under a UV lamp. Once cured, dip a small applicator or eyeshadow sponge into chrome powder and rub it gently across the nail until it turns reflective. Brush off excess powder and seal with another layer of gel top coat. Silver chrome reads cool and futuristic, while rose gold chrome feels warm and feminine. Chrome nails look incredible on every shape but especially striking on long almond or coffin nails. They photograph beautifully under any lighting.
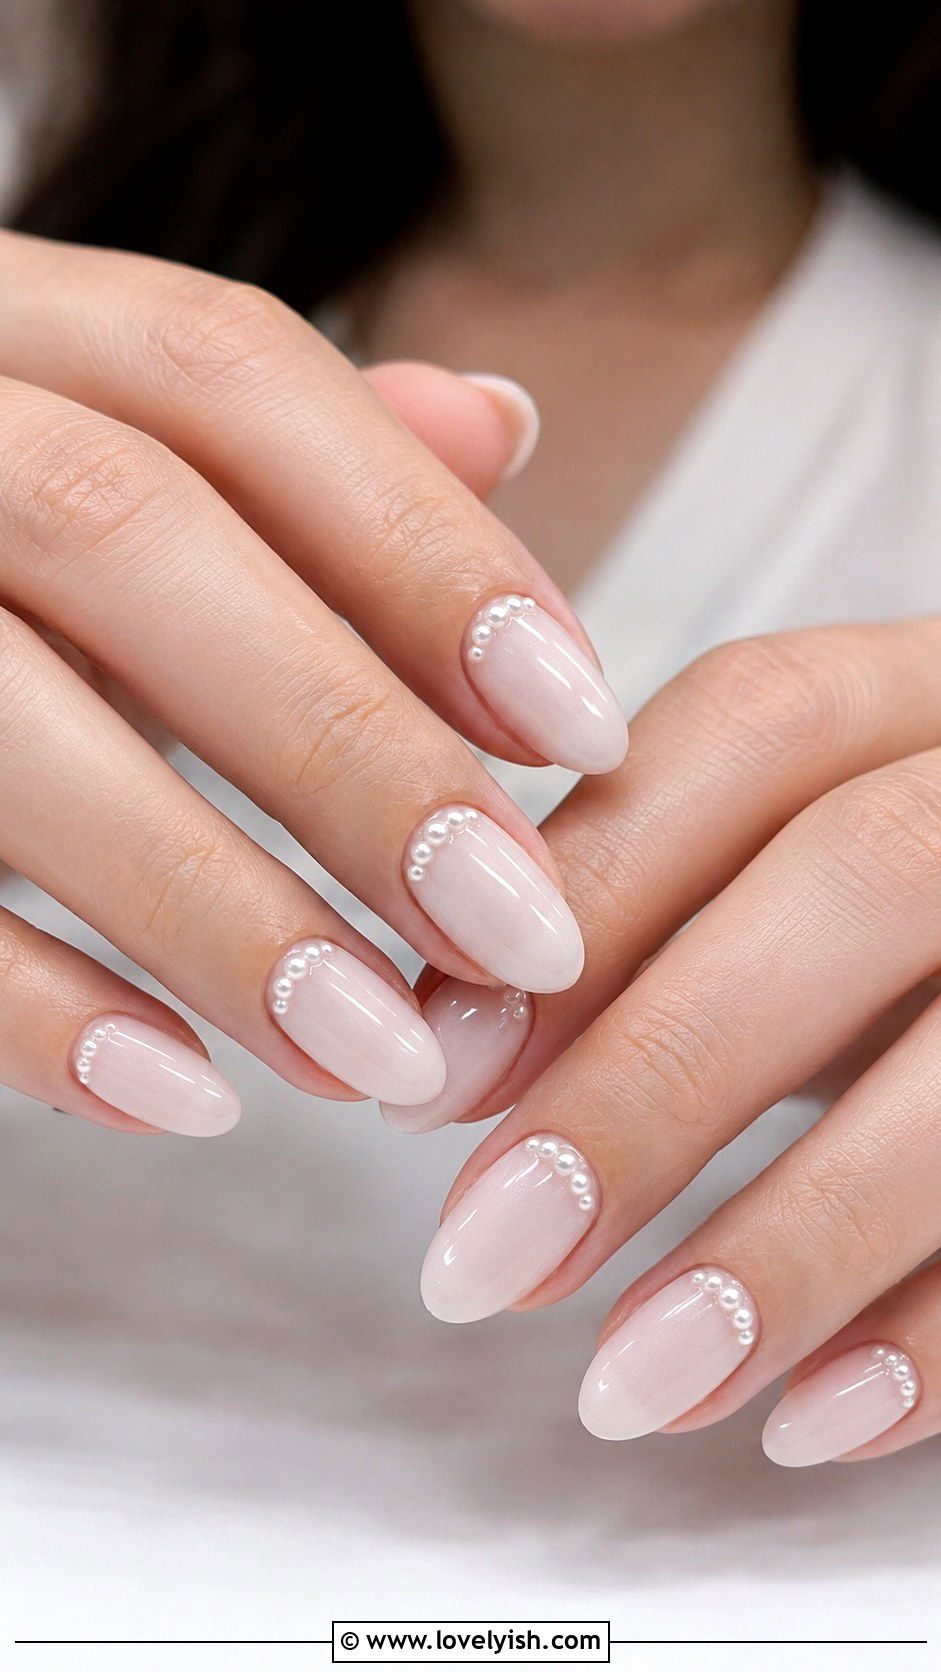
38. Pearl Accent Nail Art
Pearl accent nails feel timeless and bridal. Start with a sheer milky white or pale pink base across each nail. Once dry, use tweezers to place small flatback pearls along the cuticle line of one or two accent nails. You can arrange them in a row, scatter them randomly, or cluster them in a small heart shape. Use a tiny dab of clear nail glue or thick top coat to adhere each pearl. Seal everything with a generous layer of glossy top coat, brushing carefully around the pearls. Pearl nails suit weddings, anniversaries, and dressy occasions, and they look especially elegant on almond and oval shapes.
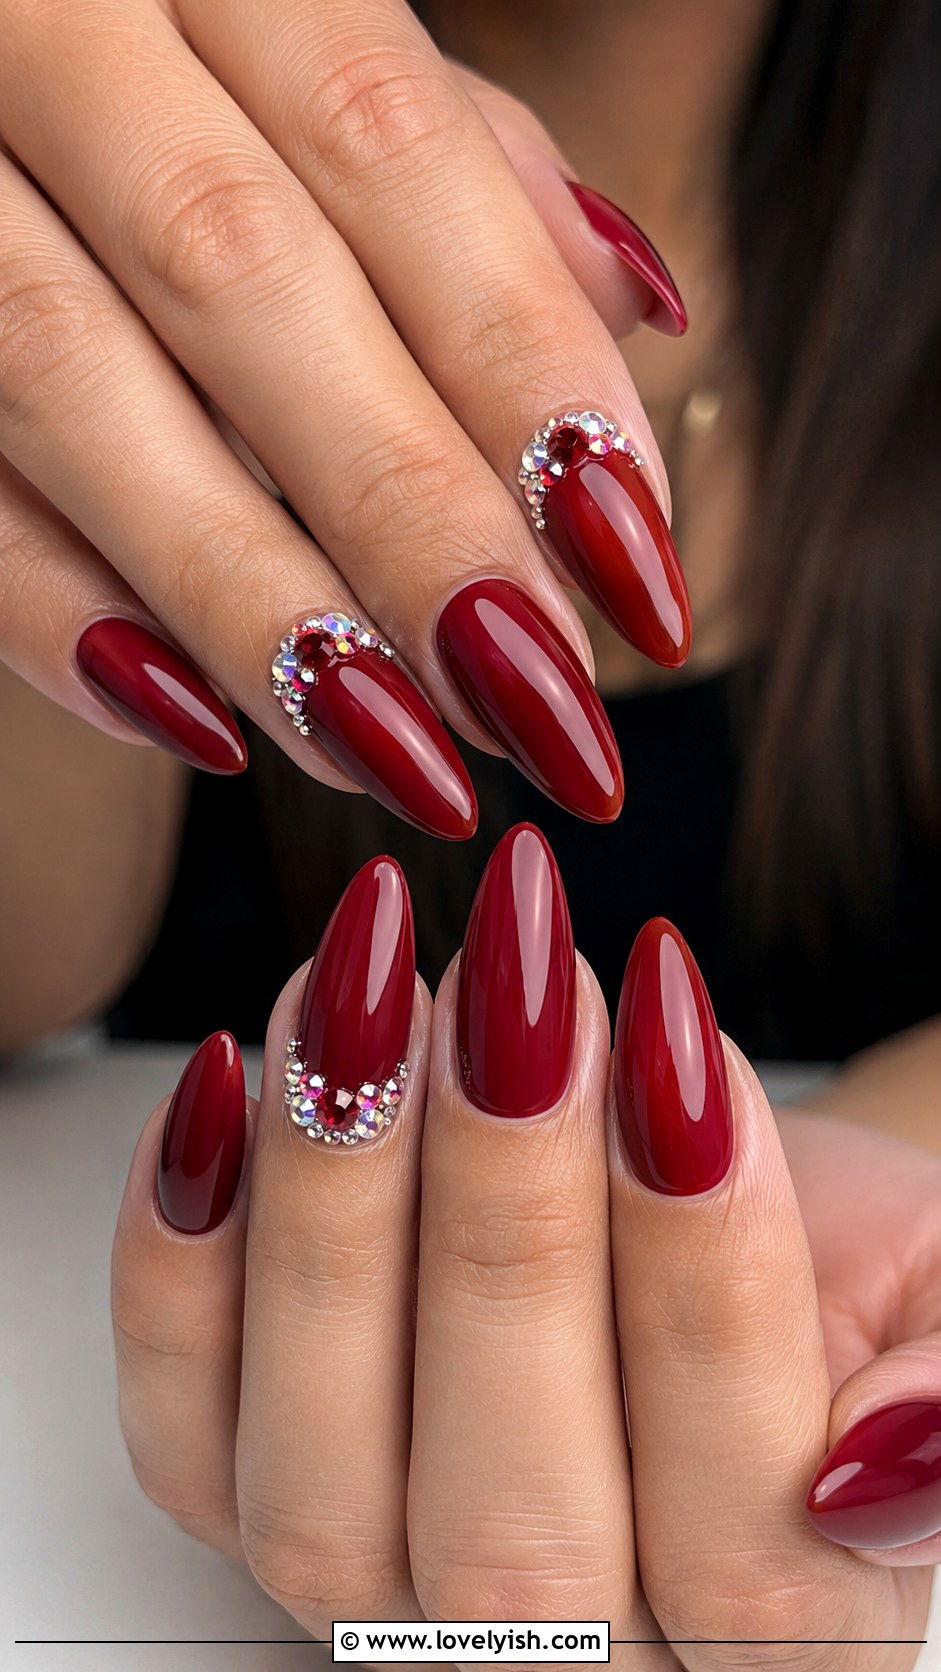
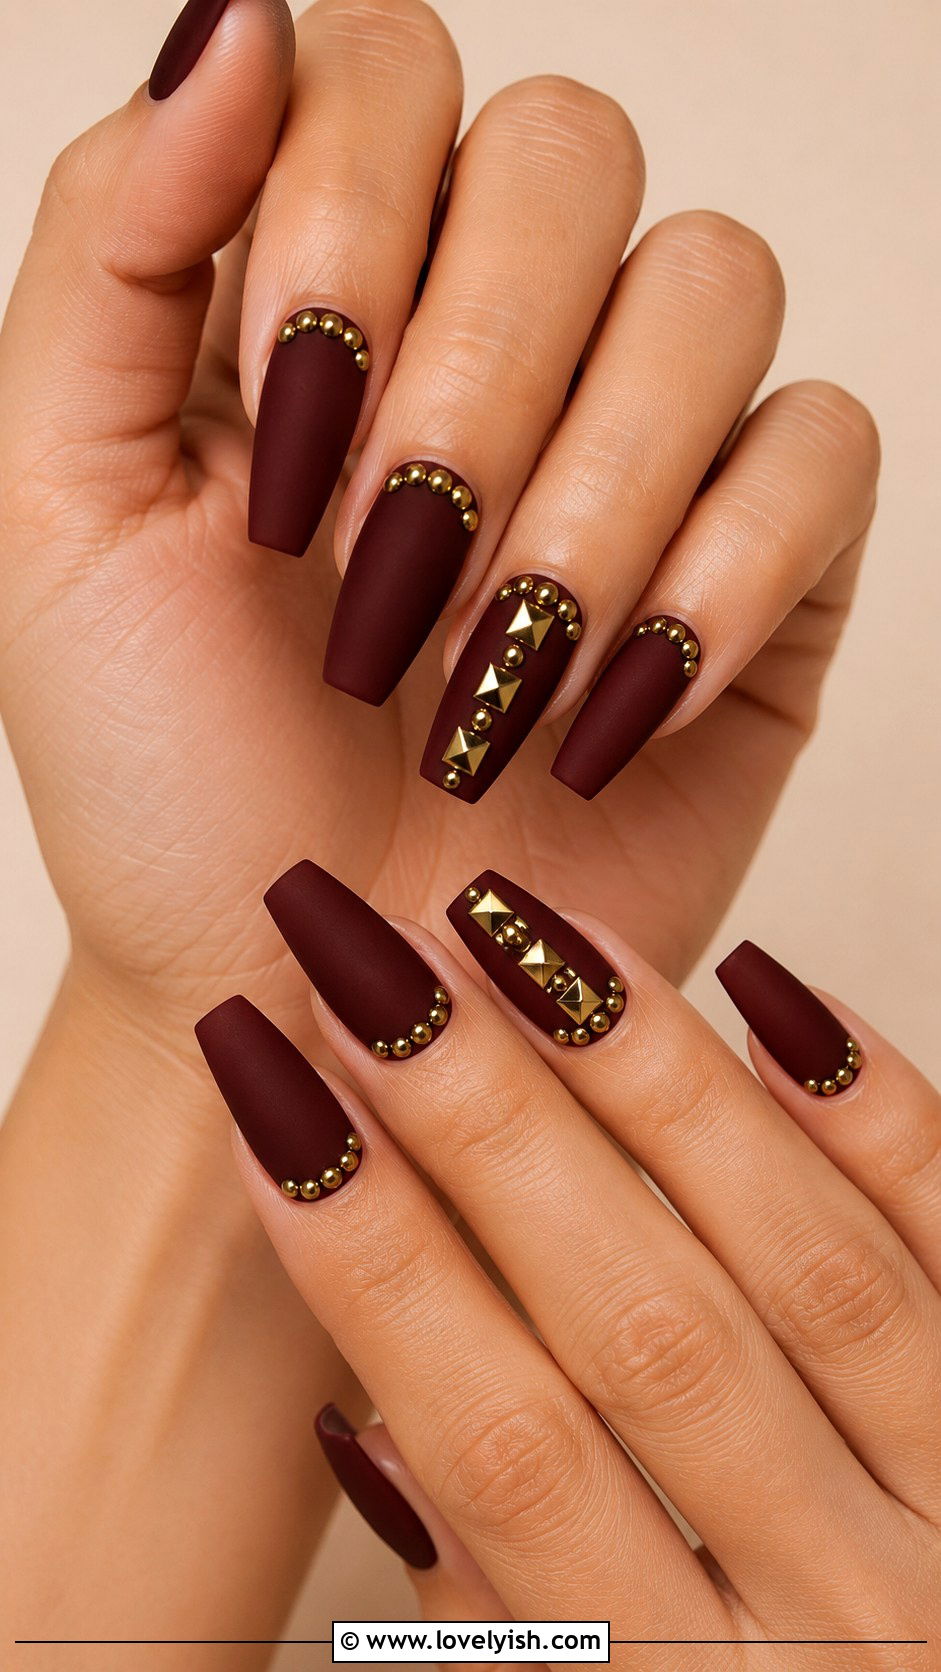
39. Rhinestone Accent Nail Art
Rhinestones turn an ordinary manicure into something glamorous. Apply two coats of your favorite base color, deep red, nude, or black work beautifully. Once dry, use tweezers and a dab of nail glue or thick top coat to place small rhinestones on one or two accent nails. Cluster them at the cuticle, line them along the side of the nail, or form a small shape like a heart or star. Mix sizes for visual interest. Seal everything with a generous top coat that goes over and around the stones. Rhinestone nails look stunning for parties, weddings, and special events, and they suit every nail shape and length.
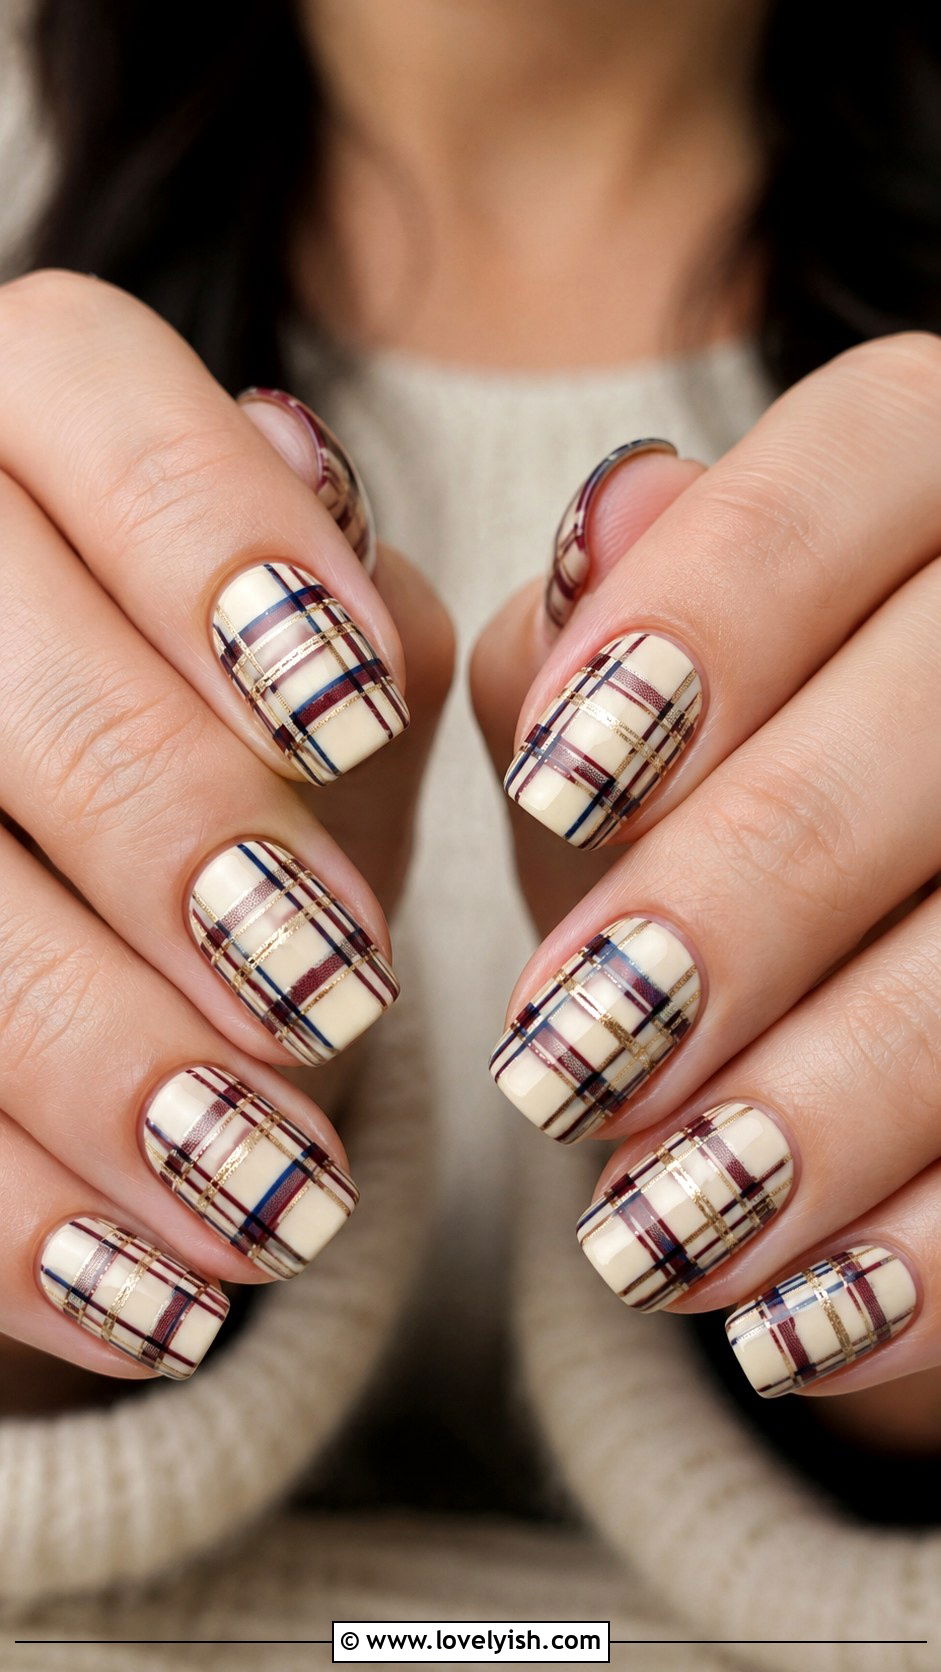
40. Plaid Nail Art
Plaid nails feel cozy and very seasonal. Start with a cream, soft red, or warm beige base. Once dry, use thin striping tape or a steady hand with a striping brush to create vertical and horizontal lines across each nail in coordinating colors like burgundy, navy, and gold. The intersections create that classic plaid look. Don’t worry about perfect symmetry, the slight irregularity makes it feel hand-painted. Add a glossy top coat to finish. Plaid nails feel especially right for fall through winter and pair beautifully with sweaters and scarves. This design suits short to medium length nails and looks polished on squoval and oval shapes.
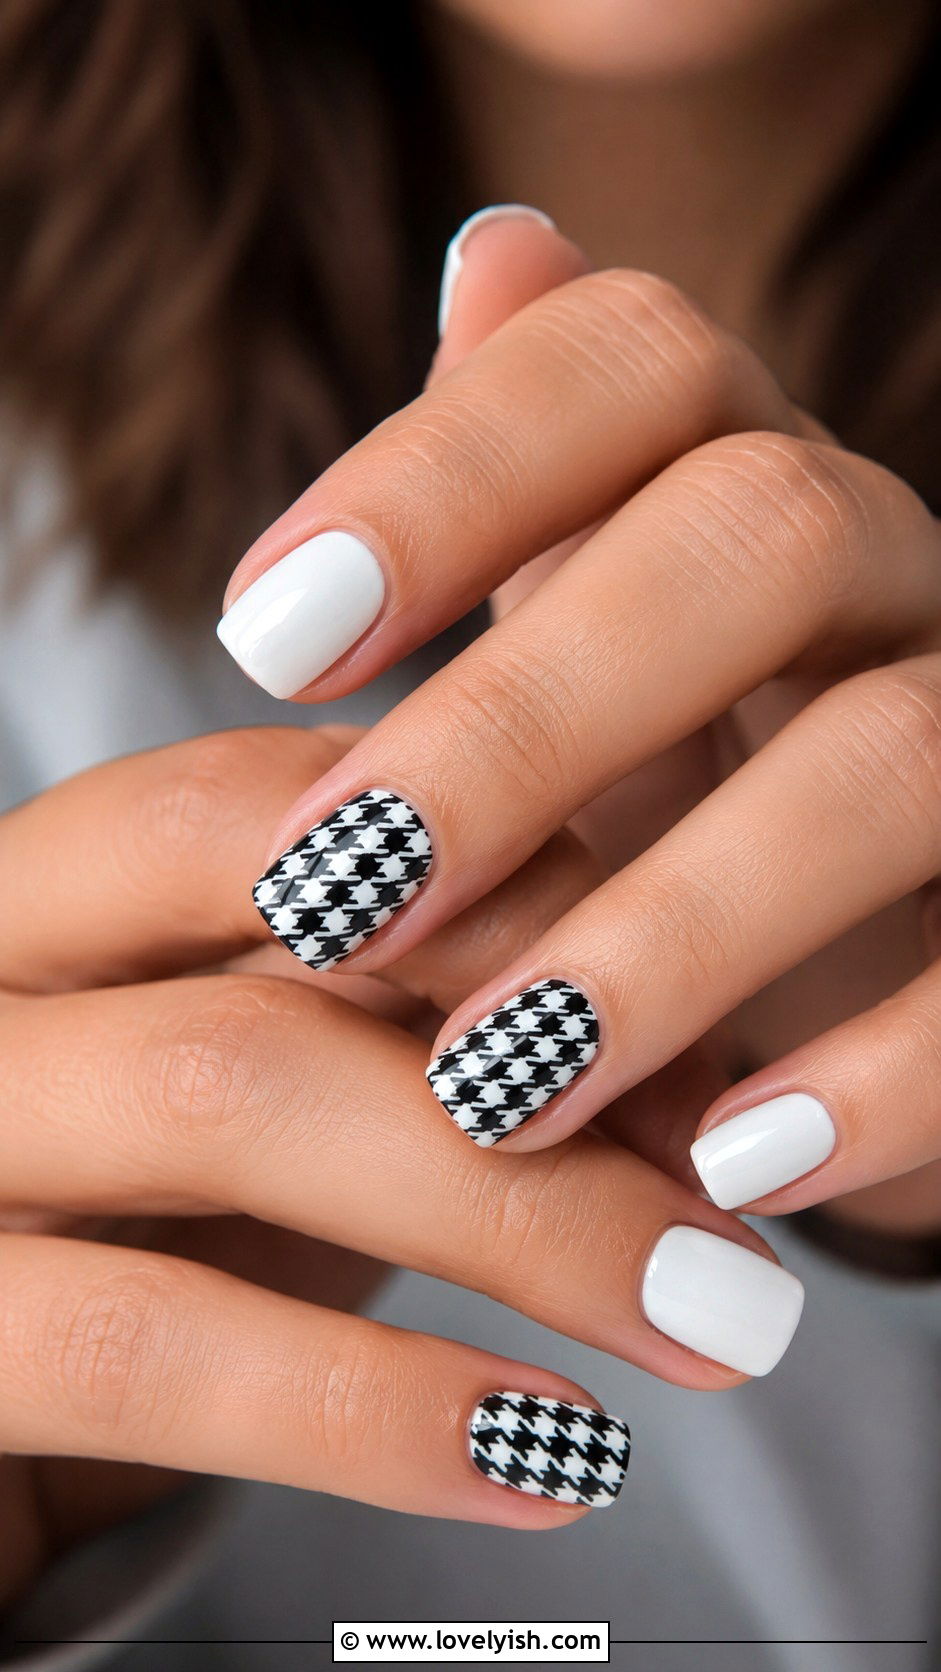
41. Houndstooth Nail Art
Houndstooth is a classic pattern that translates beautifully to nails. Paint two coats of white as your base. Once fully dry, use a thin nail art brush dipped in black polish to create small jagged checkmark shapes connected in rows across each nail. The pattern is intricate, so go slowly and use a magnifying mirror if helpful. Two accent nails with full houndstooth, paired with solid black or white on the rest, balances the look. Top with glossy clear coat. Houndstooth feels chic and editorial, perfect for fall fashion seasons. This design looks sharpest on short to medium squoval nails where the pattern reads clearly without distortion.
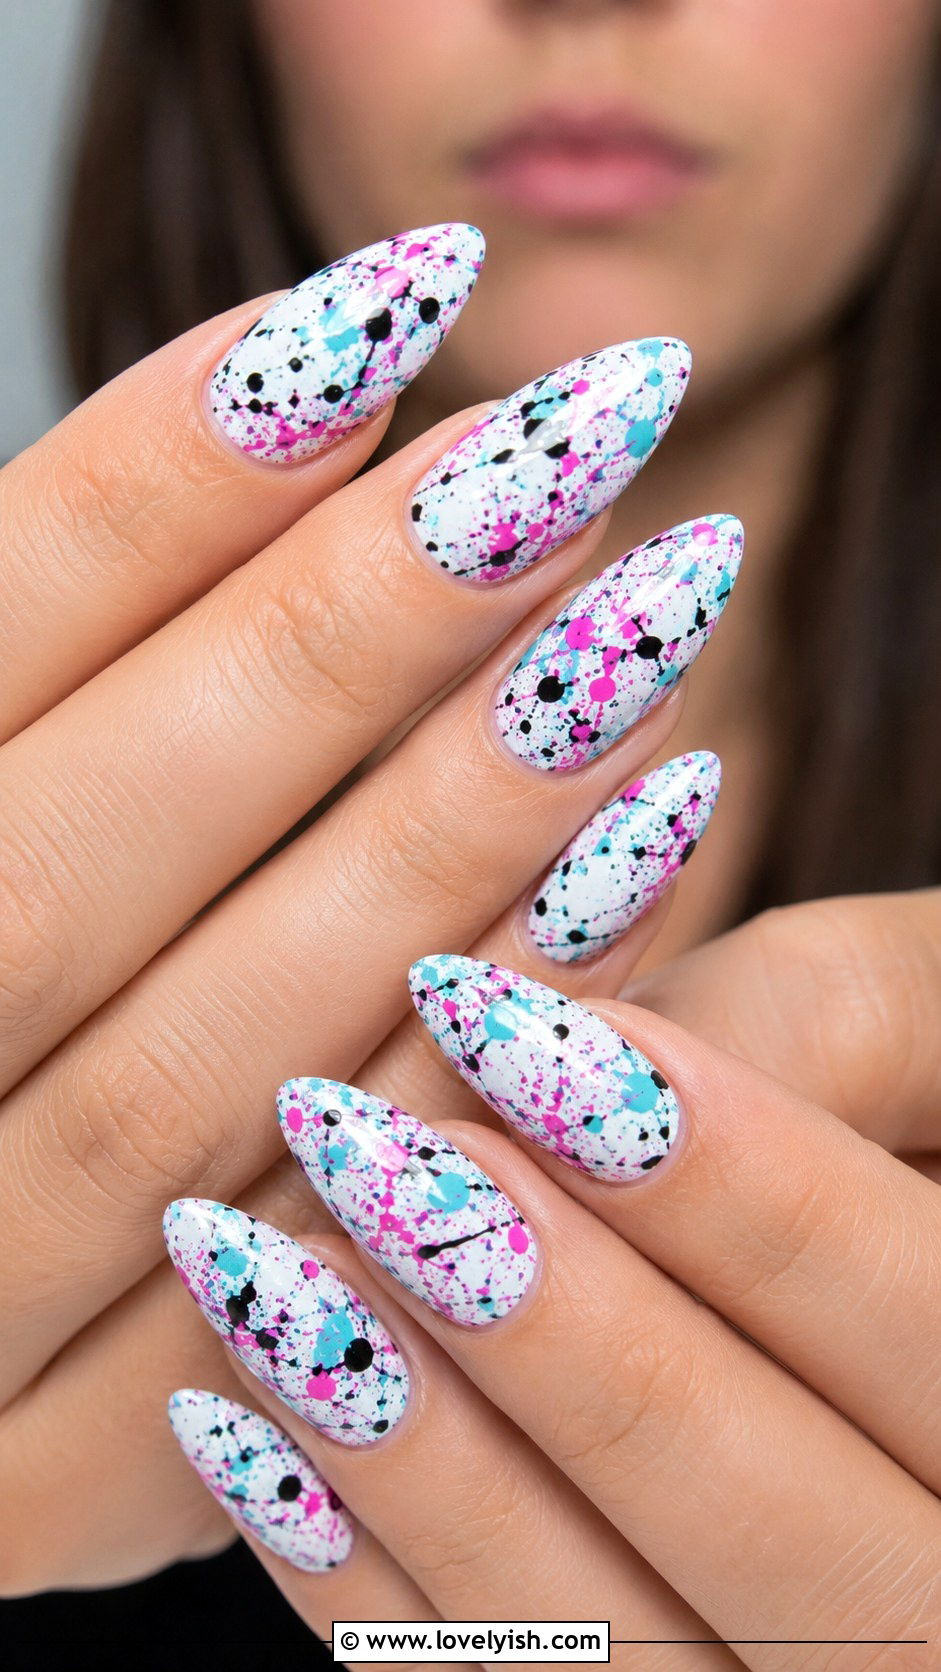
42. Splatter Paint Nail Art
Splatter paint nails feel artistic and freeing. Start with a white base coat across each nail. Dip a clean toothbrush or thin straw into a contrasting polish, then flick or blow tiny droplets across your nails. Use a few different colors, like black, hot pink, and turquoise, for that street-art vibe. Tape around your fingers first to keep your skin clean. The splatters will be random and unique on every nail. Once dry, clean up the edges and add a glossy top coat. Splatter paint nails work on every shape but look especially cool on longer almond or coffin shapes where there’s more canvas to play.
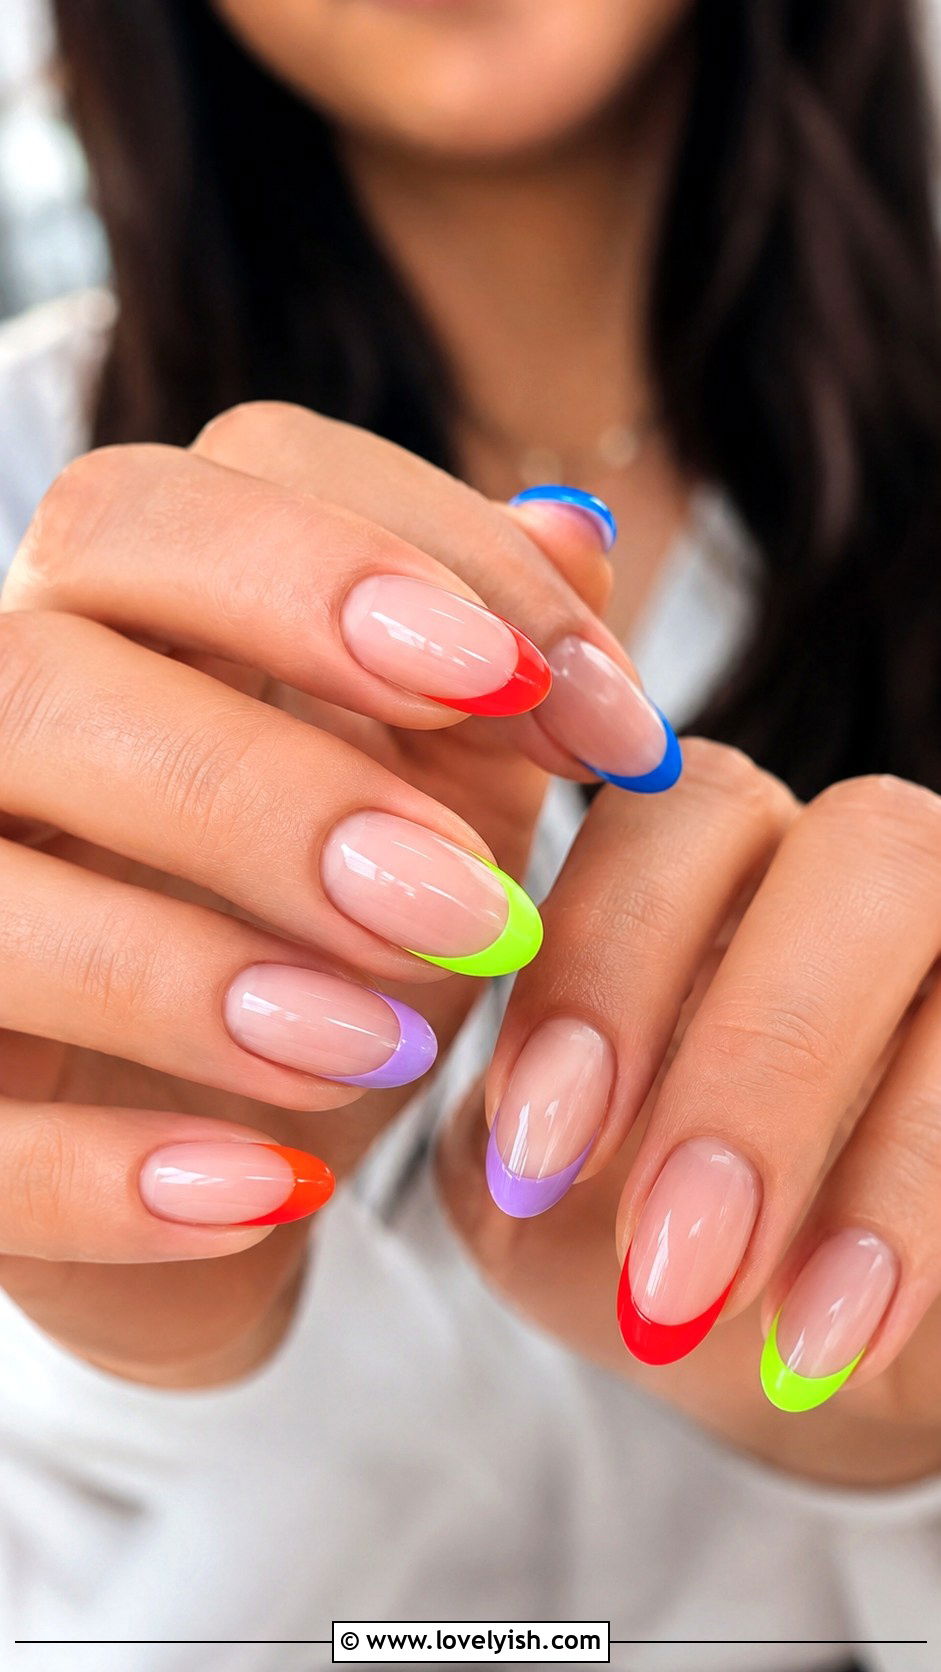
43. Colored French Tip Nail Art
A colored French tip is the modern take on the classic look. Start with a sheer nude or pale pink base. Once dry, use a thin nail art brush to paint the tip of each nail in an unexpected shade, neon green, electric blue, lavender, or cherry red all look fresh. Keep the tip thin and follow the natural curve of the nail. For variety, paint each nail’s tip a different color of the rainbow. Top with glossy clear coat. Colored French tips feel modern, playful, and easy to customize. They work on every nail shape and length and suit everything from casual outings to brunches with friends.
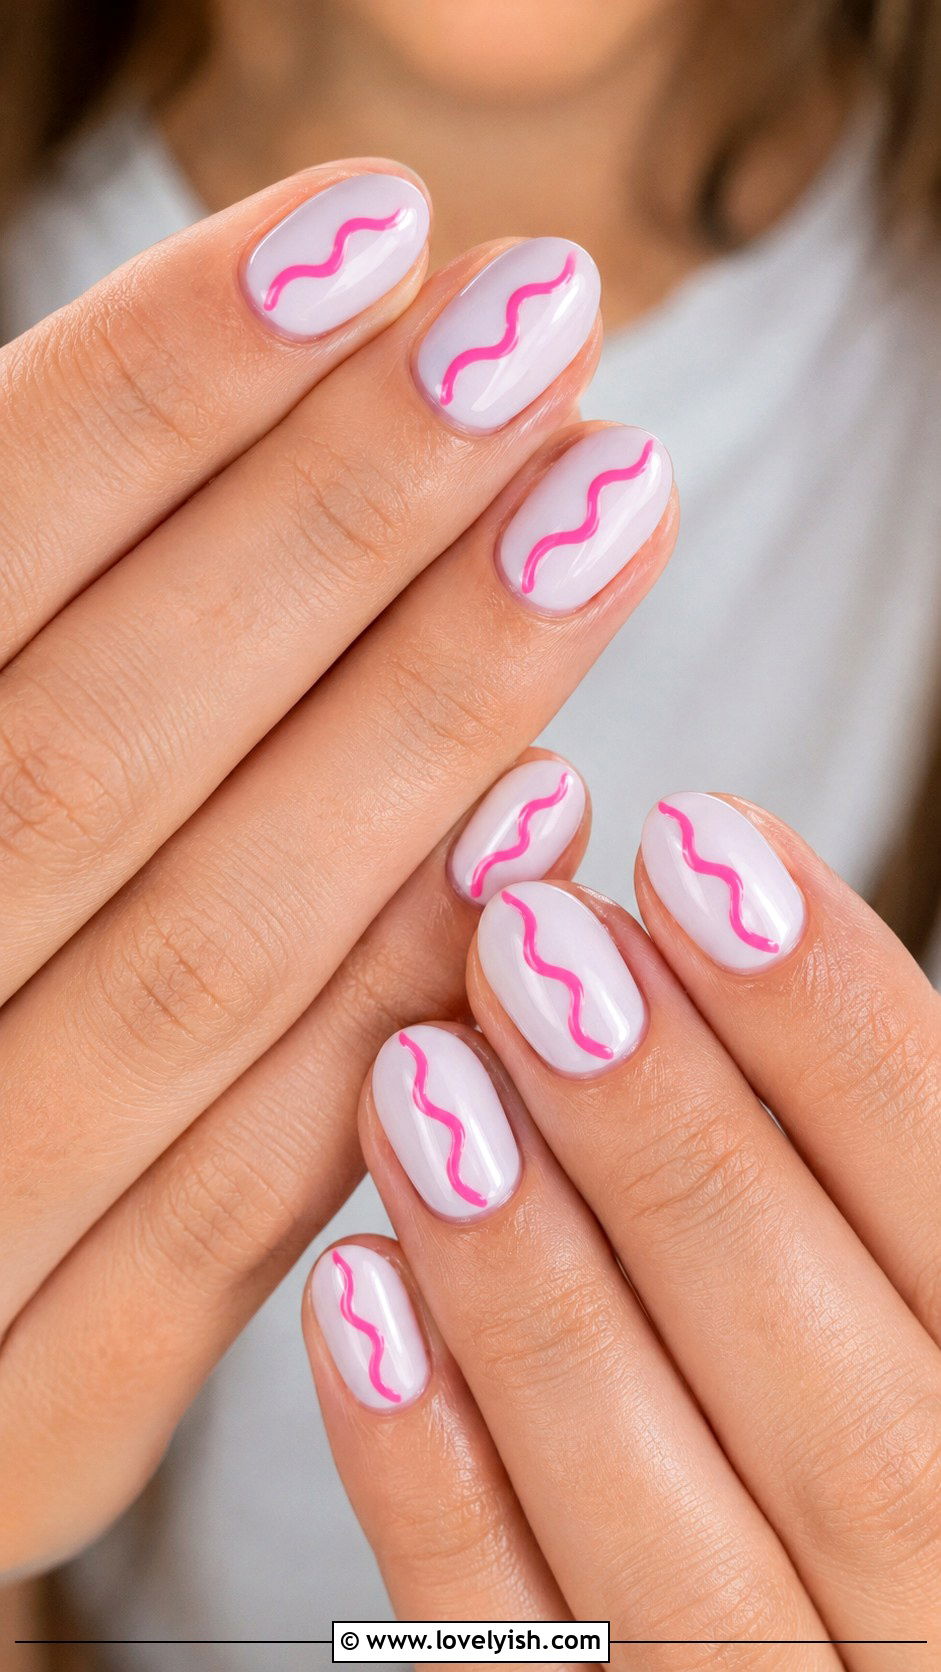
44. Squiggle Line Nail Art
Squiggle nails are wavy, fun, and very on-trend. Apply a milky white or sheer pink base across each nail. Once dry, use a thin nail art brush dipped in a contrasting color, black, hot pink, or sage green, to draw a single wavy squiggle line down the center of each nail. Keep the waves loose and uneven for that playful effect. Each nail can have a slightly different squiggle direction. Top with glossy clear coat. Squiggle nails feel youthful, artsy, and minimal at the same time. This design works beautifully on every nail shape and looks especially chic on medium-length almond or oval nails.
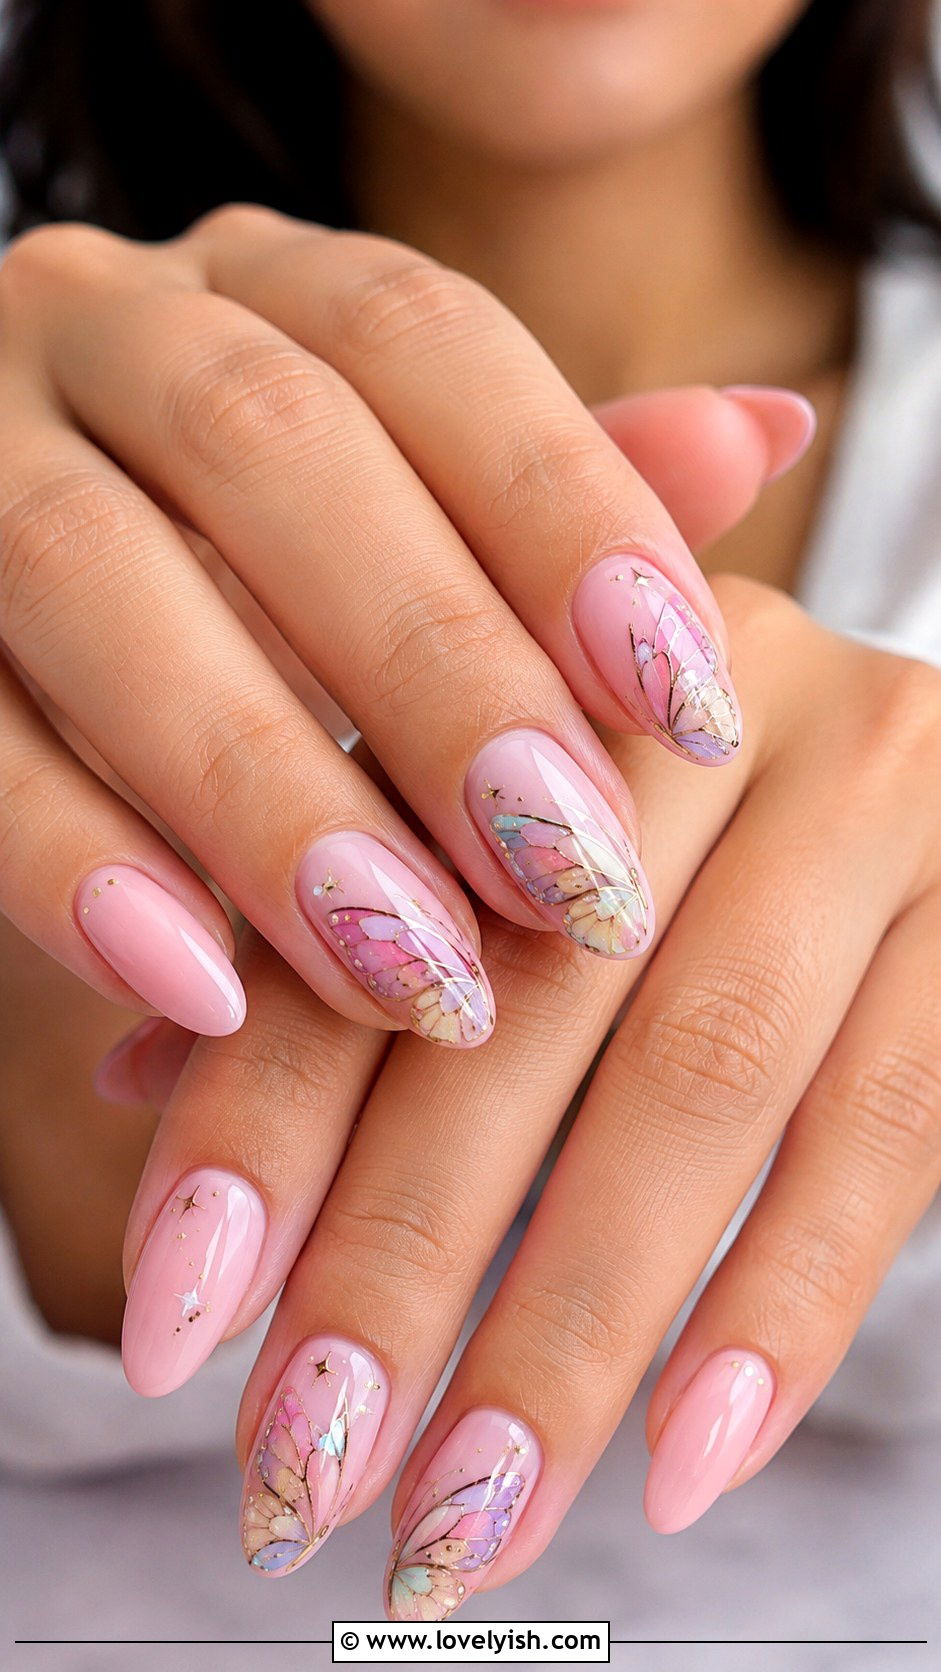
45. Butterfly Nail Art
Butterfly nails feel whimsical and a little nostalgic. Start with a soft pink, sky blue, or milky white base. To draw a butterfly, use a thin brush dipped in a contrasting color to paint two small symmetrical wing shapes on either side of an imaginary center line. Add a tiny black body in the middle and dot small details on the wings with another color. One accent nail with a butterfly, paired with solid color on the rest, keeps the look balanced. A glossy top coat finishes the design. Butterfly nails feel perfect for spring, summer, and bohemian outfits. They look especially pretty on almond and oval shapes.
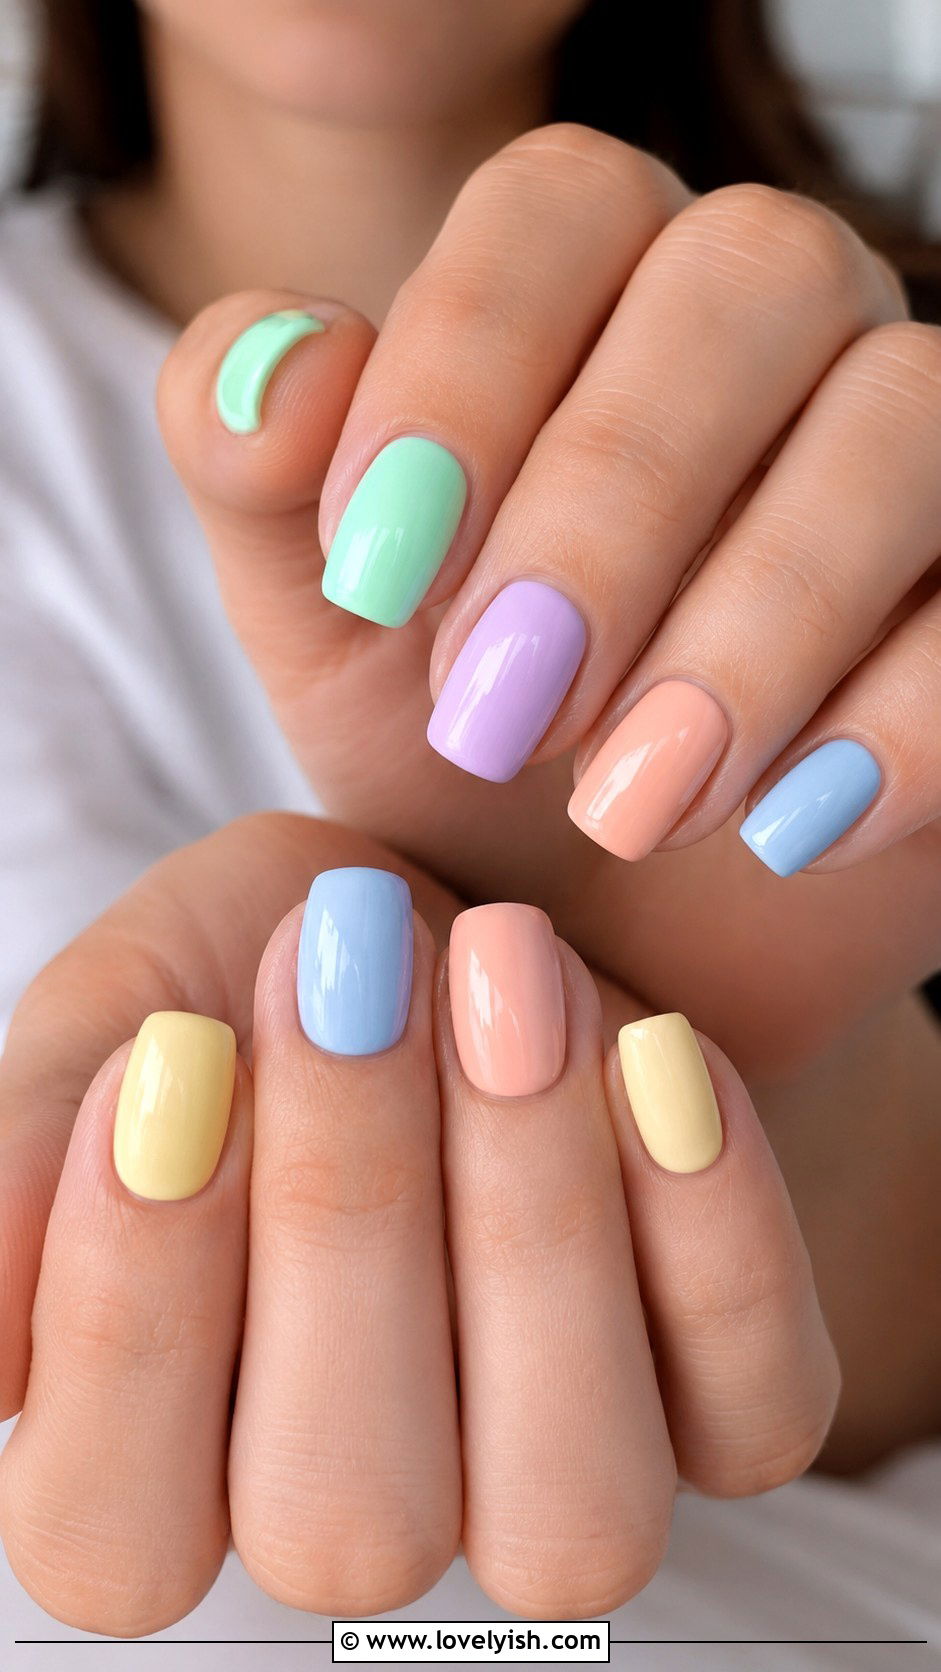
46. Mismatched Color Nail Art
Mismatched color nails celebrate playful color combinations. Choose five coordinating polishes, like pastels for spring or jewel tones for fall, and paint each nail a different shade. The trick is choosing colors that share a vibe so the look feels intentional rather than chaotic. Apply two coats of each color for full opacity. You can repeat the color order on the other hand or mirror it. Add a glossy top coat to tie everything together. Mismatched nails are quick, low-effort, and very on-trend. They suit every nail shape and length and feel especially fun for summer vacations, casual weekends, and anyone who can’t pick just one color.
47. Two Tone French Nail Art
Two tone French nails layer two colors at the tip for extra dimension. Start with a sheer nude or pale pink base. Once dry, paint a thin tip in white along the natural curve. While that’s drying, use a thin brush to add a second color, like black, gold, or coral, just below or above the white tip. The result looks like two stripes outlining the nail edge. Top with glossy clear coat. This sleek twist on the classic French feels modern and elevated. Two tone French nails work beautifully on every nail shape and suit everything from work to weddings, depending on your color choices.
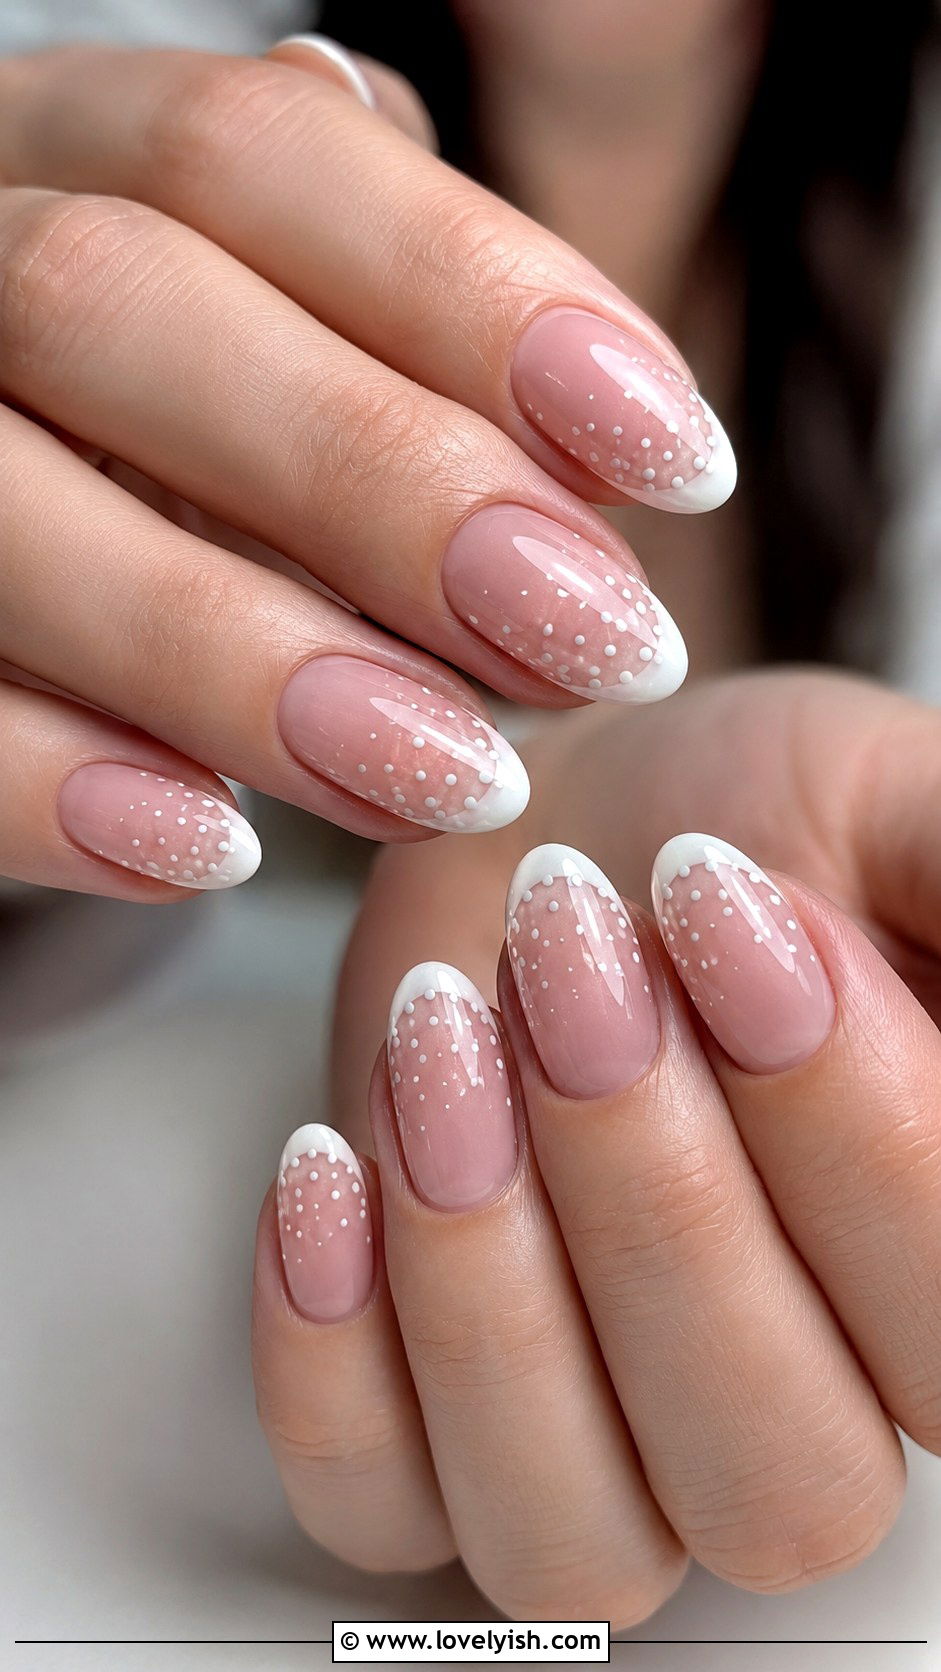
48. Polka Dot French Tip Nail Art
This design combines two beginner favorites into one polished look. Start with a sheer pink or nude base. Once dry, paint a thin white French tip along the curve of each nail. Then, use a small dotting tool dipped in white polish to scatter a few tiny dots just below the tip, fading down toward the middle of the nail. The result looks soft, romantic, and a little vintage. Top with glossy clear coat to seal. Polka dot French tips feel sweet and feminine without going overboard. They flatter every nail shape but especially short to medium oval and almond shapes for that timeless, ladylike finish.
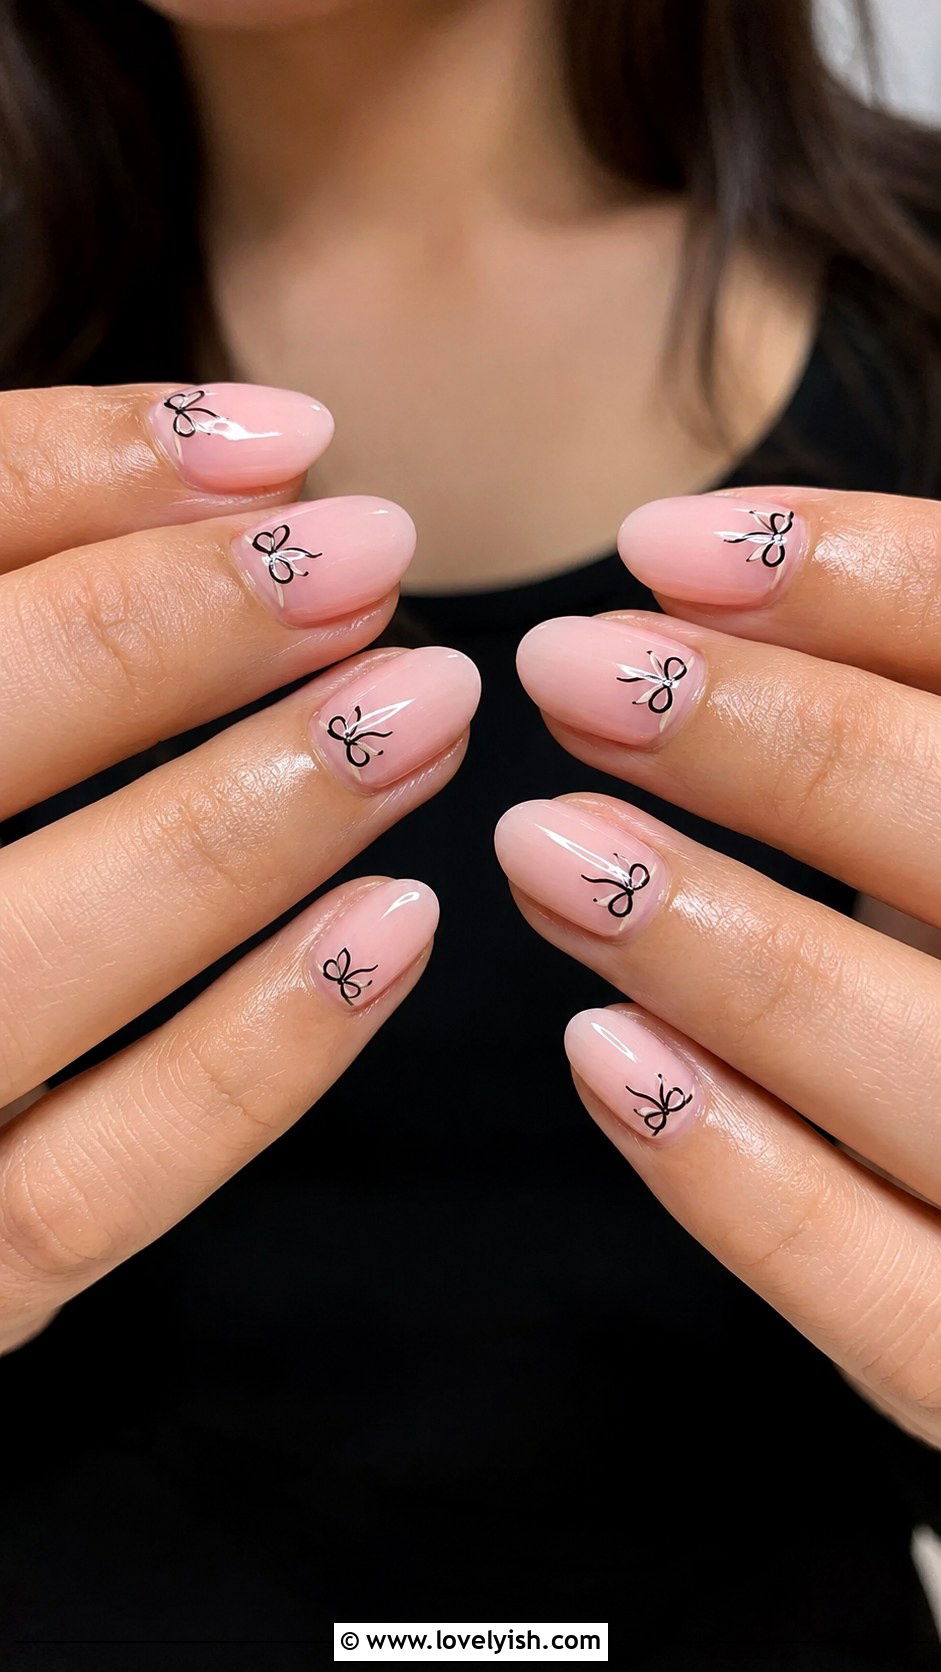
49. Mini Bow Nail Art
Mini bow nails feel feminine, soft, and very on-trend. Start with a milky white, pale pink, or sheer nude base. To create a bow, use a thin nail art brush dipped in a contrasting color, black, red, or pastel pink, to draw two small triangles meeting at a center point. Add a tiny dot or square between them for the knot. Place one bow at the cuticle of each nail or just on accent fingers. Top with glossy clear coat. Mini bows pair beautifully with the coquette aesthetic and look especially adorable on shorter rounded or almond shapes. They suit brunches, birthdays, and feminine outfits perfectly.
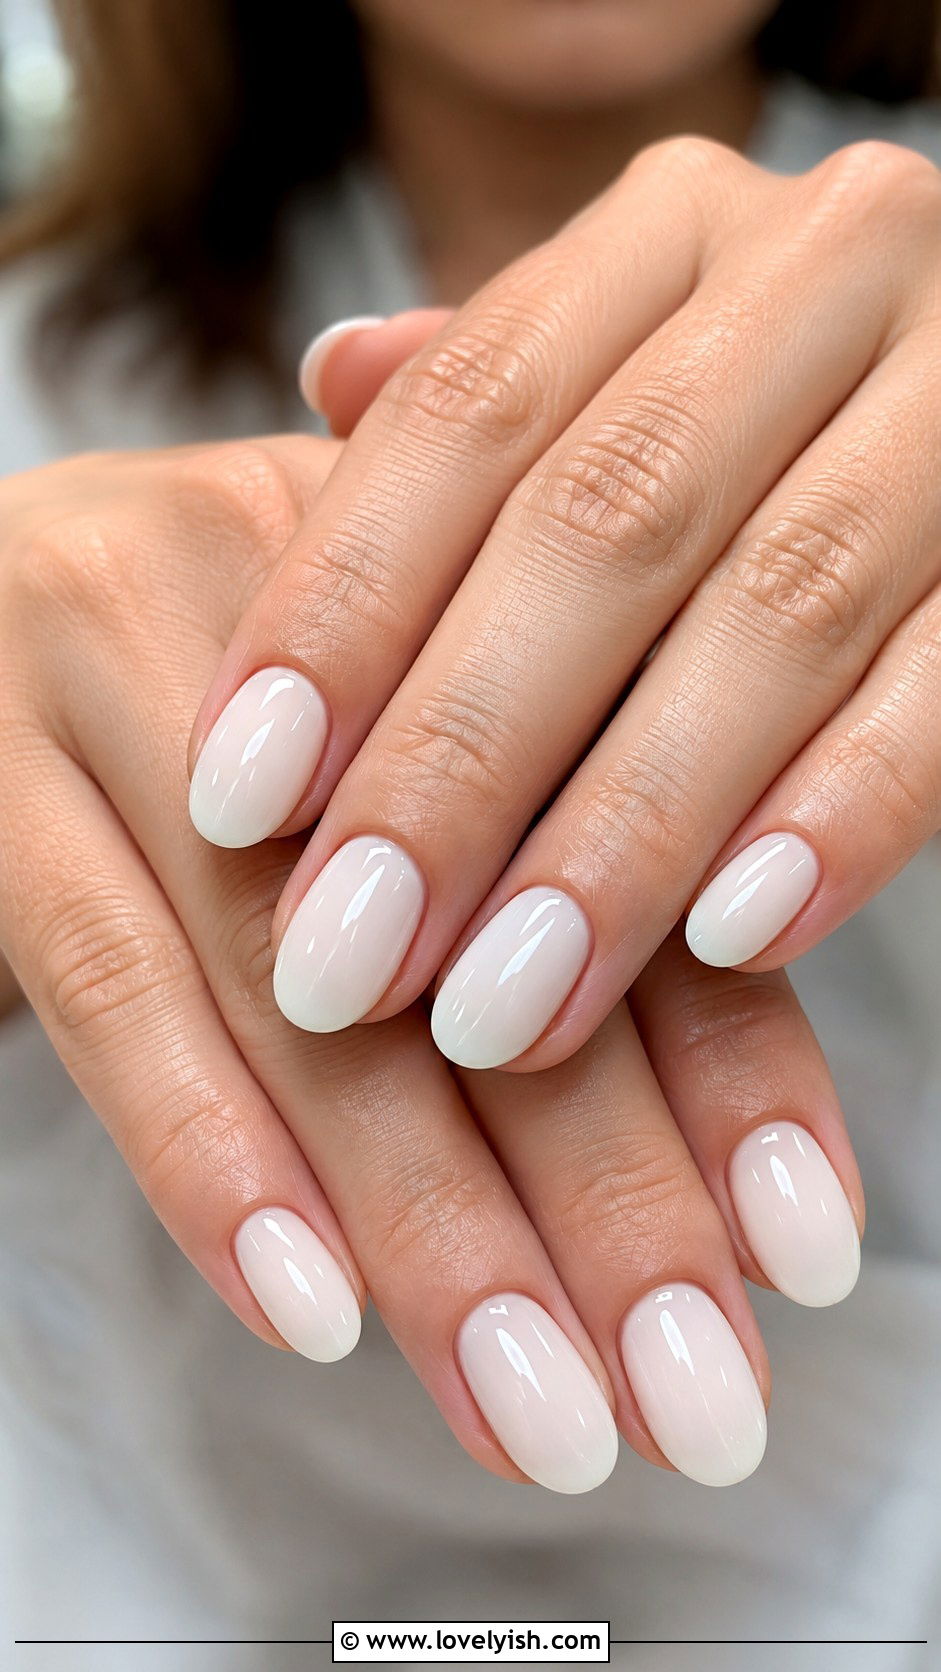
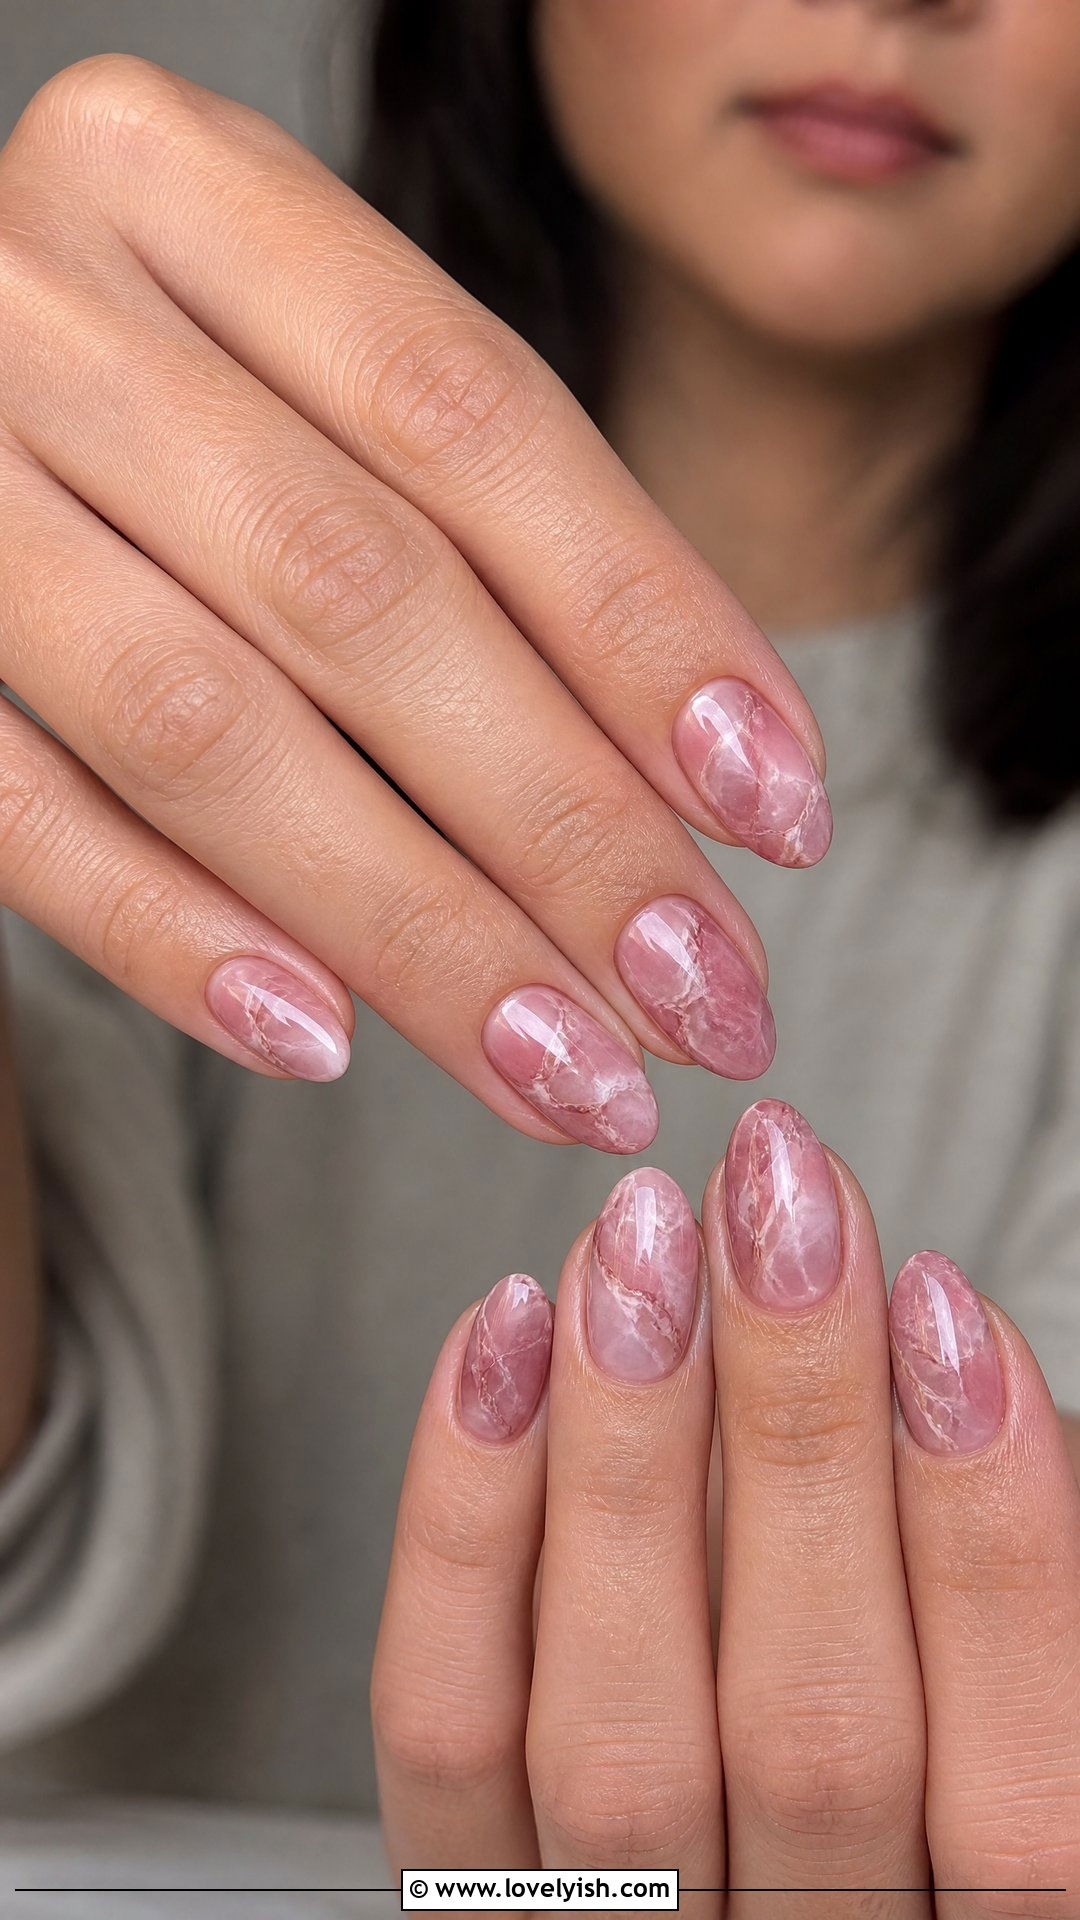
50. Glossy Milky White Nail Art
Sometimes the simplest manicure is the most striking. Apply a strengthening base coat, then layer two thin coats of milky white polish across each nail. Milky white sits between sheer and opaque, giving your natural nail a fresh, healthy glow. For subtle interest, add a single tiny pearl at the cuticle of one accent nail or a thin gold stripe down the center. Finish with two coats of high-shine glossy top coat for that wet-look finish. Milky white nails look clean, modern, and versatile, working with every outfit and occasion. They flatter every nail shape and skin tone, especially on short to medium length nails.
Conclusion:
DIY nail art proves you don’t need a salon appointment to wear something special on your fingertips. With basic supplies like dotting tools, tape, sponges, and a few favorite polishes, you can recreate every look in this guide right at home. Start with beginner-friendly designs like polka dots, French tips, or glitter ombre, then work up to more detailed art like florals, plaids, and chrome finishes. The best part of doing your own nails is the freedom to experiment, mix colors, and try trends without commitment. Pick a few designs that match your mood, set up a comfy space, and have fun creating manicures that feel completely you.
You'll Like These Styles:


Leave a Reply